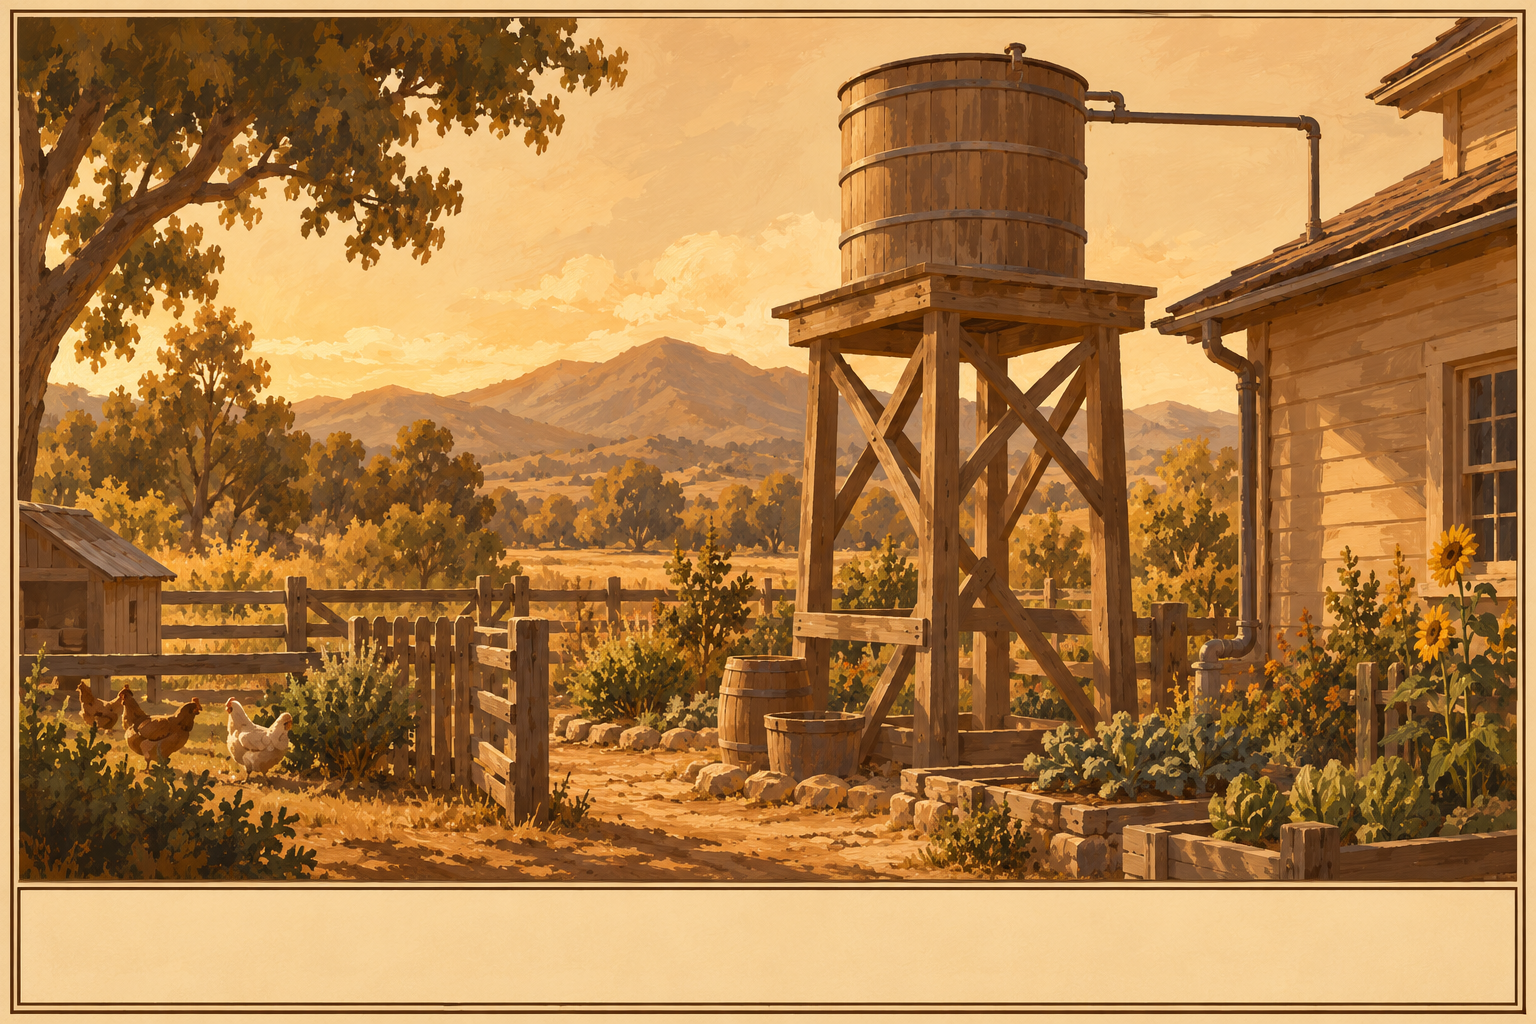
Power is a convenience. Water is survival. Never lean on a single source: a dry roof, a frozen spring, or a dropped water table should never leave you empty. This chapter is twelve ways to harvest water, then how to make it safe and where to keep it.
Ceric's HomesteadWater · Rainwater Catchment
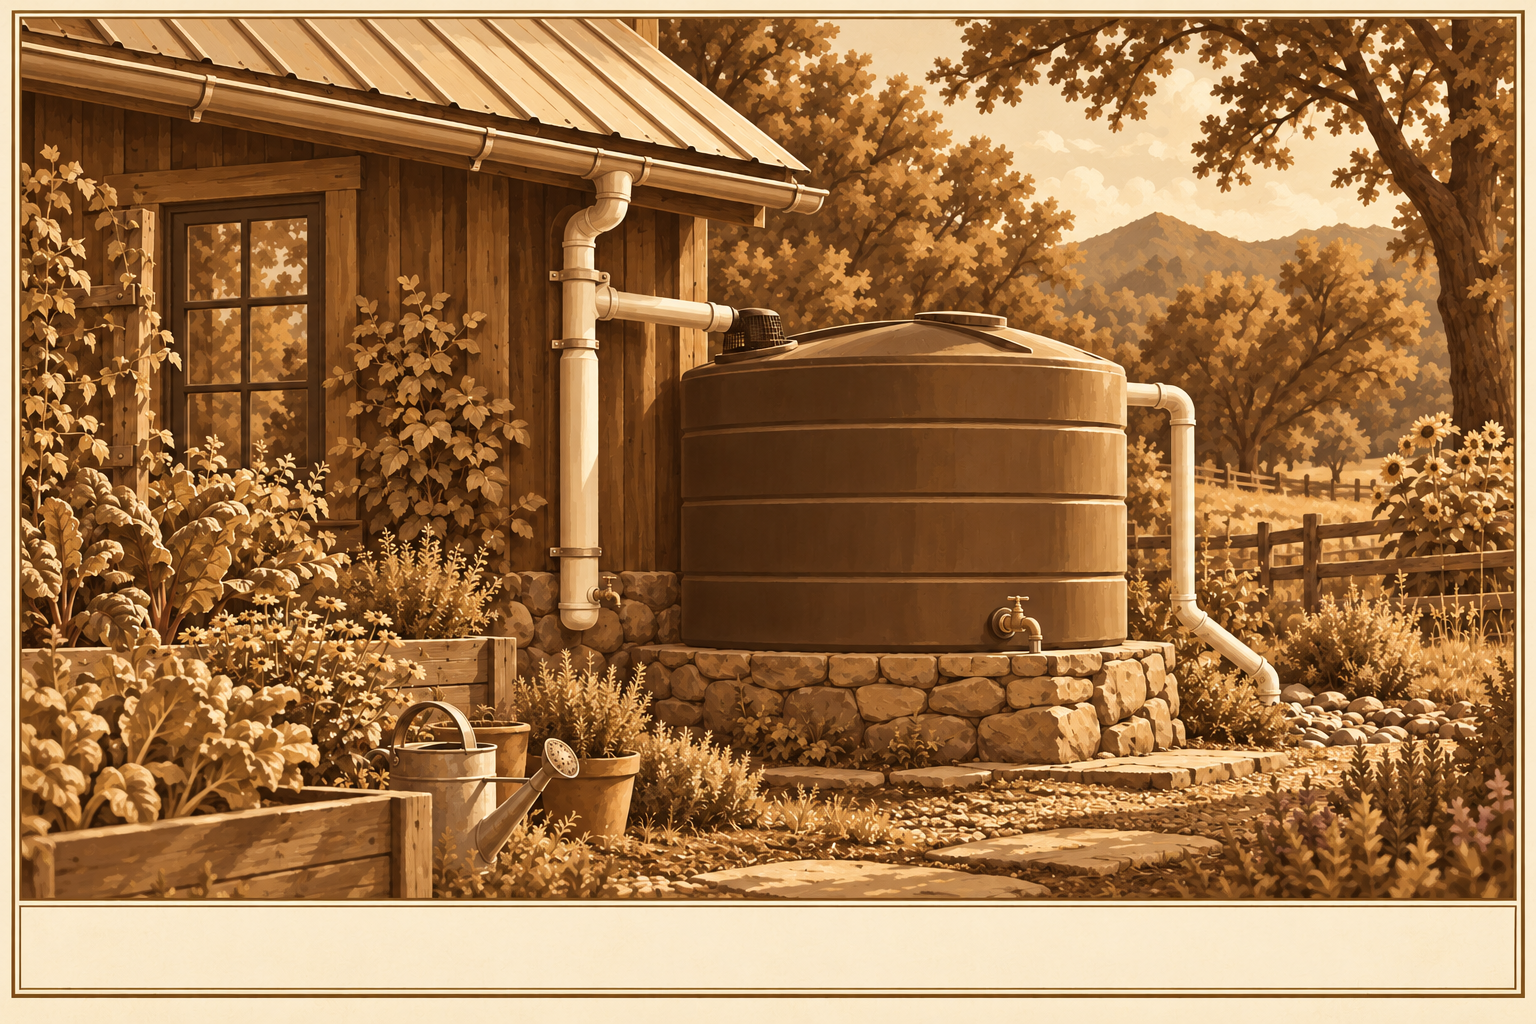
Rooftop Rainwater Catchment
Every inch of rain on a roof is hundreds of gallons. Stop letting it run off.
DifficultyBeginner
TimeA weekend
Cost$60–$300
SkillsHand tools
Why it is worth it
A roof is a rain magnet you already own. Every square foot sheds about 0.62 gallons per inch of rain, so an 800 sq ft roof turns a single one-inch storm into roughly 500 gallons. Captured, that water carries a garden through a dry spell, waters stock, fills wash basins, and once treated becomes drinking water.
Materials & tools
Gutters + end caps
Downspout + elbows
Leaf screen
First-flush diverter
Opaque food-grade tank or IBC tote
Bulkhead + spigot
Overflow fitting
Mosquito screen
Drill, hole saw, level
Step by step
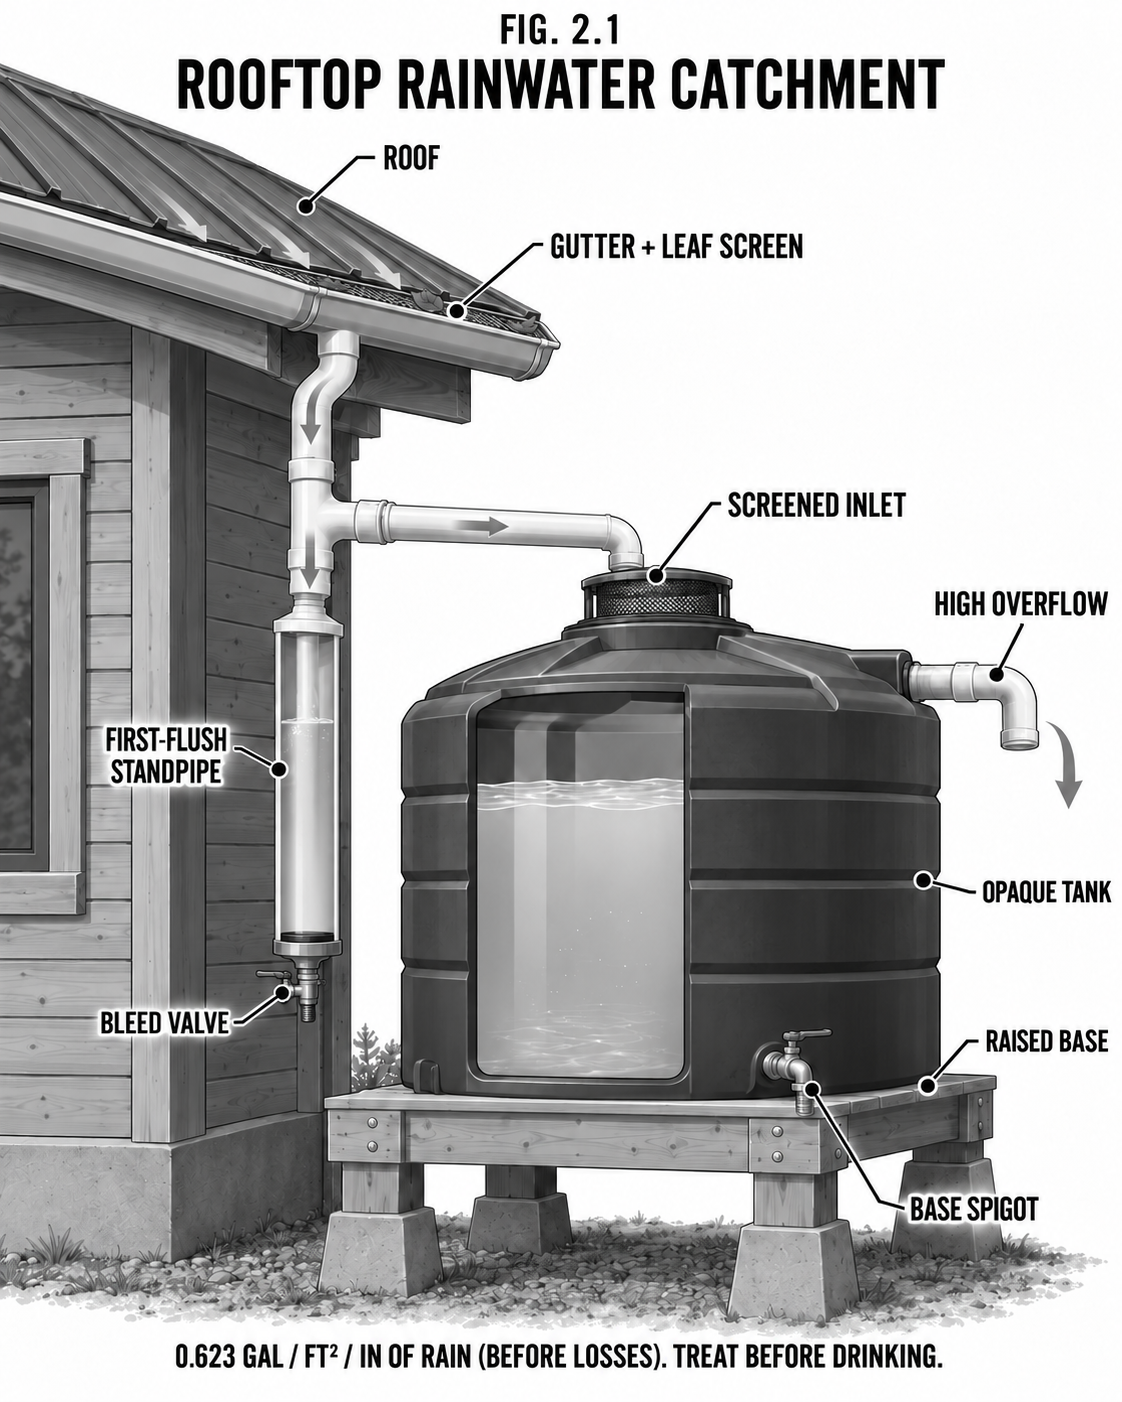
Size it: roof sq ft x rainfall in x 0.62 = gallons per storm.
Hang gutters with a slight fall (~1/4 in per 10 ft) to the downspout.
Screen the gutter against needles and debris.
Run the downspout into a first-flush diverter so the first dirty ~10 gal per 1,000 sq ft bleeds off.
Screen the tank inlet; keep the tank opaque and fully sealed.
Fit a base spigot and a high overflow routed away from the foundation.
Raise the tank for pressure: ~2.3 ft of height is about 1 psi.
Safety & code Roof water is NOT drinkable as collected: treat it before any human use. Avoid roofs with lead flashing for potable catchment. Keep the tank opaque and tightly screened (mosquitoes, algae). A full barrel is 400+ lb, so the base must be solid. A few states regulate rainwater, so check local rules. Drain before hard freeze.
Tips & variations Link barrels at the base to grow capacity cheaply. A dark tank stops algae. A food-grade IBC tote (275 gal) is the best starter cistern.
Ceric's HomesteadWater · Earthworks
Ground Catchment & Earthworks
Shape the land so the rain soaks in instead of running away.
DifficultyIntermediate
Time1–3 days
CostSweat + hand tools
SkillsReading contour
Why it is worth it
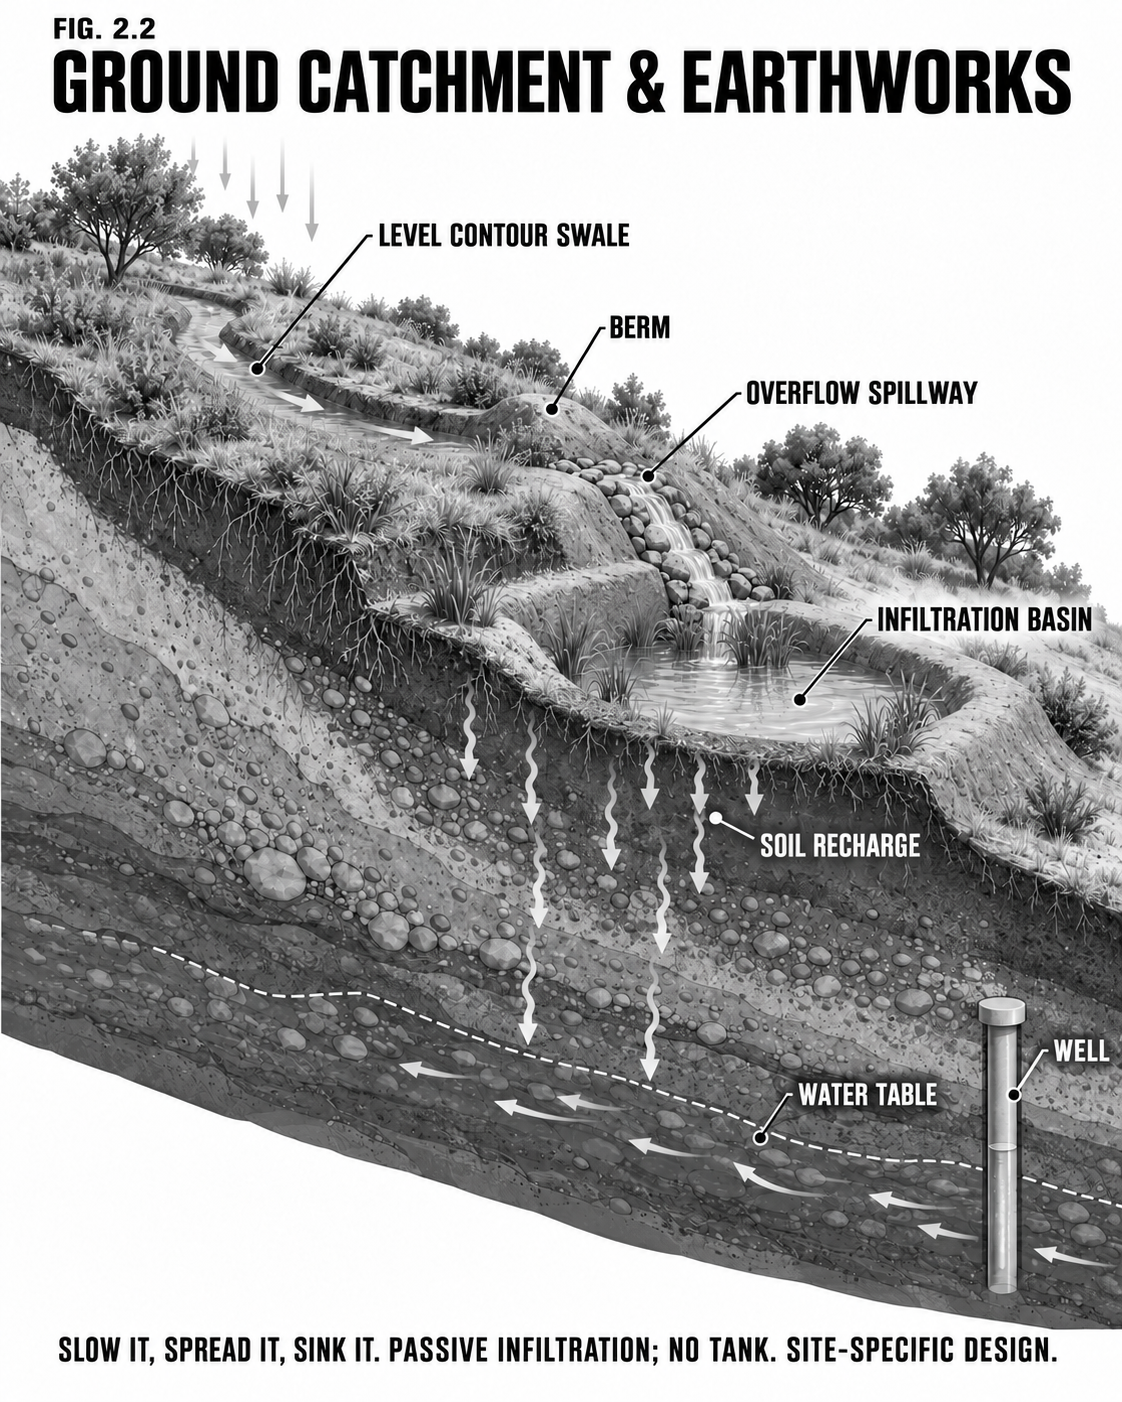
The cheapest tank is the ground itself. A swale is a level trench dug on contour with its spoil mounded on the downhill side; rain runoff pools in it and sinks straight down, recharging the soil, your trees, and the water table under your well. The rule is simple: slow it, spread it, sink it. Done right, a hillside that used to shed water in a storm holds it for weeks.
Materials & tools
A-frame or bunyip water level
Shovel / mattock (or a machine)
Stakes + string
Mulch and cover plants
Rock for the spillway
Step by step
Find true contour across the slope with an A-frame level and flag the line.
Dig the swale on that line, flat-bottomed and dead level, piling spoil into a downhill berm.
Build a rock-armored spillway at one end so overflow leaves gently, not by blowing out the berm.
Mulch the trench and plant the berm so roots hold it.
For more storage, dig a small infiltration basin at the low end.
Safety & code A swale that is not level becomes a ditch that erodes. Never swale above a building, a road cut, or an unstable slope: concentrated infiltration can trigger slumping. Keep earthworks well back from septic drain fields. Call before you dig near buried lines.
Tips & variations On gentle ground, a chain of small swales beats one big one. Pair with the rooftop overflow (2.1) so the tank's excess feeds the swale instead of the ditch.
Ceric's HomesteadWater · Shallow Well
Hand-Dug & Driven Shallow Well
If the water table is close, you can reach it with muscle and a pipe.
DifficultyHard (dug) / Moderate (driven)
TimeDays
Cost$100–$600
SkillsPipe work
Why it is worth it
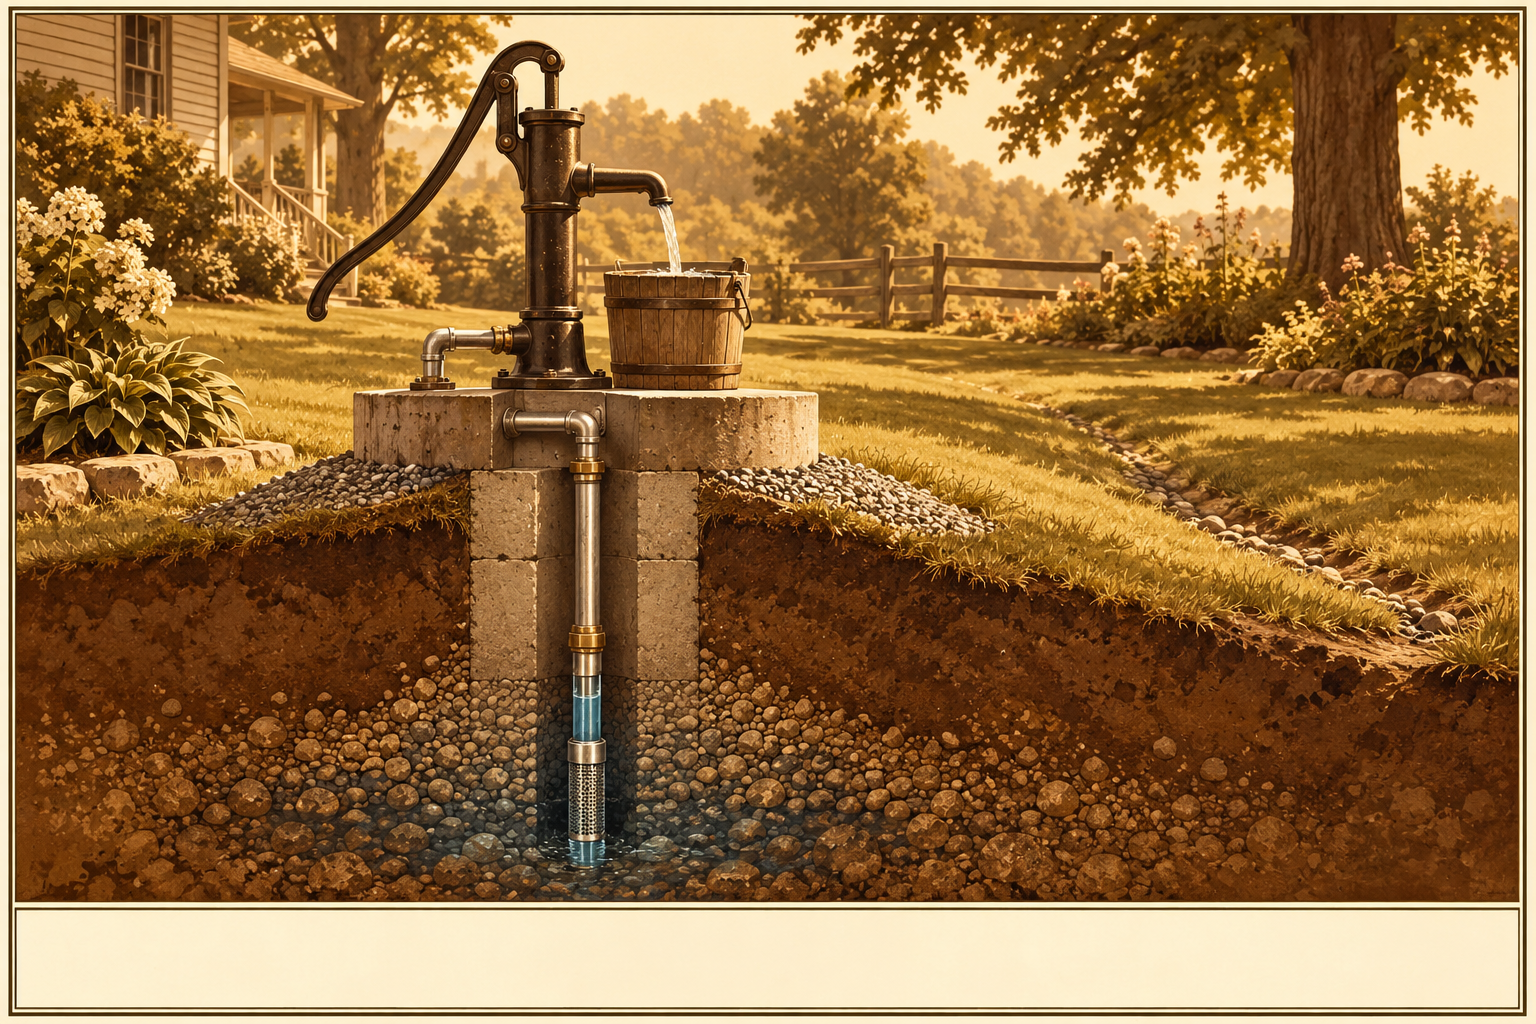
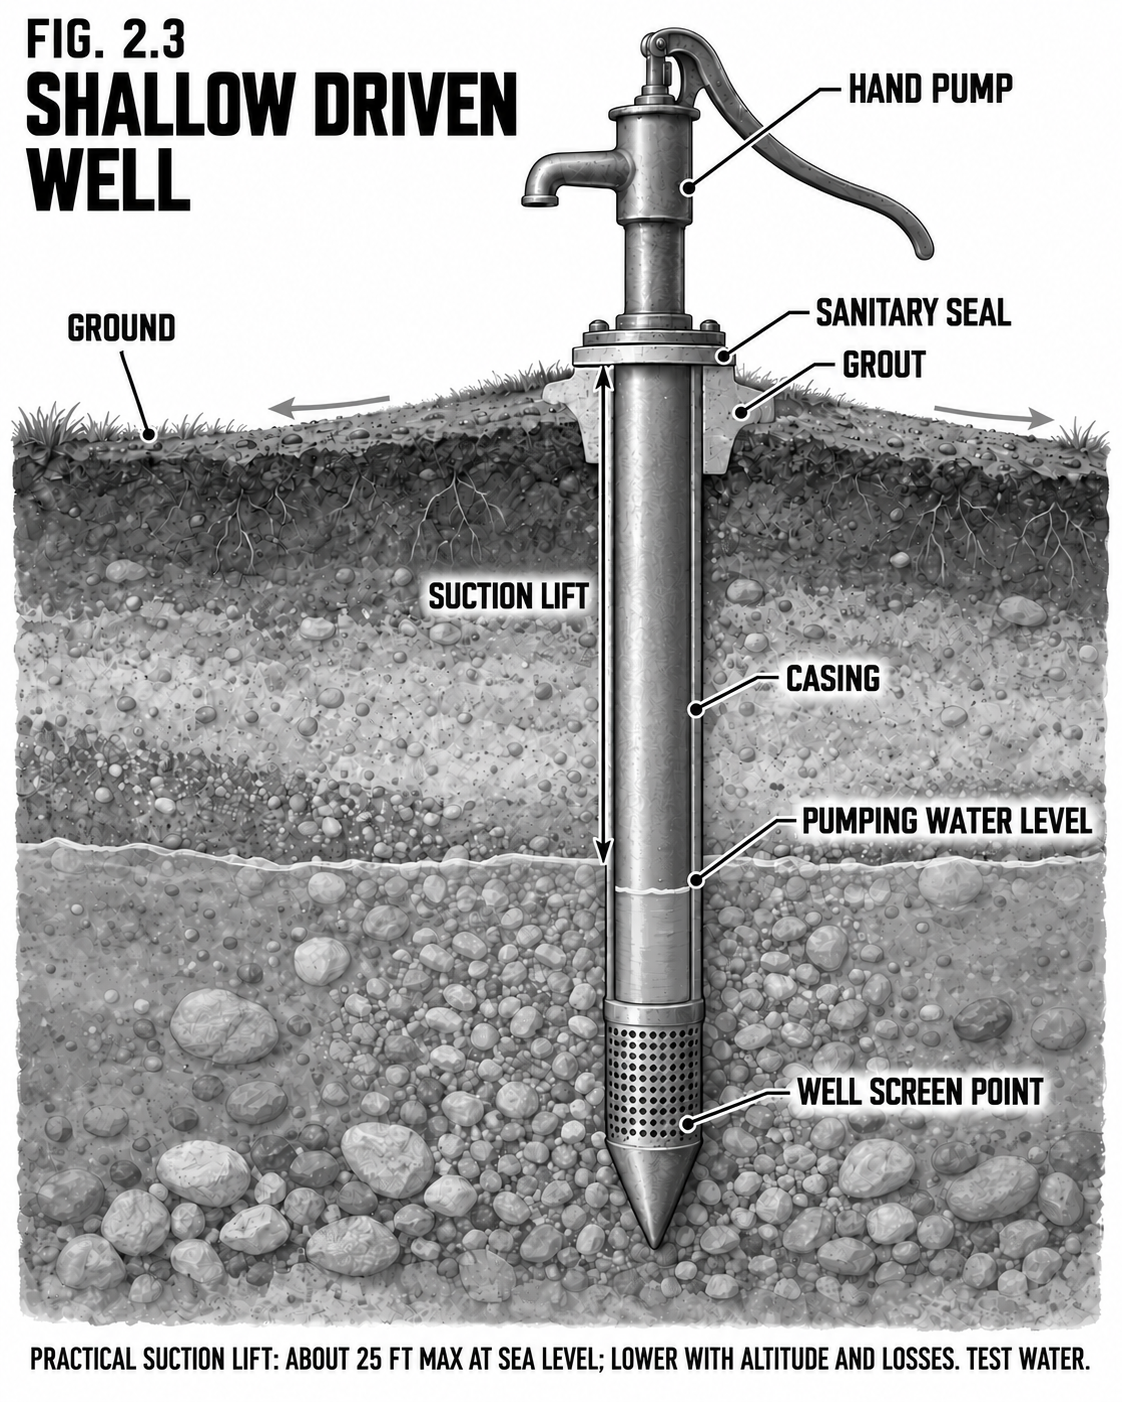
Where the water table sits within reach, groundwater is the steadiest source there is: it does not care whether it rained this month. A driven (sand-point) well hammers a screened point down through sandy soil to the water; a hand-dug well is an older, wider hole lined with stone or tile. Both can run a simple hand or pitcher pump, which lifts water by suction to a practical limit of about 25 feet.
Materials & tools
Well point + drive cap
Galvanized pipe + couplings
Drive weight / post driver
Pitcher or hand pump
Grout / bentonite for the seal
(Dug) stone or concrete tile lining
Step by step
Confirm a shallow table (neighbors' wells, a hand auger test).
Driven: thread the point onto pipe, drive it down adding pipe until you hit water, protecting the threads with a drive cap.
Dug: excavate carefully with shoring, line the shaft, never enter an unshored hole.
Develop the well by pumping until it runs clear.
Grout a sanitary seal at the surface so surface water cannot run down the casing.
Mount the pump, prime, and test.
Safety & code A hand-dug well is one of the most dangerous jobs on a homestead: unshored walls collapse and bad air collects at the bottom. Shore every foot, test the air, never go down alone. Keep the wellhead sealed and uphill of any septic or barnyard (typically 50–100 ft minimum, per local code). Test the water before drinking.
Tips & variations A sand point is far safer and faster than digging where soils allow. For water deeper than the ~25 ft suction limit, you need a deep well and a lift pump (next entry).
Ceric's HomesteadWater · Deep Well
Drilled Deep Well
When the water is far down, you stop sucking and start lifting.
DifficultyAdvanced / hired rig
TimeDays
Cost$$$
SkillsDrilling / pumps
Why it is worth it
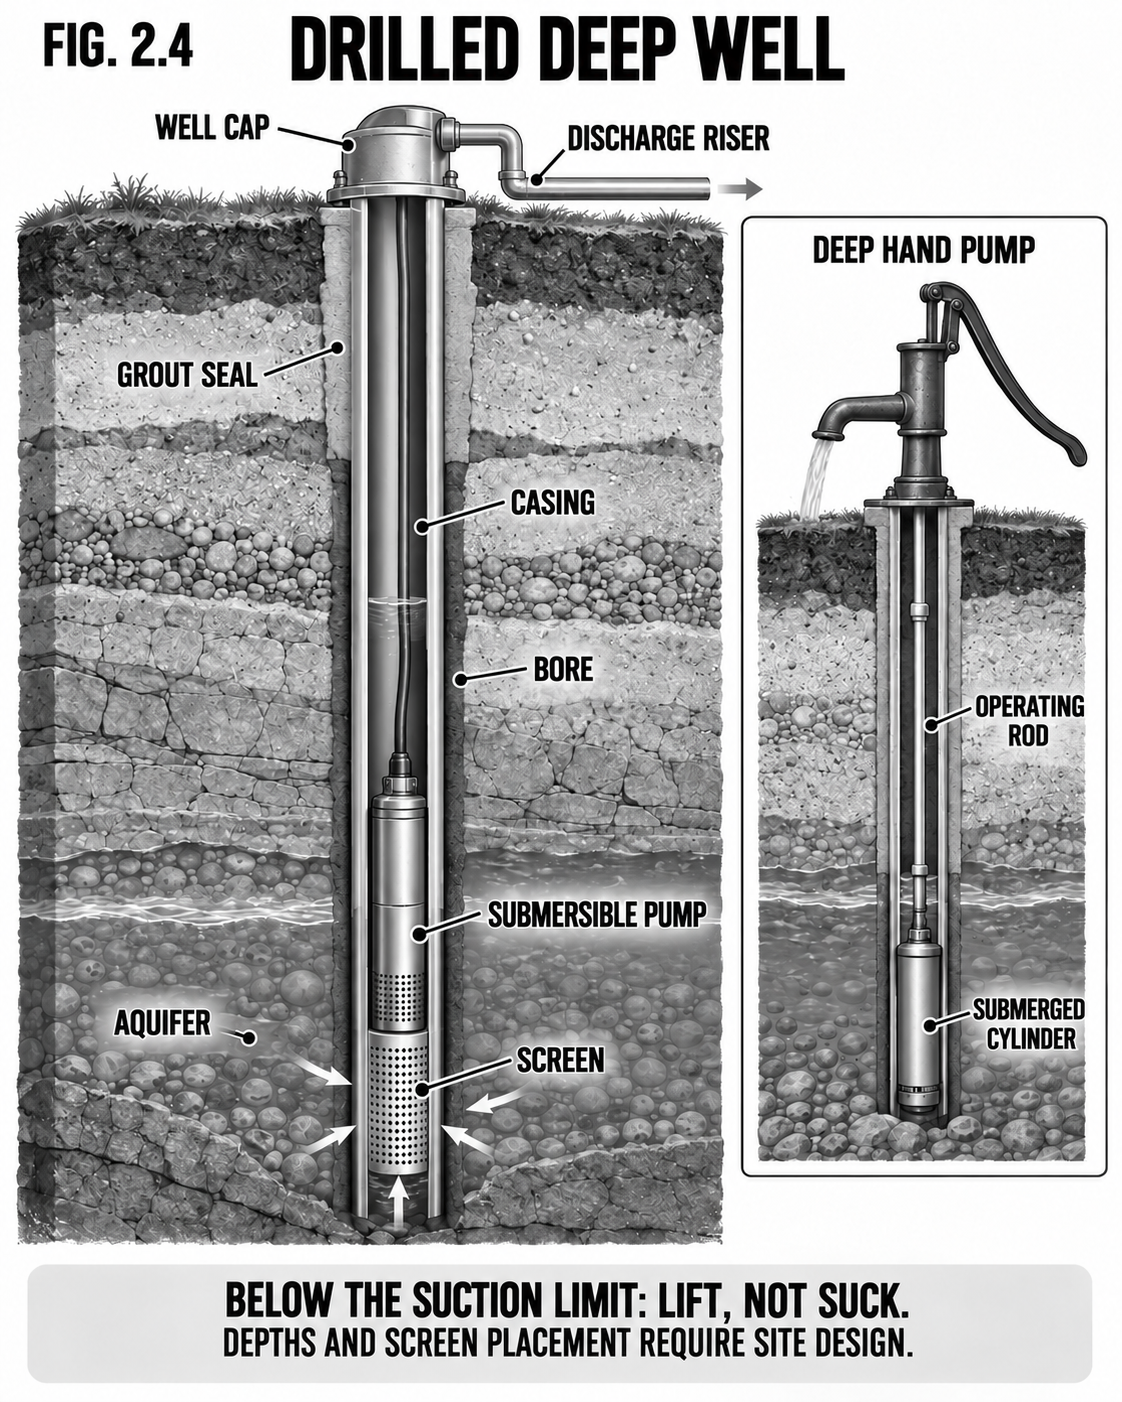
Most reliable year-round water comes from a drilled well into a true aquifer. Past the roughly 25-foot suction limit, no surface pump can "pull" water up, so a deep well uses a pump that pushes from below: a deep-well hand pump with a down-hole cylinder, or a submersible run on solar/DC. A properly cased and sealed well also keeps surface contamination out, which a shallow hole struggles to do.
Materials & tools
Drilling rig (hired) or DIY rig for soft ground
Steel or PVC casing
Well screen
Grout / bentonite seal
Deep-well hand pump or submersible + wire
Pressure tank (if pressurized)
Step by step
Site the well uphill and well clear of septic, barns, and fuel.
Bore to the aquifer; set casing the full depth.
Set screen at the water-bearing layer and grout a seal from screen to surface.
Develop until clear and test yield (gallons per minute).
Hang a deep-well hand pump, or drop a submersible and wire it to the solar array.
Cap the well sanitary-tight and test the water.
Safety & code Well construction is regulated nearly everywhere: setbacks, casing, and grouting protect the aquifer and are often legally required, so check your rules (and many areas require a licensed driller). A failed seal lets surface filth into your drinking water. Lab-test a new well for bacteria and nitrate before you drink it.
Tips & variations A hand pump installed alongside a submersible is cheap insurance: water when the power is down. Solar-direct submersibles can pump to a tank by day and let you draw by gravity at night.
Ceric's HomesteadWater · Spring Box
Spring Capture (Spring Box)
Free, gravity-fed water that was flowing before you got here.
DifficultyIntermediate
Time1–2 days
Cost$50–$300
SkillsMasonry basics
Why it is worth it
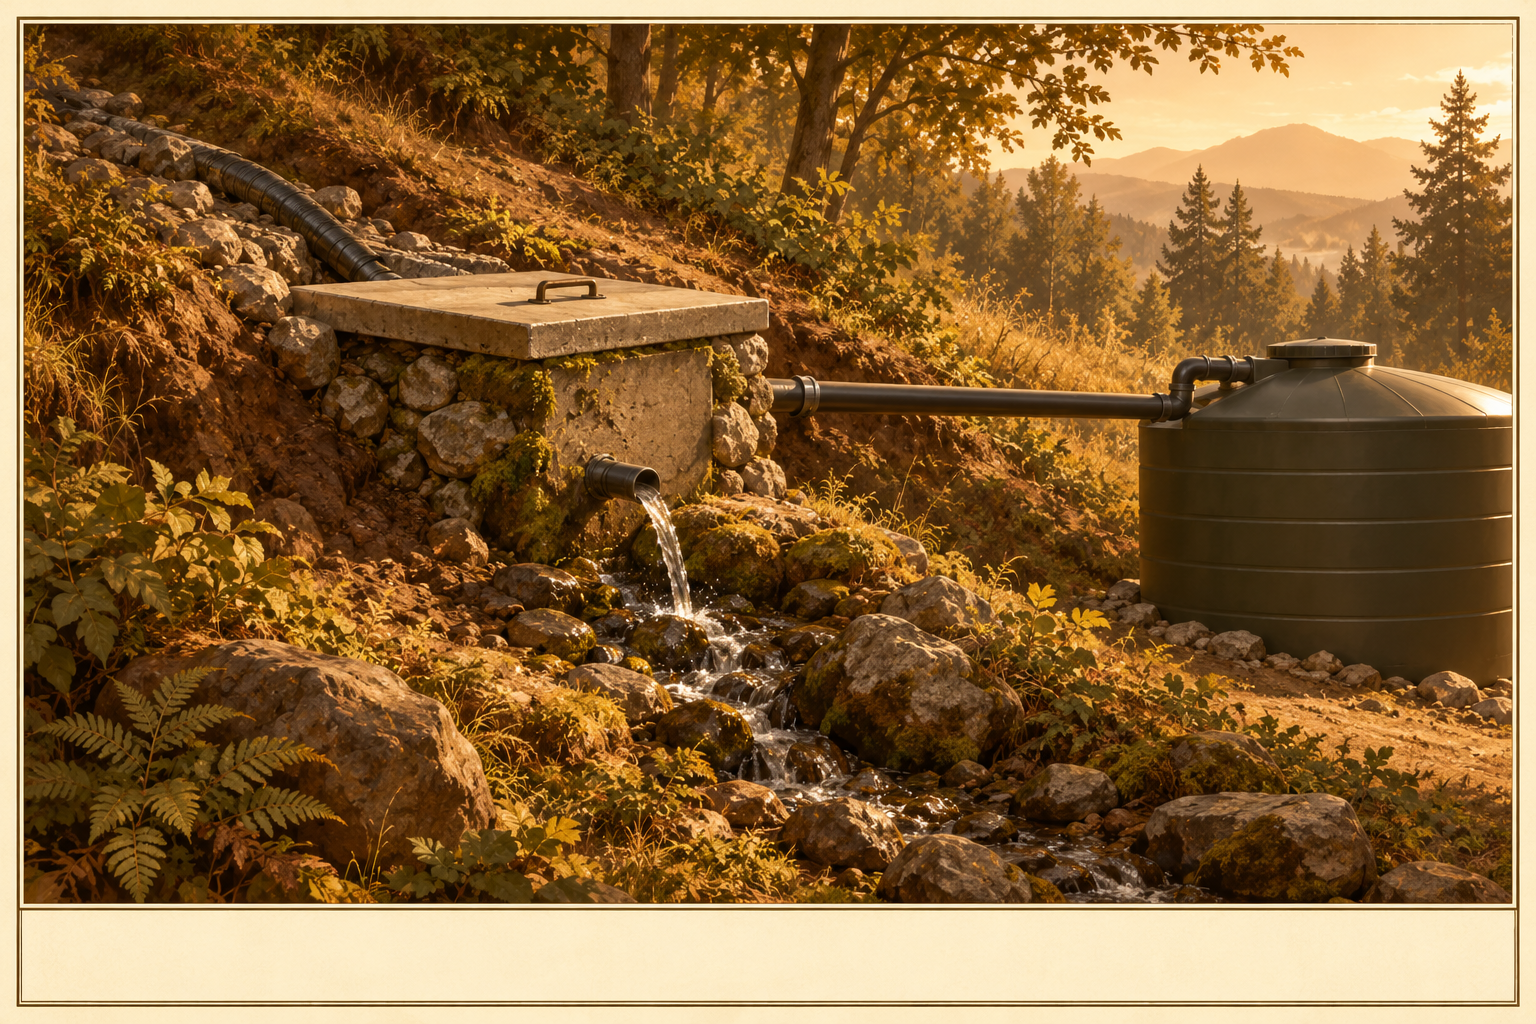
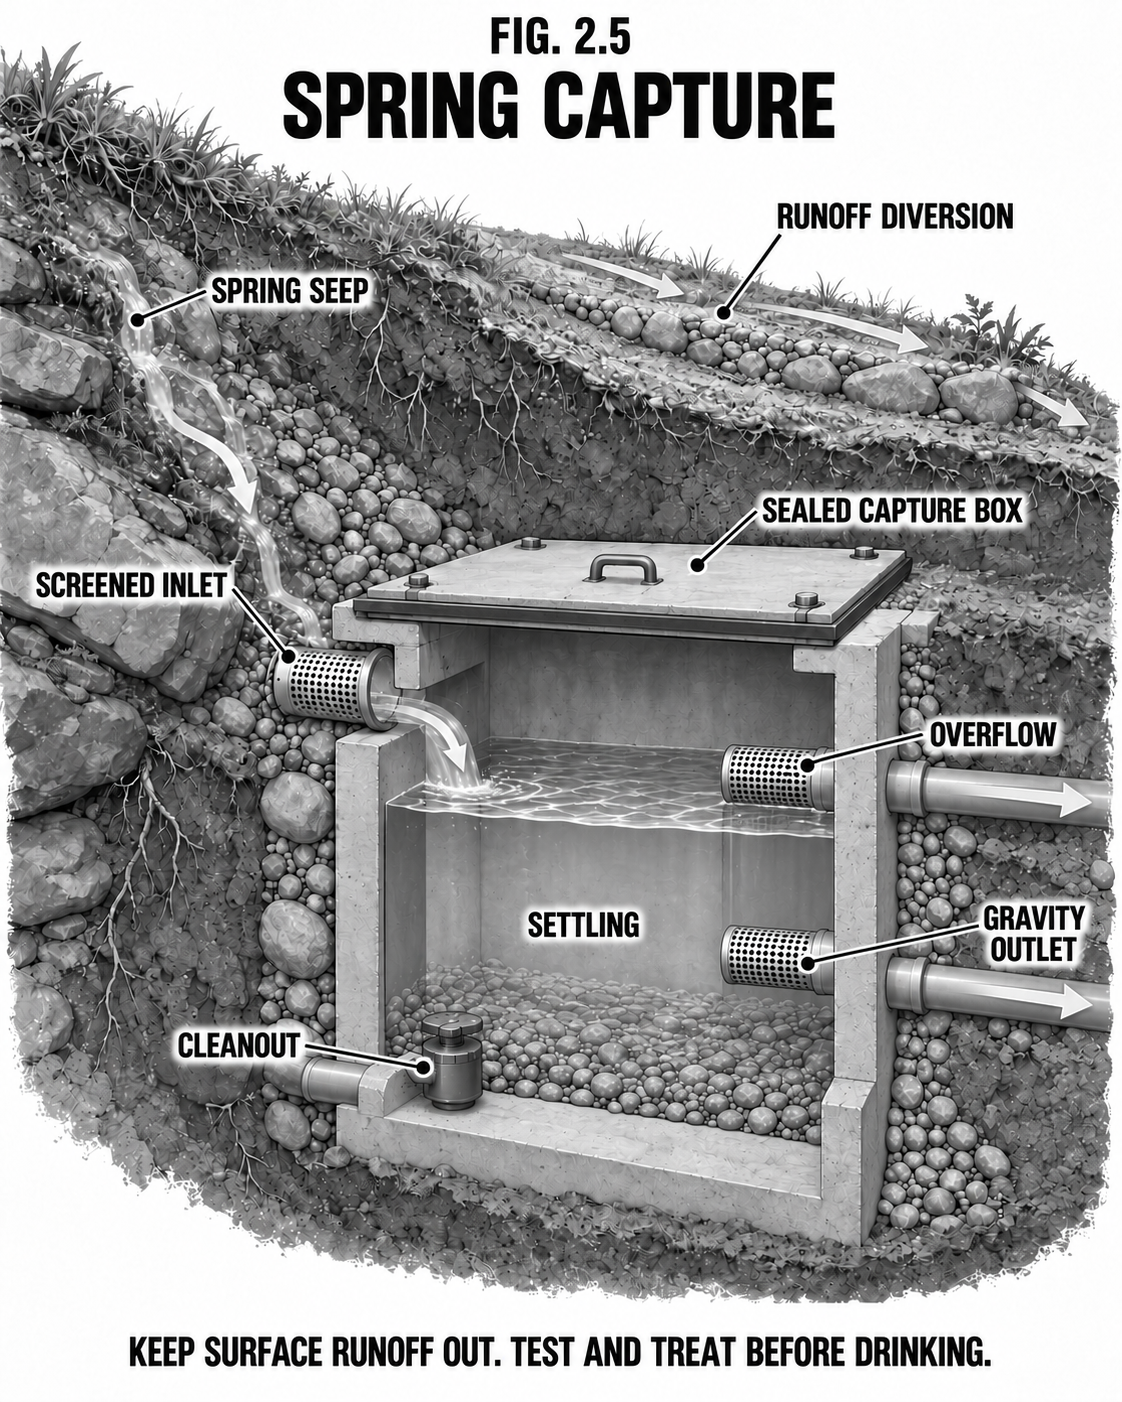
A good spring is the homesteader's dream: clean groundwater surfacing on its own, needing no pump if you have a slope below it. A spring box captures the water at the point it emerges, settles out sand, keeps surface runoff and critters out, and sends a clean gravity-fed line downhill to your storage. Protect the source and it can run for generations.
Materials & tools
Concrete or a food-grade tank for the box
Clean gravel
Screened inlet + overflow
Outlet + cleanout pipe
Lid (sealed, lockable)
Surface diversion ditch
Step by step
Dig back to where the water truly emerges from the soil or rock, not the puddle below.
Build the box so water enters through a gravel-and-screen face and the chamber lets sand settle.
Set the outlet above the floor (clean water), a screened overflow, and a low cleanout.
Seal the lid and dig a diversion ditch uphill so runoff never reaches the box.
Run a buried gravity line (below frost) to your cistern.
Safety & code Spring water can still carry pathogens from surface infiltration, so treat it for drinking and test it seasonally. Keep livestock, septic, and cropland fertilizer well uphill. Know your water rights: in some regions spring use is legally governed.
Tips & variations If the spring is below your home, a ram pump (no electricity, powered by the water itself) can lift a share of the flow uphill. A sealed, shaded box also stays cold enough to double as a springhouse cooler.
Ceric's HomesteadWater · Surface Intake
Surface-Water Intake
A stream or pond is a lot of water, if you take it cleanly and treat it well.
DifficultyIntermediate
Time1–2 days
Cost$80–$400
SkillsPipe + siting
Why it is worth it
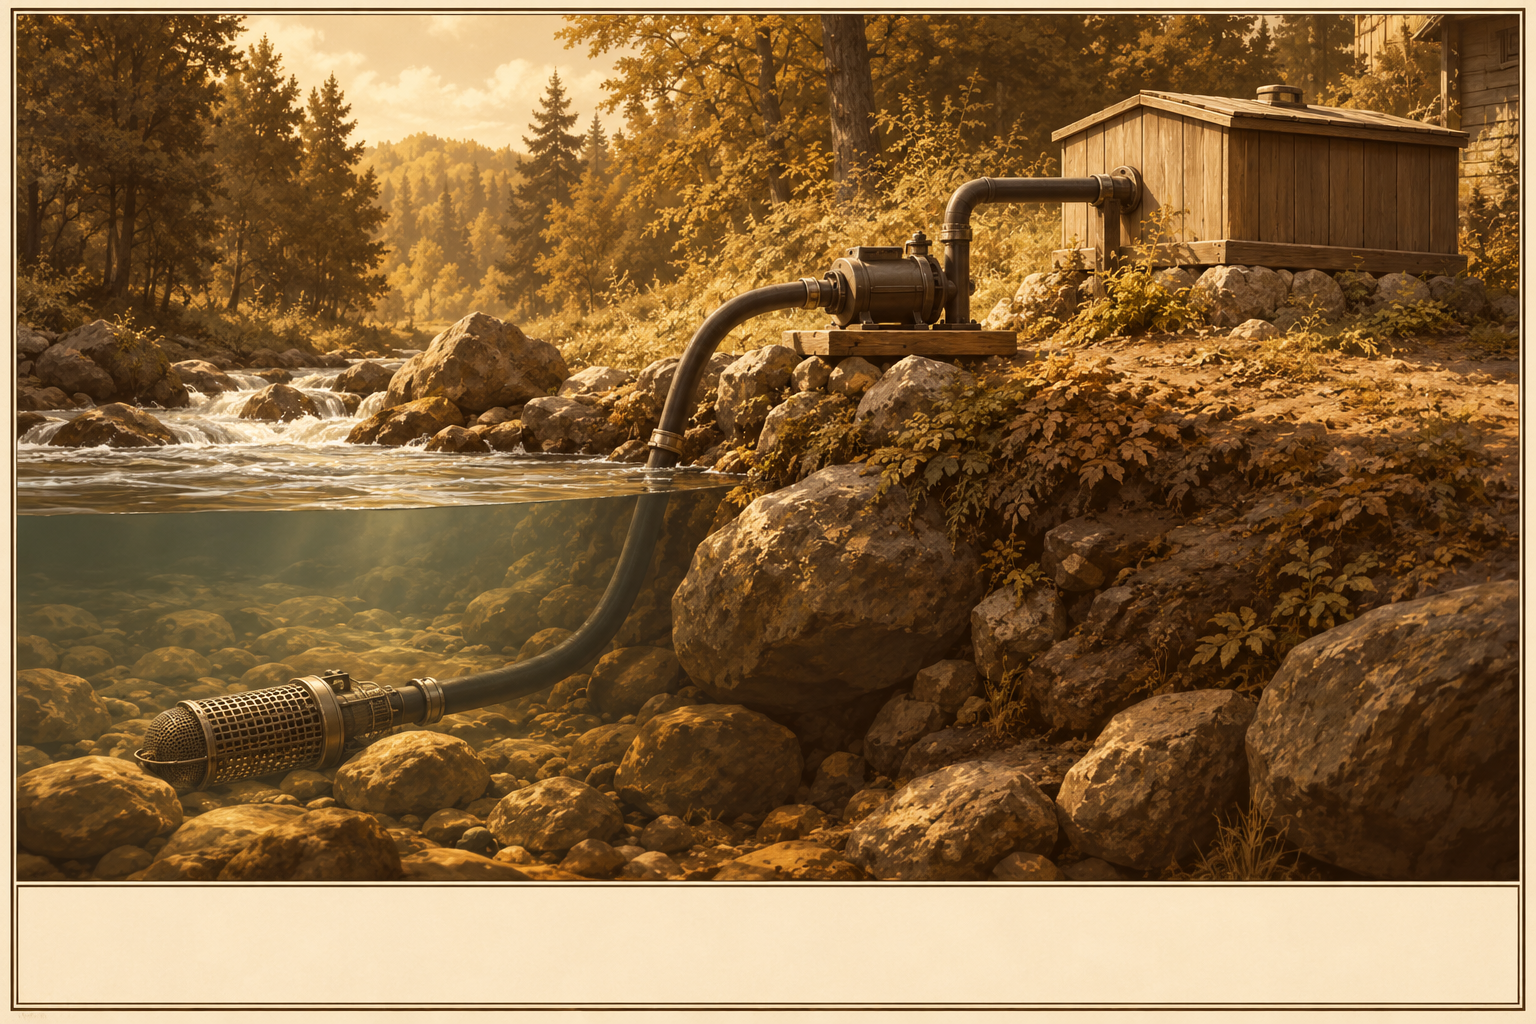
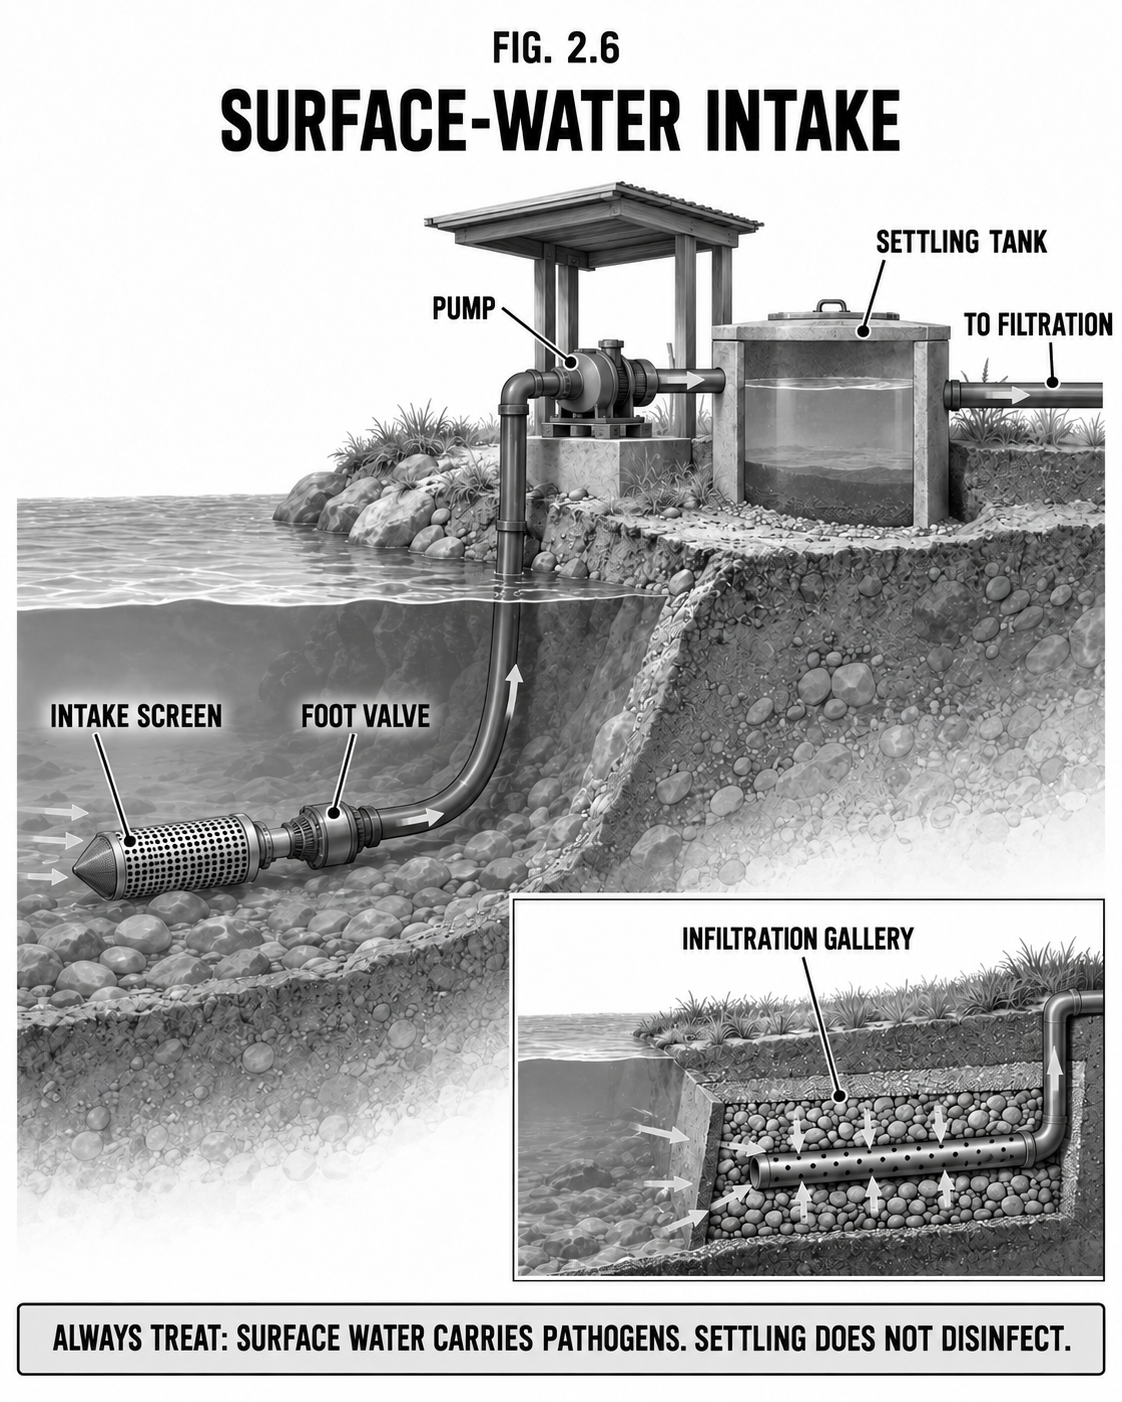
When you have a reliable stream, pond, or lake, the volume problem is solved; the quality problem is not. Surface water always carries silt, organics, and pathogens, so the job is to draw it cleanly and treat it fully. A screened intake above the muddy bottom, or a buried infiltration gallery along the bank that lets the ground pre-filter it, feeds a settling tank ahead of your filter.
Materials & tools
Intake screen / strainer
Foot valve (keeps the line primed)
Pipe + fittings
Settling tank/barrel
(Gallery) perforated pipe + gravel
Step by step
Place the intake upstream of any fouling, above the silty bottom, below the low-water line.
Screen it against leaves and fish, and fit a foot valve so the line stays primed.
Better quality: bury a perforated-pipe gallery in the gravel bank so the ground filters the water before it enters.
Run to a settling tank where sediment drops out.
Always follow with full treatment before any household use.
Safety & code Treat surface water as contaminated, always: it is the classic source of giardia and crypto. Filter then disinfect for drinking. Water rights and in-stream intake permits apply in many places. Protect the intake from freezing and from flood debris.
Tips & variations An infiltration gallery delivers far clearer water than a bare pipe and clogs less. Pair this with the slow-sand filter (2.14) for a robust two-stage system.
Ceric's HomesteadWater · Fog Harvesting
Fog Harvesting
On the right ridge, you can comb drinking water straight out of the air.
DifficultyIntermediate
Time1 day
Cost$50–$300
SkillsFraming
Why it is worth it
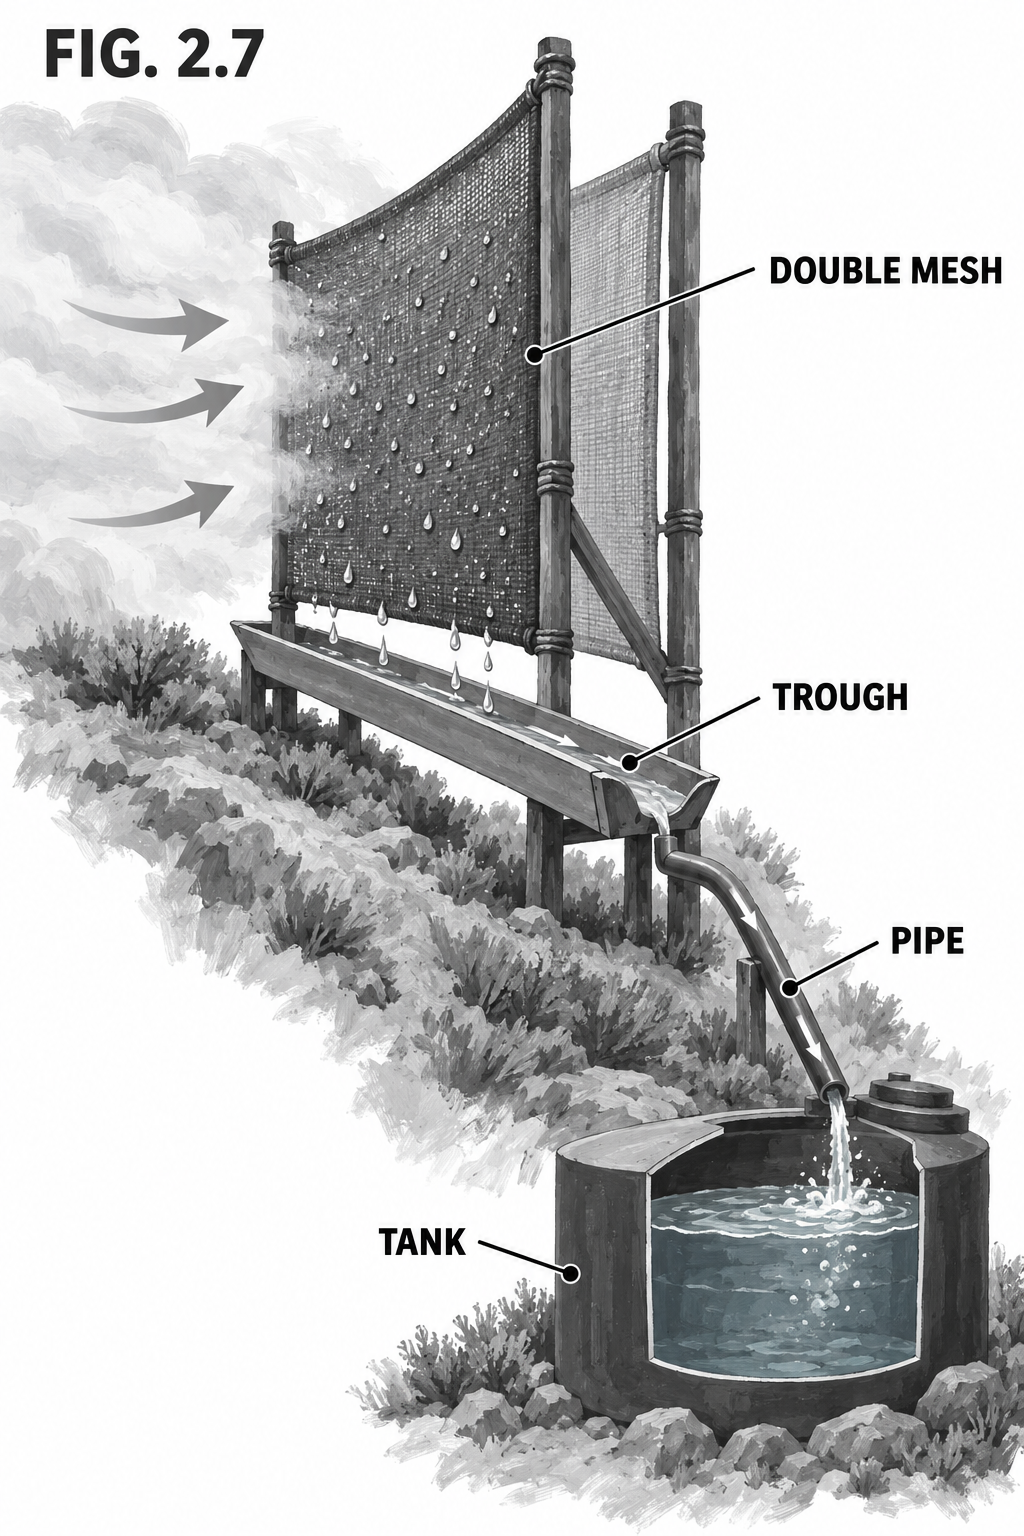
Where fog rolls in off a coast or over a ridge, a vertical screen of fine mesh does what leaves and spider webs do: fog droplets catch on the threads, run down, and drip into a trough. In the right spot a square meter of mesh can yield several liters a day, and large arrays supply whole villages. It needs no power and runs best exactly when rain is scarce.
Materials & tools
Fine shade-cloth / Raschel mesh (double layer)
Posts + cross-rails
Guy lines
Collection trough (split pipe)
Line to tank
Step by step
Find your foggiest, windward exposure (a ridge or coastal rise).
Frame a tall rectangular panel broadside to the prevailing fog wind and guy it well.
Stretch a double layer of fine mesh across the frame.
Run a trough along the bottom edge to catch the runoff and pipe it to a covered tank.
Keep the mesh clean so droplets keep shedding.
Safety & code Fog water is cleaner than surface water but not sterile and can pick up airborne dust or pollution, so filter and disinfect before drinking. Big mesh panels are kites in a storm: build the frame and anchors to take real wind, or drop the mesh when gales come.
Tips & variations Yield scales with mesh area, so go wide. Two panels in a shallow V catch shifting wind. First flush after a dry spell can be dusty, so send the first runoff to the garden.
Ceric's HomesteadWater · Dew Collection
Dew & Atmospheric Collection
Clear, calm nights hand you water for the cost of a cold surface.
DifficultyBeginner
TimeHours
Cost$20–$150
SkillsBasic
Why it is worth it
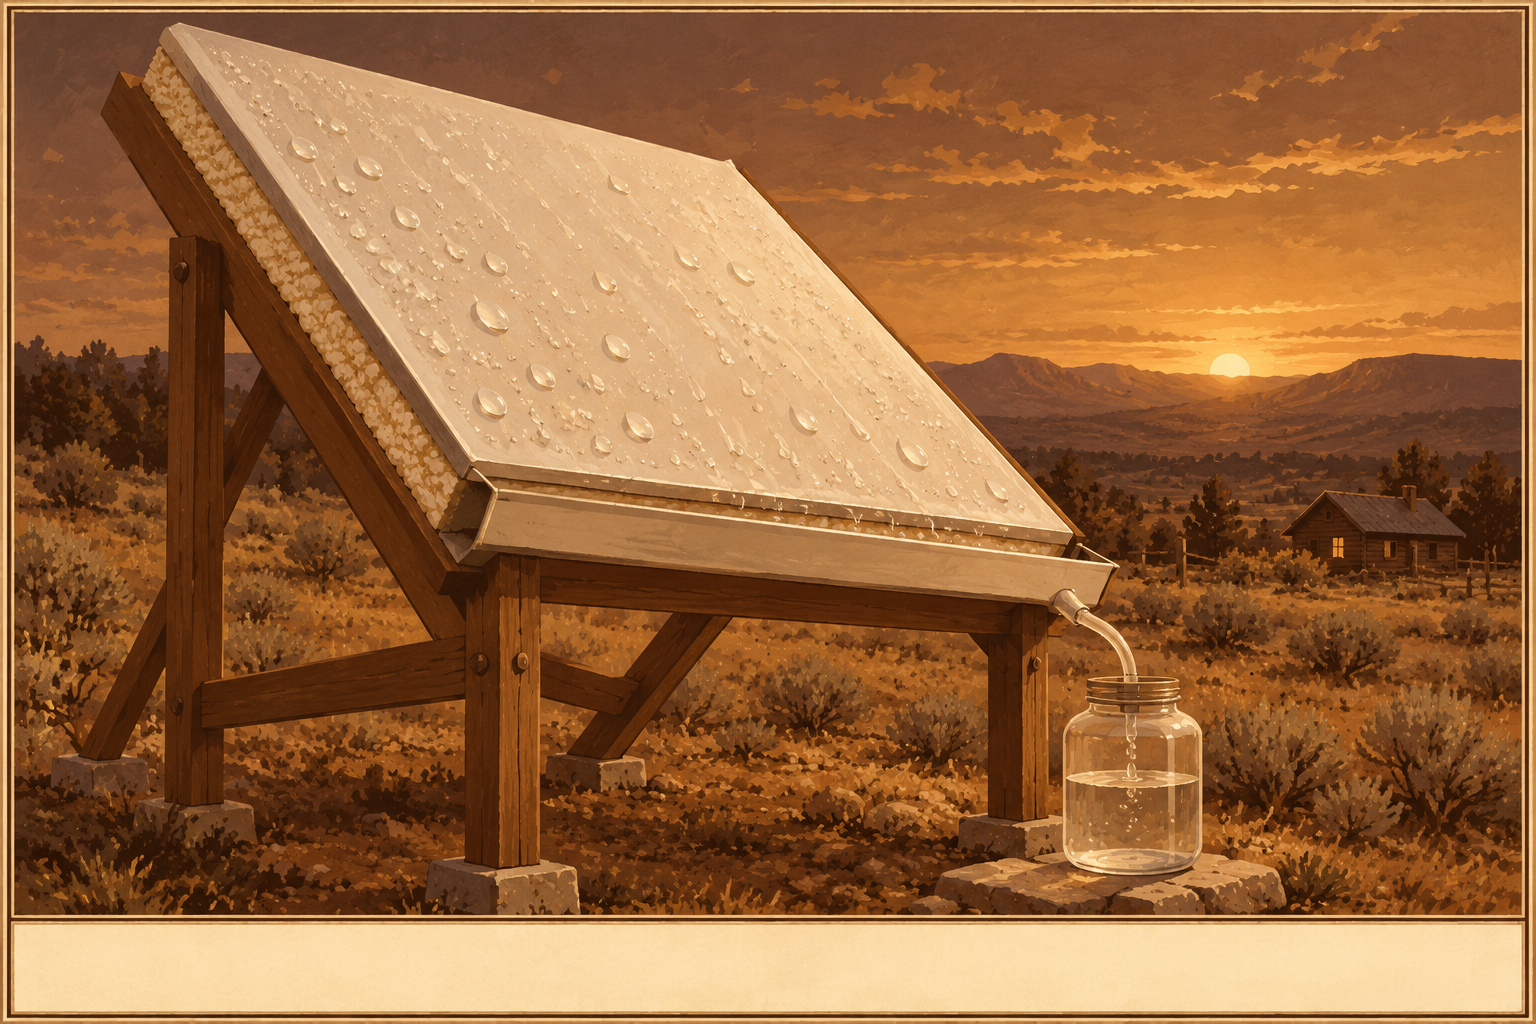
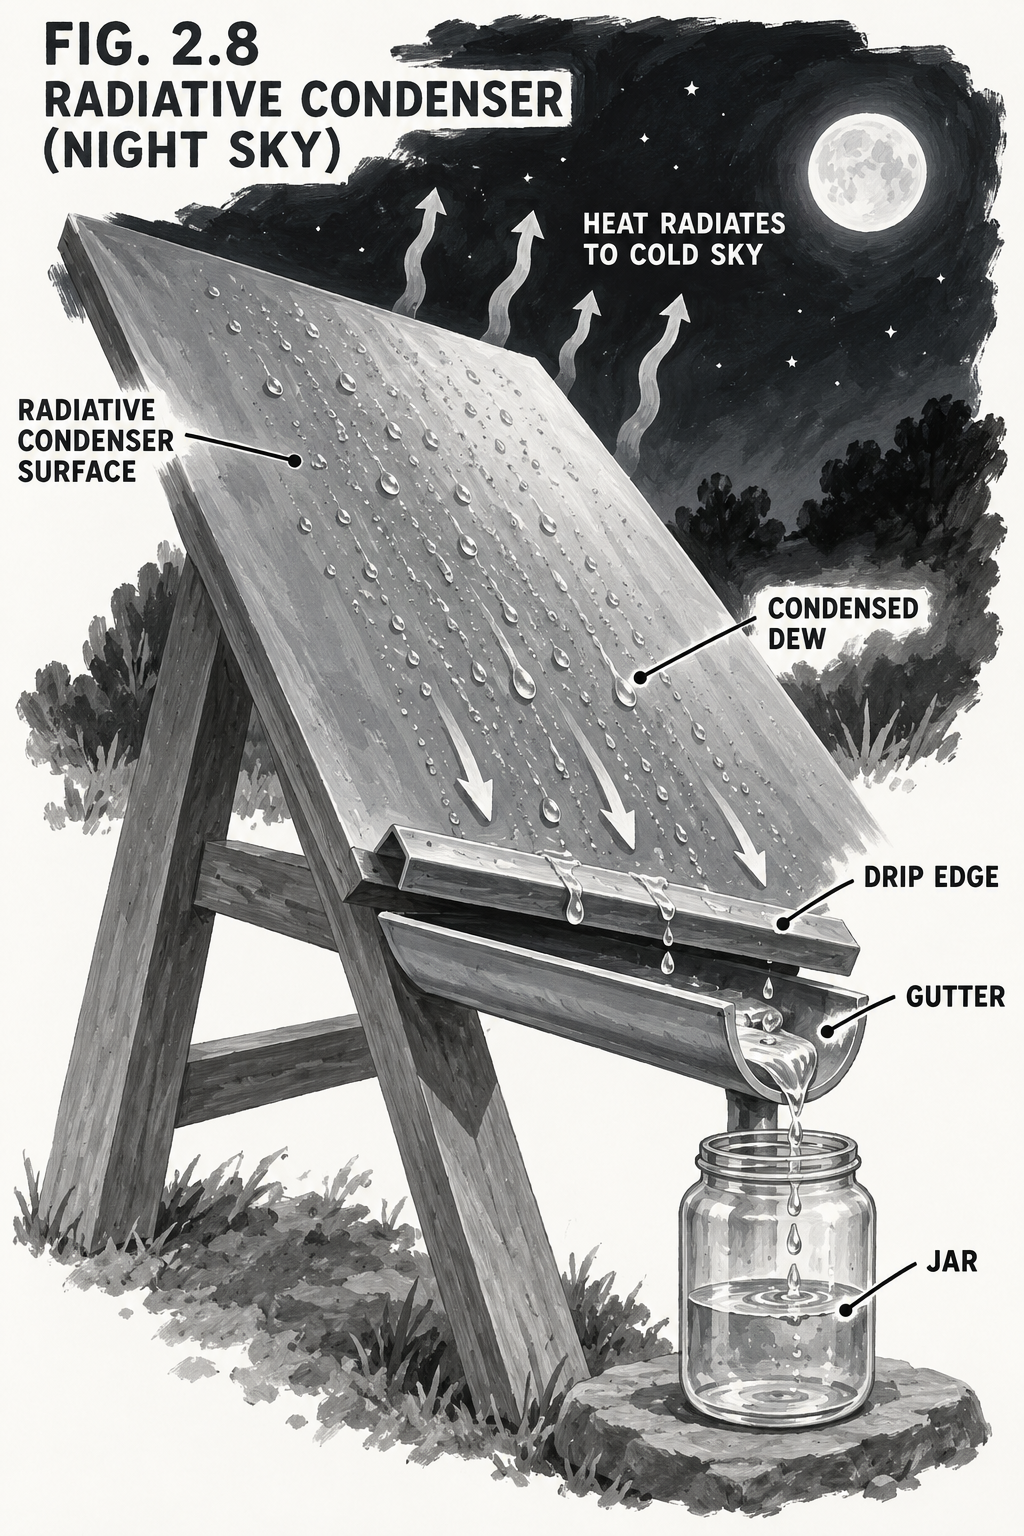
On a clear, still night a surface facing the open sky radiates its heat away and drops below the air temperature; moisture then condenses on it as dew. A tilted radiative condenser (a smooth insulated panel aimed at the night sky) gathers that dew and drips it into a jar. The yield is modest, but it is free, silent, needs no power, and works in places too dry for much else.
Materials & tools
Smooth panel (foil-faced foam, metal, or special film)
Insulating backing
A tilted frame
Drip edge + gutter
Covered jar/tank
Step by step
Build a lightweight panel with an insulated back so only the top loses heat to the sky.
Tilt it toward the open sky, clear of overhanging trees and warm walls.
Run a drip edge into a small gutter and down into a covered jar.
Set it out before dusk on clear, calm nights; collect the dew at dawn.
Safety & code Dew is nearly distilled but lands on a surface that collects dust, pollen, and bird droppings, so rinse the panel and filter the water before drinking. Yield collapses on cloudy or windy nights; never count dew as your only source.
Tips & variations A clean metal roof already sheds dew at dawn; a dedicated downspout to a jar costs nothing. Combine dew with fog (2.7): the same conditions that favor one often favor the other.
Ceric's HomesteadWater · Snow & Ice Melt
Snow & Ice Melt
In a Yooper winter, your water problem is falling out of the sky. Melt it right.
DifficultyBeginner
TimeOngoing
CostNear zero
SkillsBasic
Why it is worth it
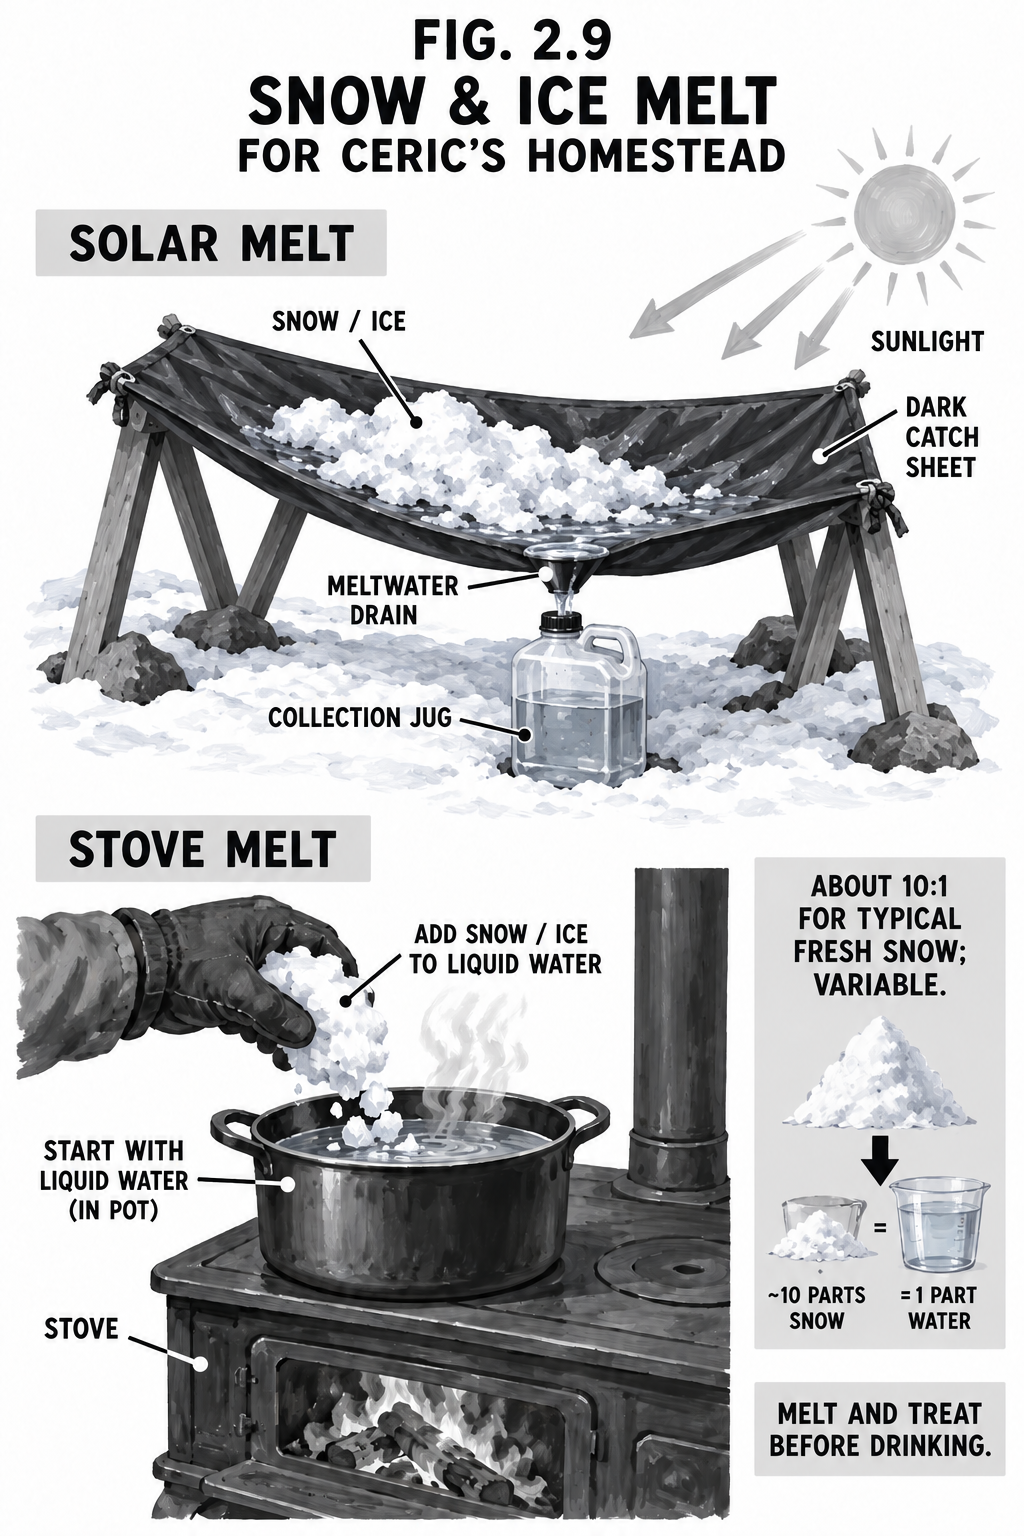
When everything is frozen and the barrels are ice, snow is water waiting to happen. It takes a lot of snow for a little water (roughly 10 to 1 by volume for light snow), but you are rarely short of it. Melt with the sun on a dark catch sheet when you can, and with stove or body heat when you must.
Materials & tools
Dark tarp or sheet (solar melt)
Catch basin / jug
Melt pot (stove melt)
Clean-snow source away from roads/roofs
Step by step
Gather clean snow well away from roads, roofs, and animal traffic; skip the gray top crust.
Solar melt: spread snow on a dark sheet angled to the sun, funneling the meltwater to a jug.
Stove melt: start with a little liquid water in the pot, then add snow so the dry pan does not scorch and taste burnt.
Keep melted water from refreezing: store it warm or insulated.
Safety & code Snow is not sterile: it scavenges dust, soot, and whatever was on the ground, so filter or boil melt before drinking. Never eat snow for hydration in the cold; melting it in your body costs heat you cannot spare. Avoid snow near roads (salt) and downwind of chimneys (soot).
Tips & variations Ice melts to more water per volume than fluffy snow, so harvest icicles and crust when you can. A black barrel in a sunny window melts a surprising amount on a bright winter day.
Ceric's HomesteadWater · Solar Still
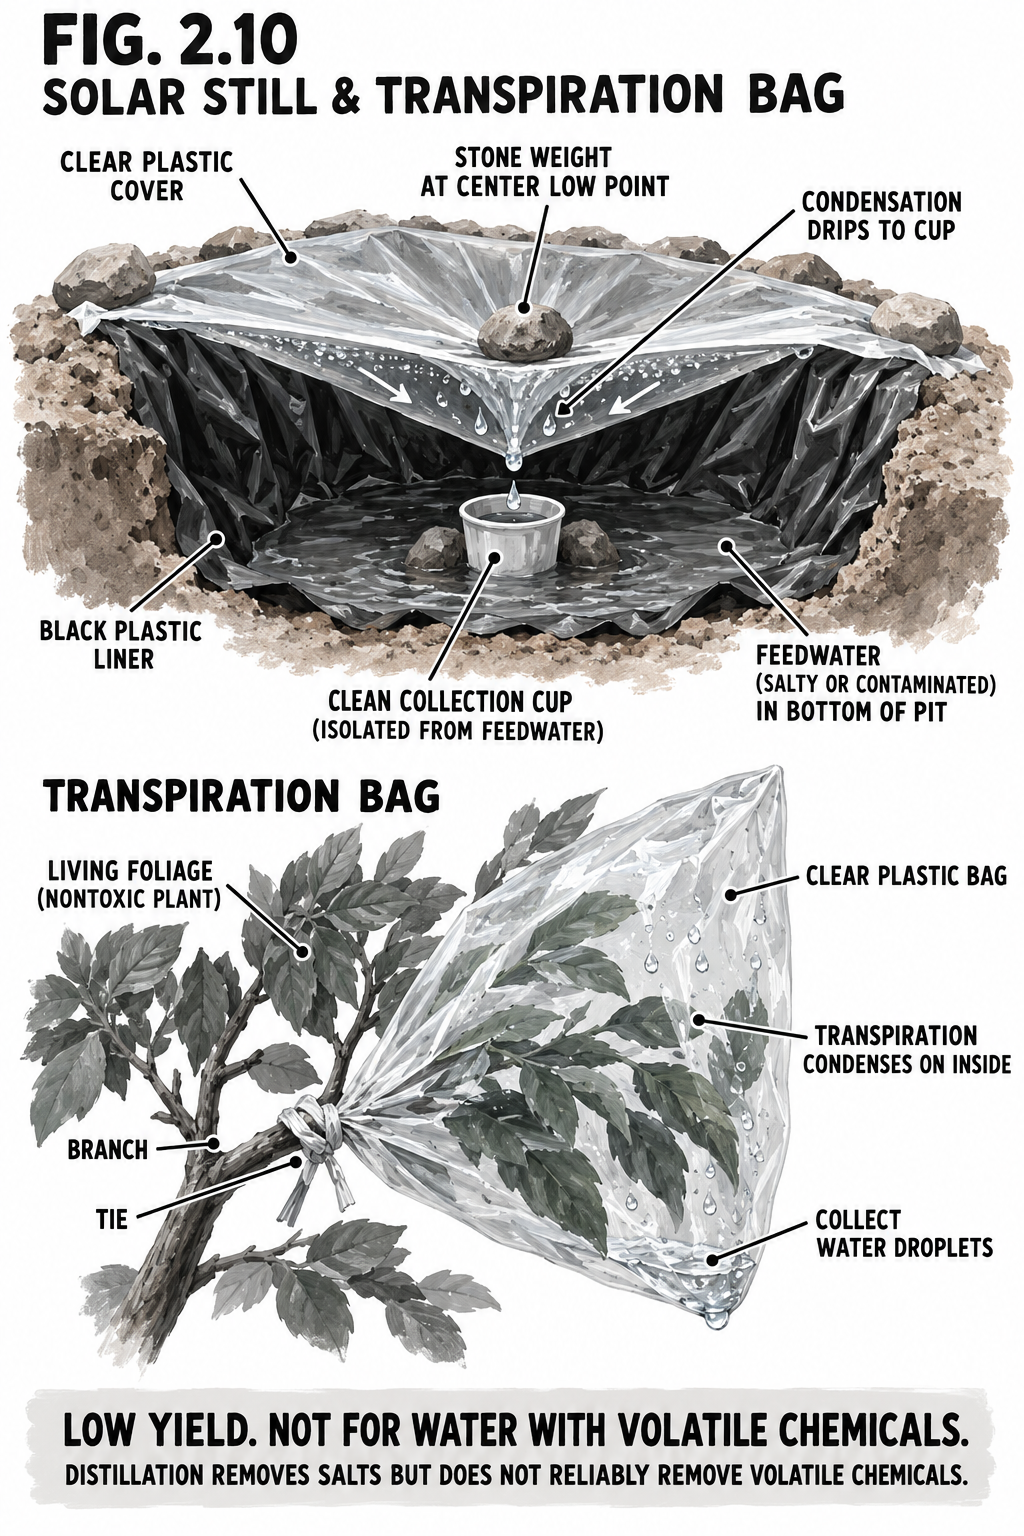
Solar Still & Transpiration Bag
Sunlight distills dirty, salty, or questionable water into clean drops.
DifficultyBeginner
TimeHours (slow yield)
CostNear zero
SkillsBasic
Why it is worth it
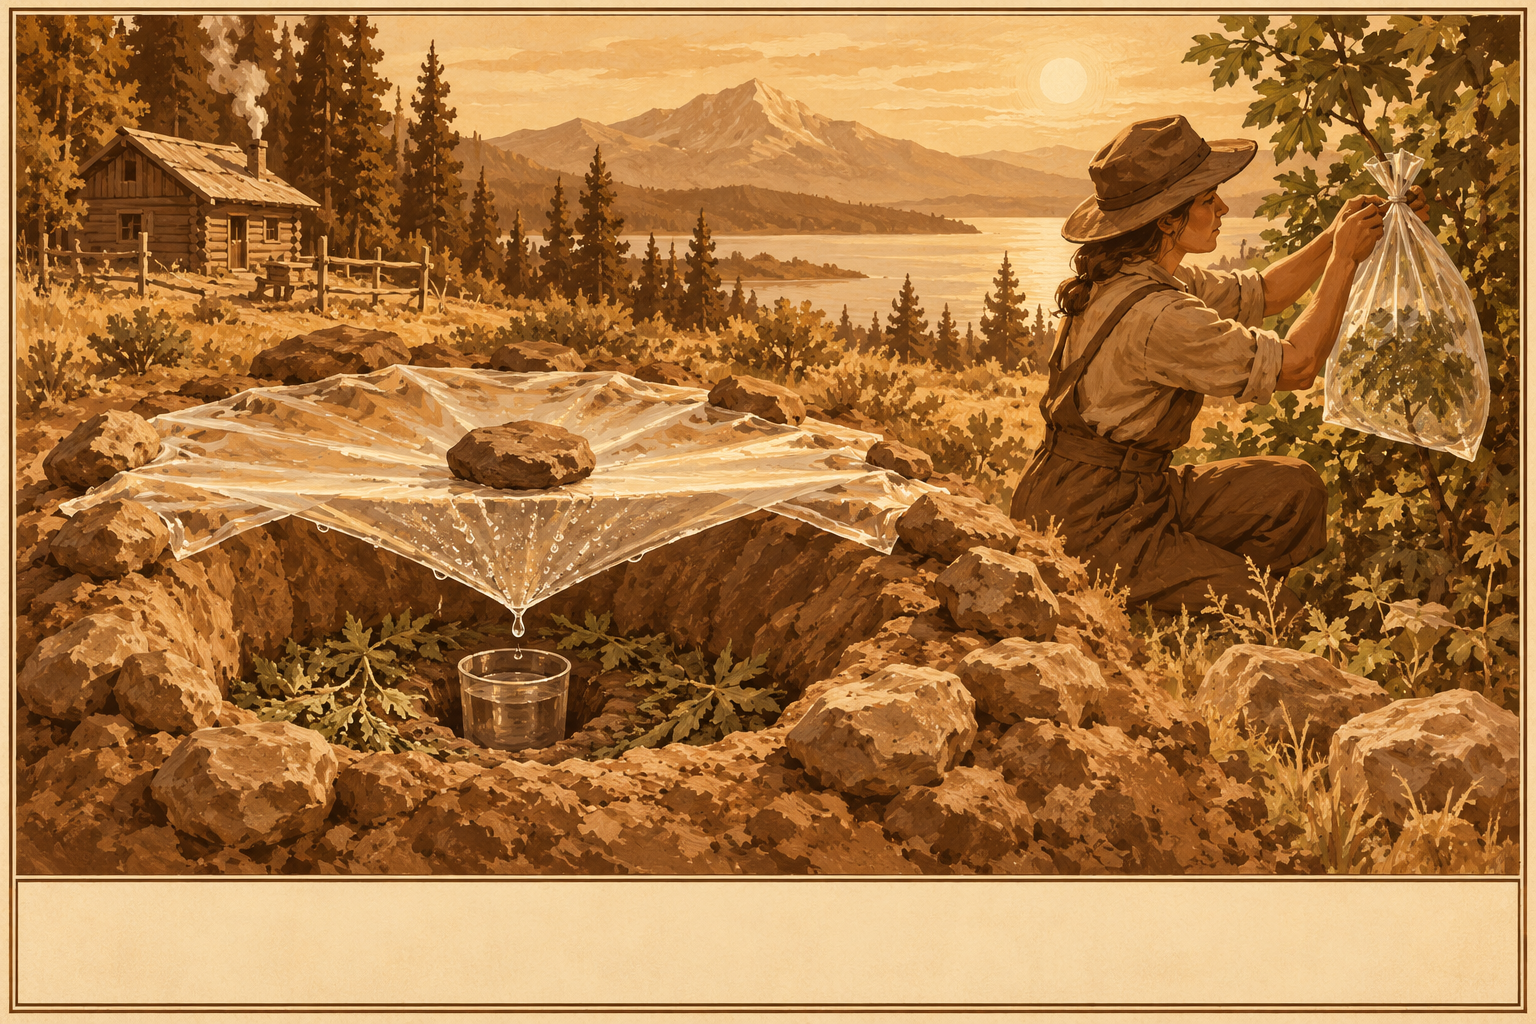
A solar still is distillation with no moving parts: the sun evaporates water from a pit of damp soil, green plants, or even salt or foul water, and it condenses as pure droplets on a clear cover sloped to a clean cup. It leaves behind the salt, the mud, and most contaminants. A transpiration bag does the same trick using a living branch as the water pump. Yield is low, so this is an emergency and polishing method, not your main supply.
Materials & tools
Clear plastic sheet or bag
Catch container (clean cup)
Small stone (center weight)
Dark pit liner (optional)
Green vegetation or the source water
Step by step
Dig a pit in sun; set a clean cup in the center, and add green matter or the dirty/salty water around it.
Stretch a clear sheet over the pit, seal the edges with soil, and set a small stone at the center so condensate runs to the low point above the cup.
Let the sun work; collect the clean water that drips in.
Transpiration bag: tie a clear bag over a leafy, non-toxic branch in sun; its own moisture condenses inside.
Safety & code Distillation removes salt, heavy metals, and microbes, which makes this the right tool for brackish or suspect water, but only use non-toxic plants for a transpiration bag (some plants give off harmful compounds). Keep the collection cup and cover clean. Do not rely on a still for daily volume; it is a trickle.
Tips & variations A black liner heats the pit faster. Several small stills beat one big one. This is also the way to make salt-free water from seawater or to reclaim a batch of greywater for emergencies.
Ceric's HomesteadWater · Greywater
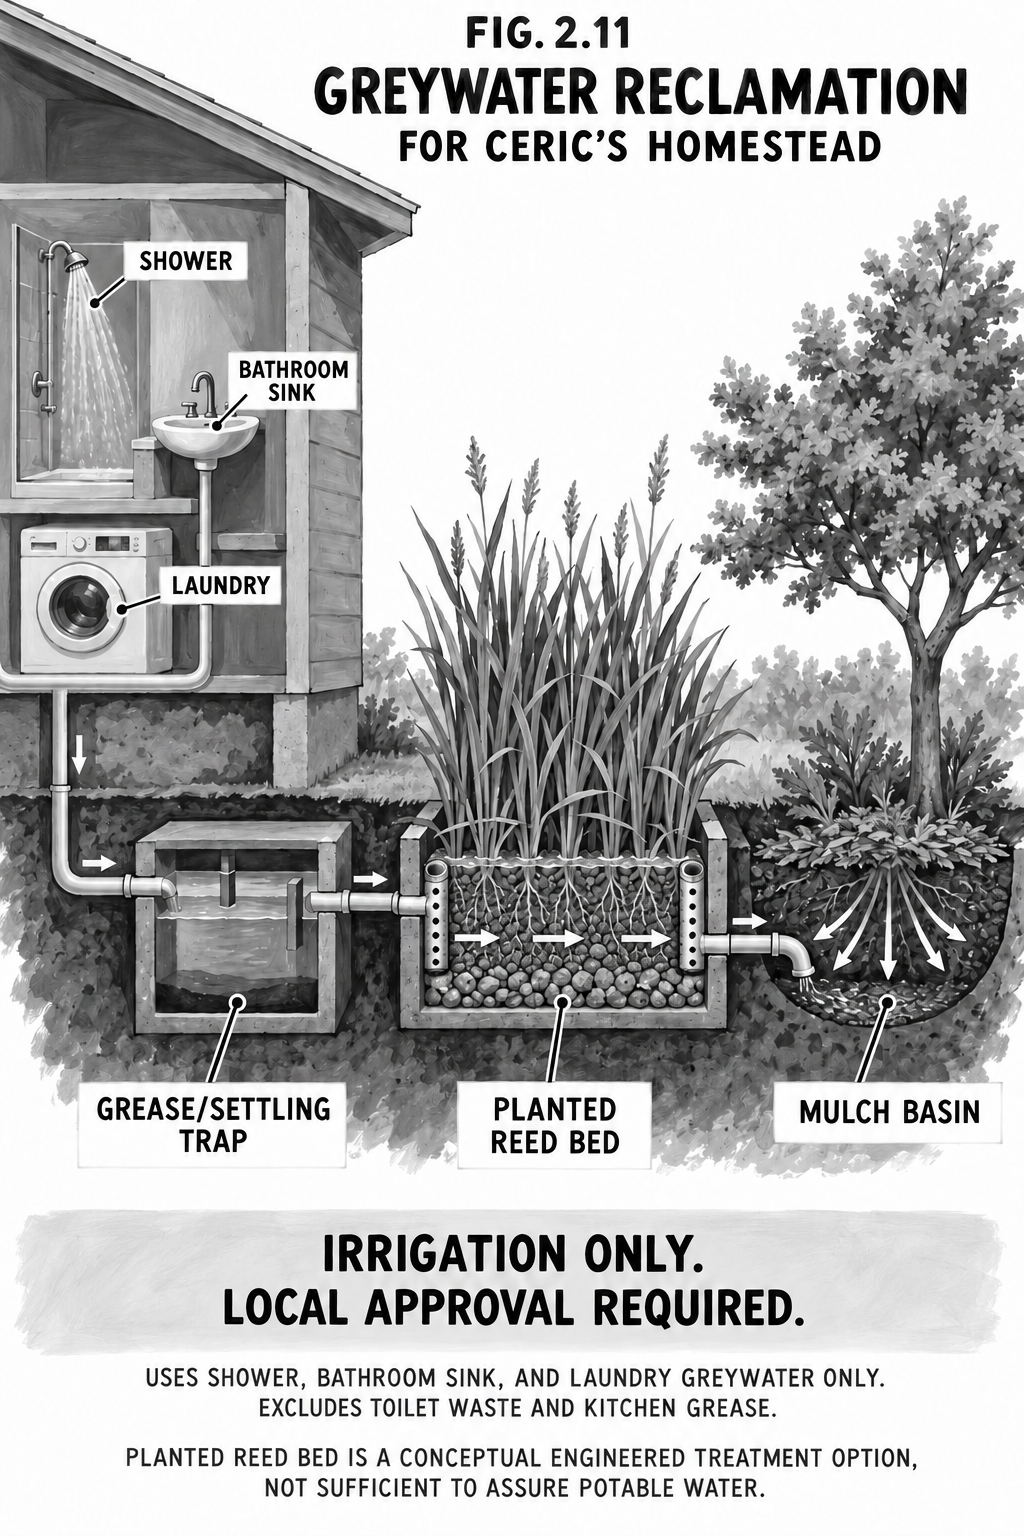
Greywater Reclamation
The water you already used can water the orchard before it hits the ground.
DifficultyIntermediate
Time1–2 days
Cost$60–$300
SkillsPlumbing + digging
Why it is worth it
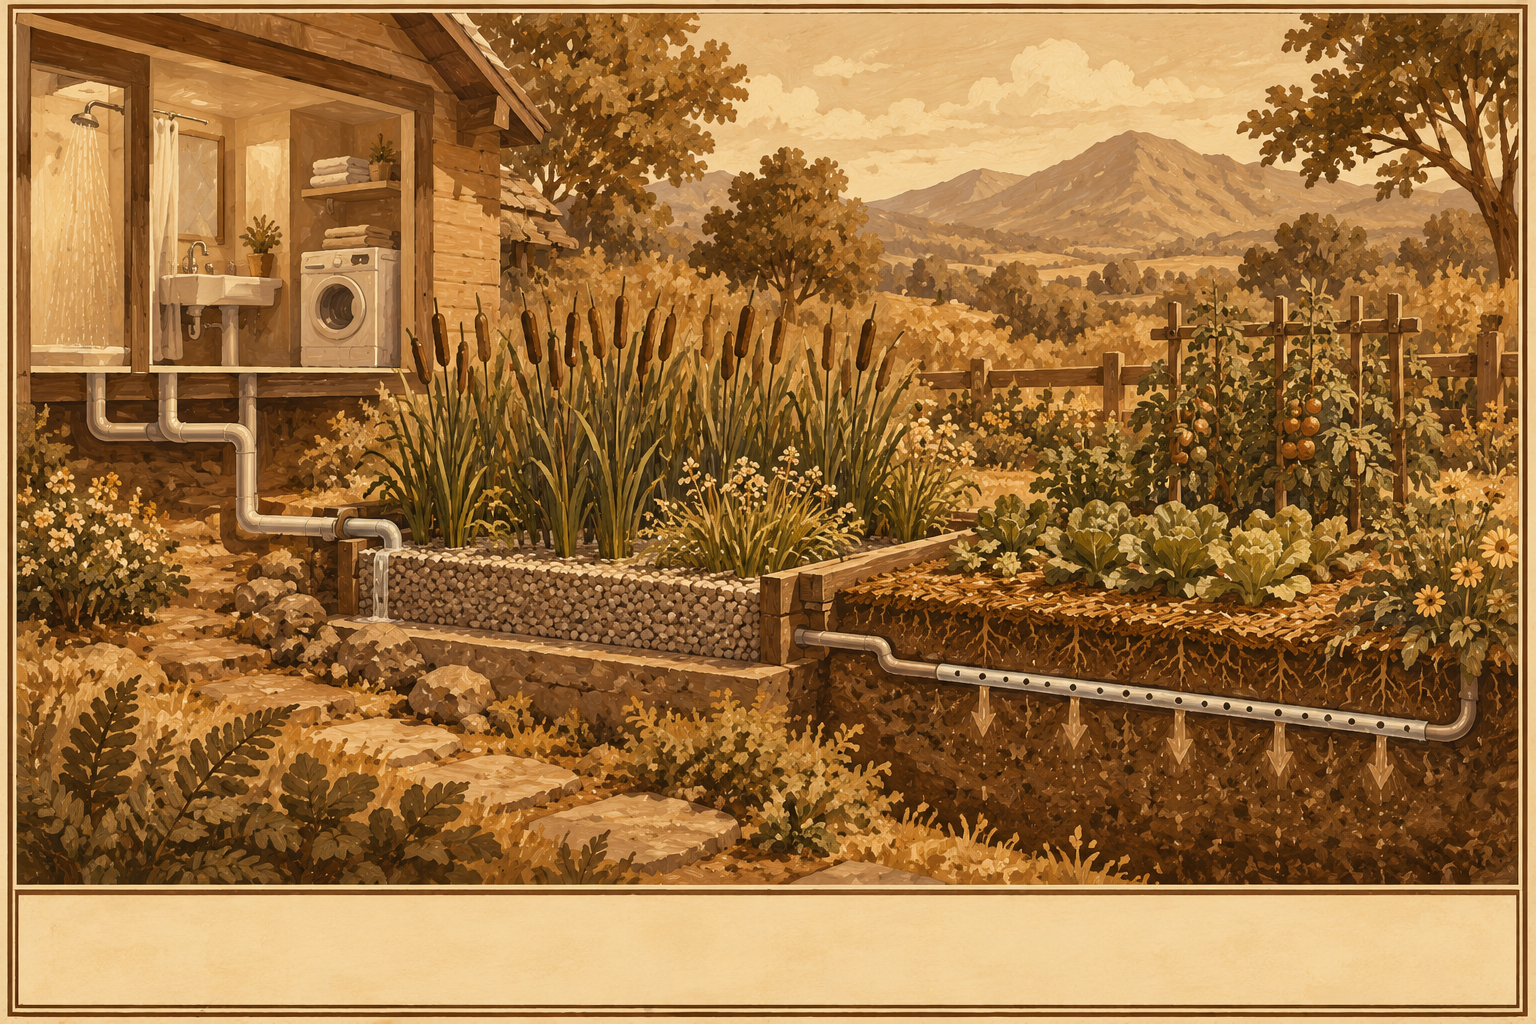
Every shower and sink sends gallons of lightly used water down the drain. Routed to the landscape instead, that greywater irrigates trees and beds and cuts your fresh-water draw hard. The two clean approaches are a branched-drain to mulch basins (gravity-fed, water straight to the root zone) and a planted gravel reed bed that polishes the water as reeds and microbes feed on it.
Materials & tools
Greywater pipe from sinks/shower/laundry
Grease/lint settling trap
Gravel + wetland plants (reed bed)
Double-ell or distribution fittings
Mulch for basins
Step by step
Separate greywater (sink, shower, laundry) from blackwater (toilet) at the drains.
Pass it through a simple grease and lint trap.
Branched drain: split the flow with double-ells to several mulch basins at trees, water released under the mulch.
Reed bed: run it through a gravel bed planted with cattails/reeds, then out to the garden.
Keep it moving; do not store raw greywater.
Safety & code Greywater is for irrigation, never drinking, and never store it (it turns septic and smells within a day). Keep kitchen grease and any toilet water out. Use plant-safe, low-sodium, boron-free soaps. Do not surface-spray it or put it on root crops you eat raw. Greywater reuse is regulated in many states, so check the rules.
Tips & variations A laundry-to-landscape line off the washer is the easiest legal starter in most places (no cutting house plumbing). Fruit trees love it.
Ceric's HomesteadWater · Condensate
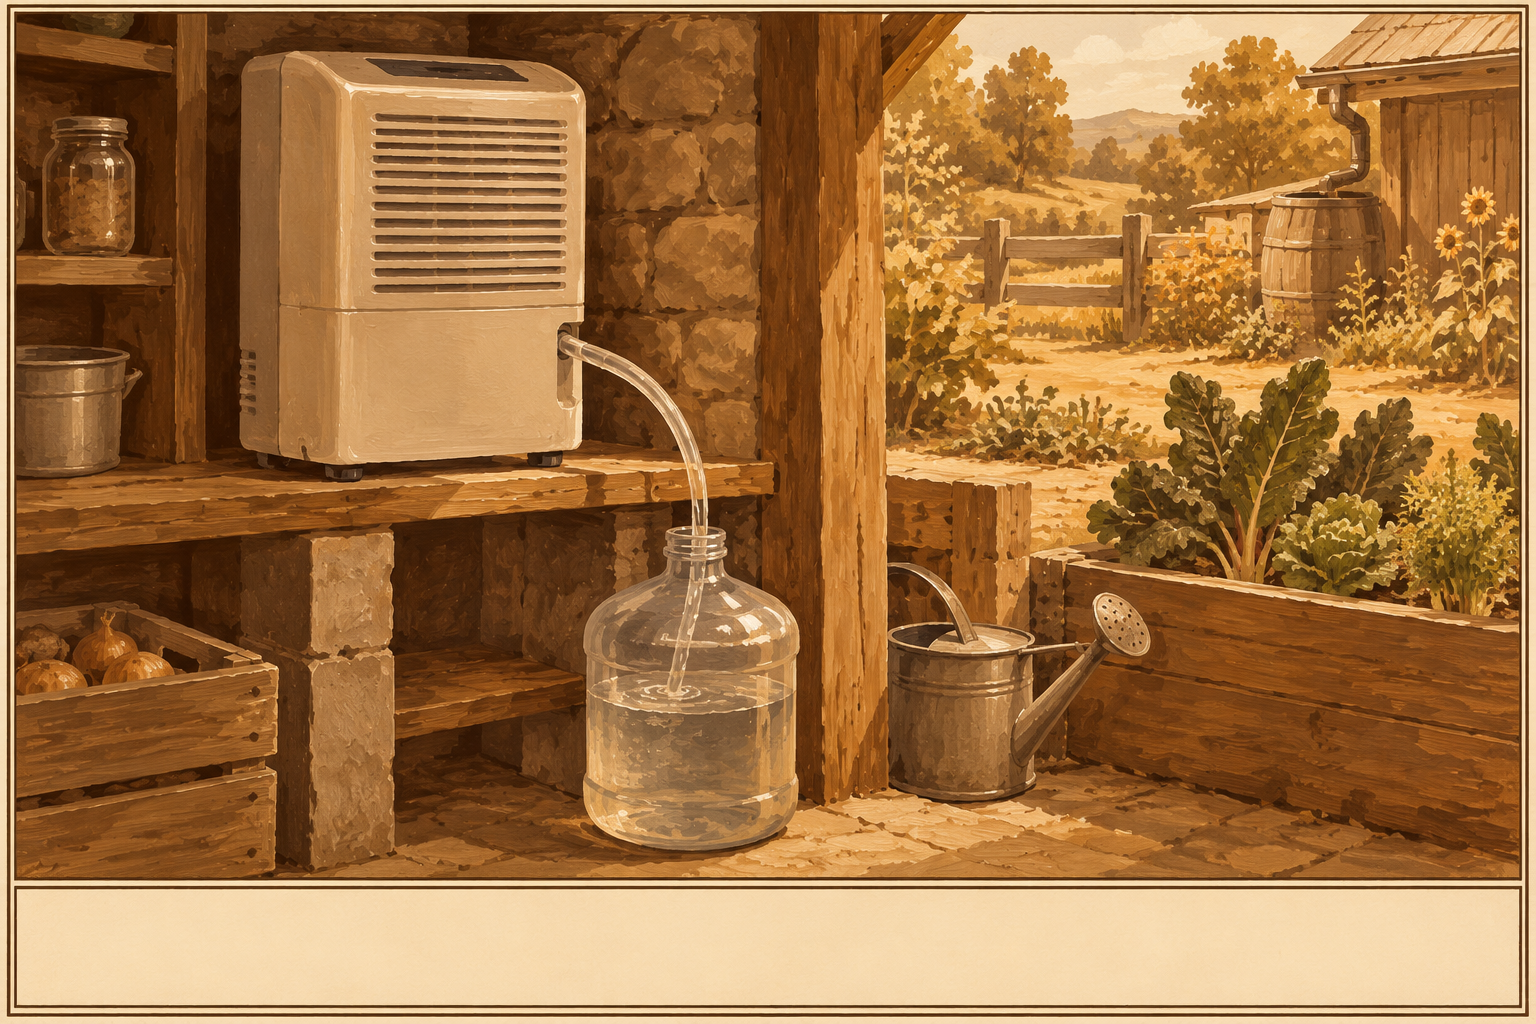
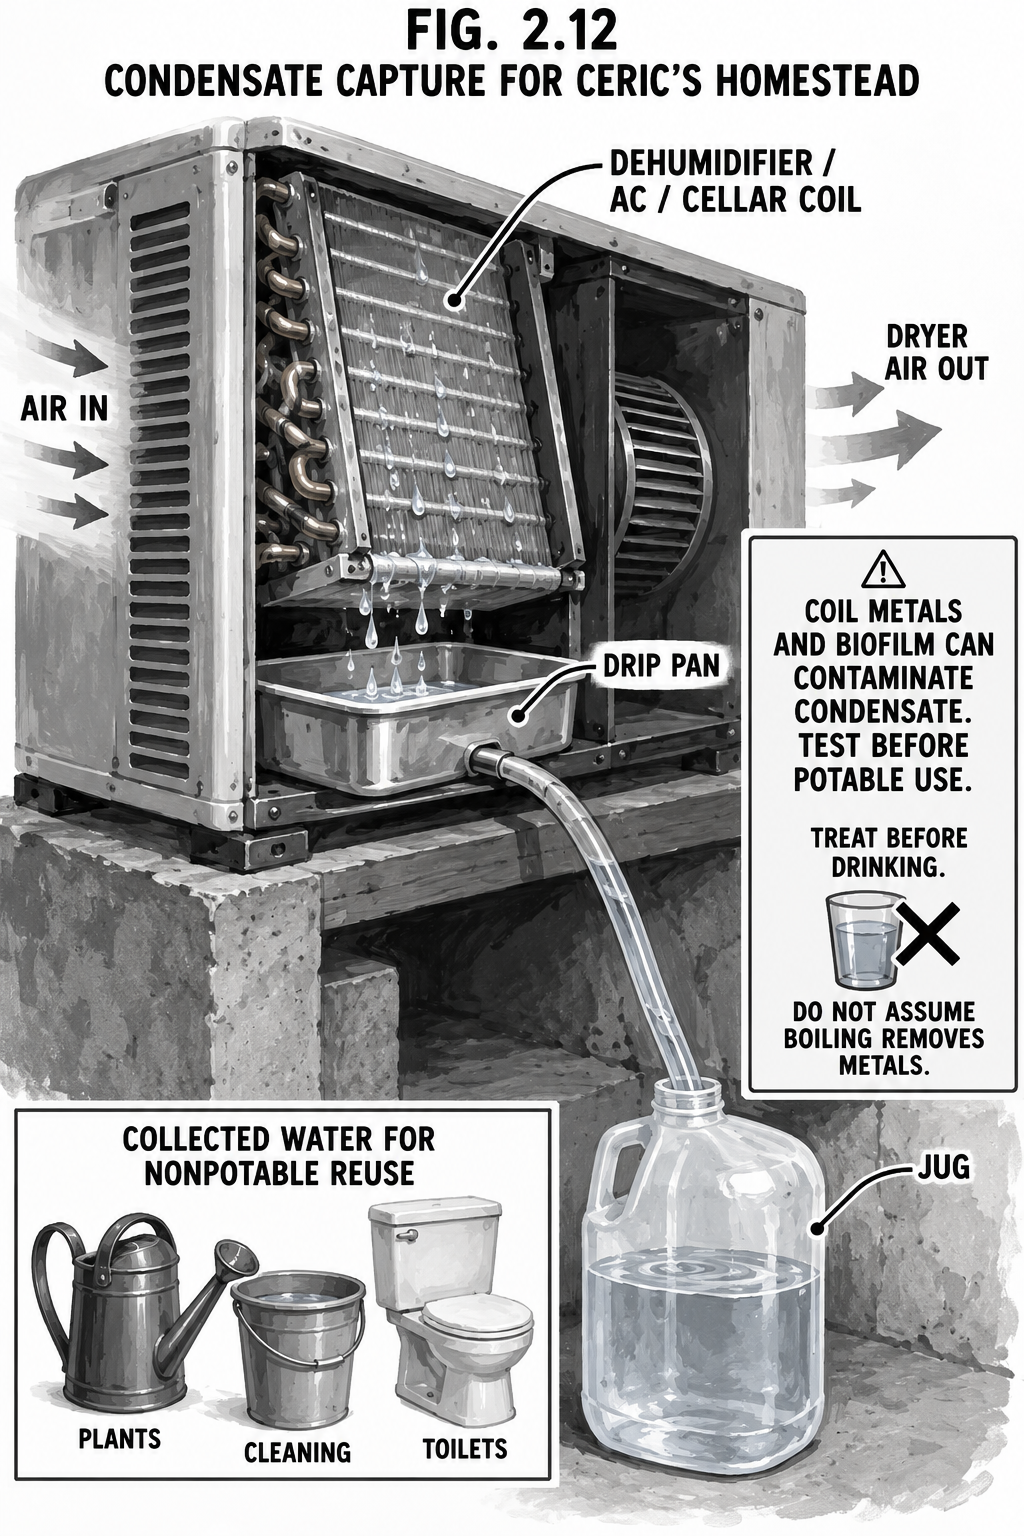
Condensate Capture
Your dehumidifier and cold surfaces are quietly making water. Catch it.
DifficultyBeginner
TimeMinutes
CostNear zero
SkillsBasic
Why it is worth it
Anything cold pulls water out of humid air. A dehumidifier running in a damp cabin, an air conditioner, or the cold coil and walls of a root cellar all drip condensate, and in a muggy climate that can add up to gallons a day you were already going to produce. It is free and, in terms of minerals, nearly distilled.
Materials & tools
Drip pan / funnel
Hose or tubing
Covered jug or tank
(Optional) float switch to a bigger tank
Step by step
Find your condensate sources: dehumidifier drain, AC condensate line, cellar coil or cold wall.
Route the drip through a funnel and tube into a covered container.
Keep it covered and cool so it does not grow anything.
Treat before any drinking use (see below).
Safety & code Condensate is mineral-free but NOT safe to drink as-is: it drips over metal coils and plastic pans that shed metals and grow biofilm and Legionella risk. Treat it (boil, UV, or filter) before drinking, or use it as-is for plants, flushing, and washing. Being distilled, it is flat and mineral-poor, so it is not ideal as your sole drinking water long term.
Tips & variations Condensate is perfect for topping off batteries (it is like distilled water) and for houseplants. Plumb the dehumidifier straight to a tank and it fills itself.
Ceric's HomesteadWater · Treatment
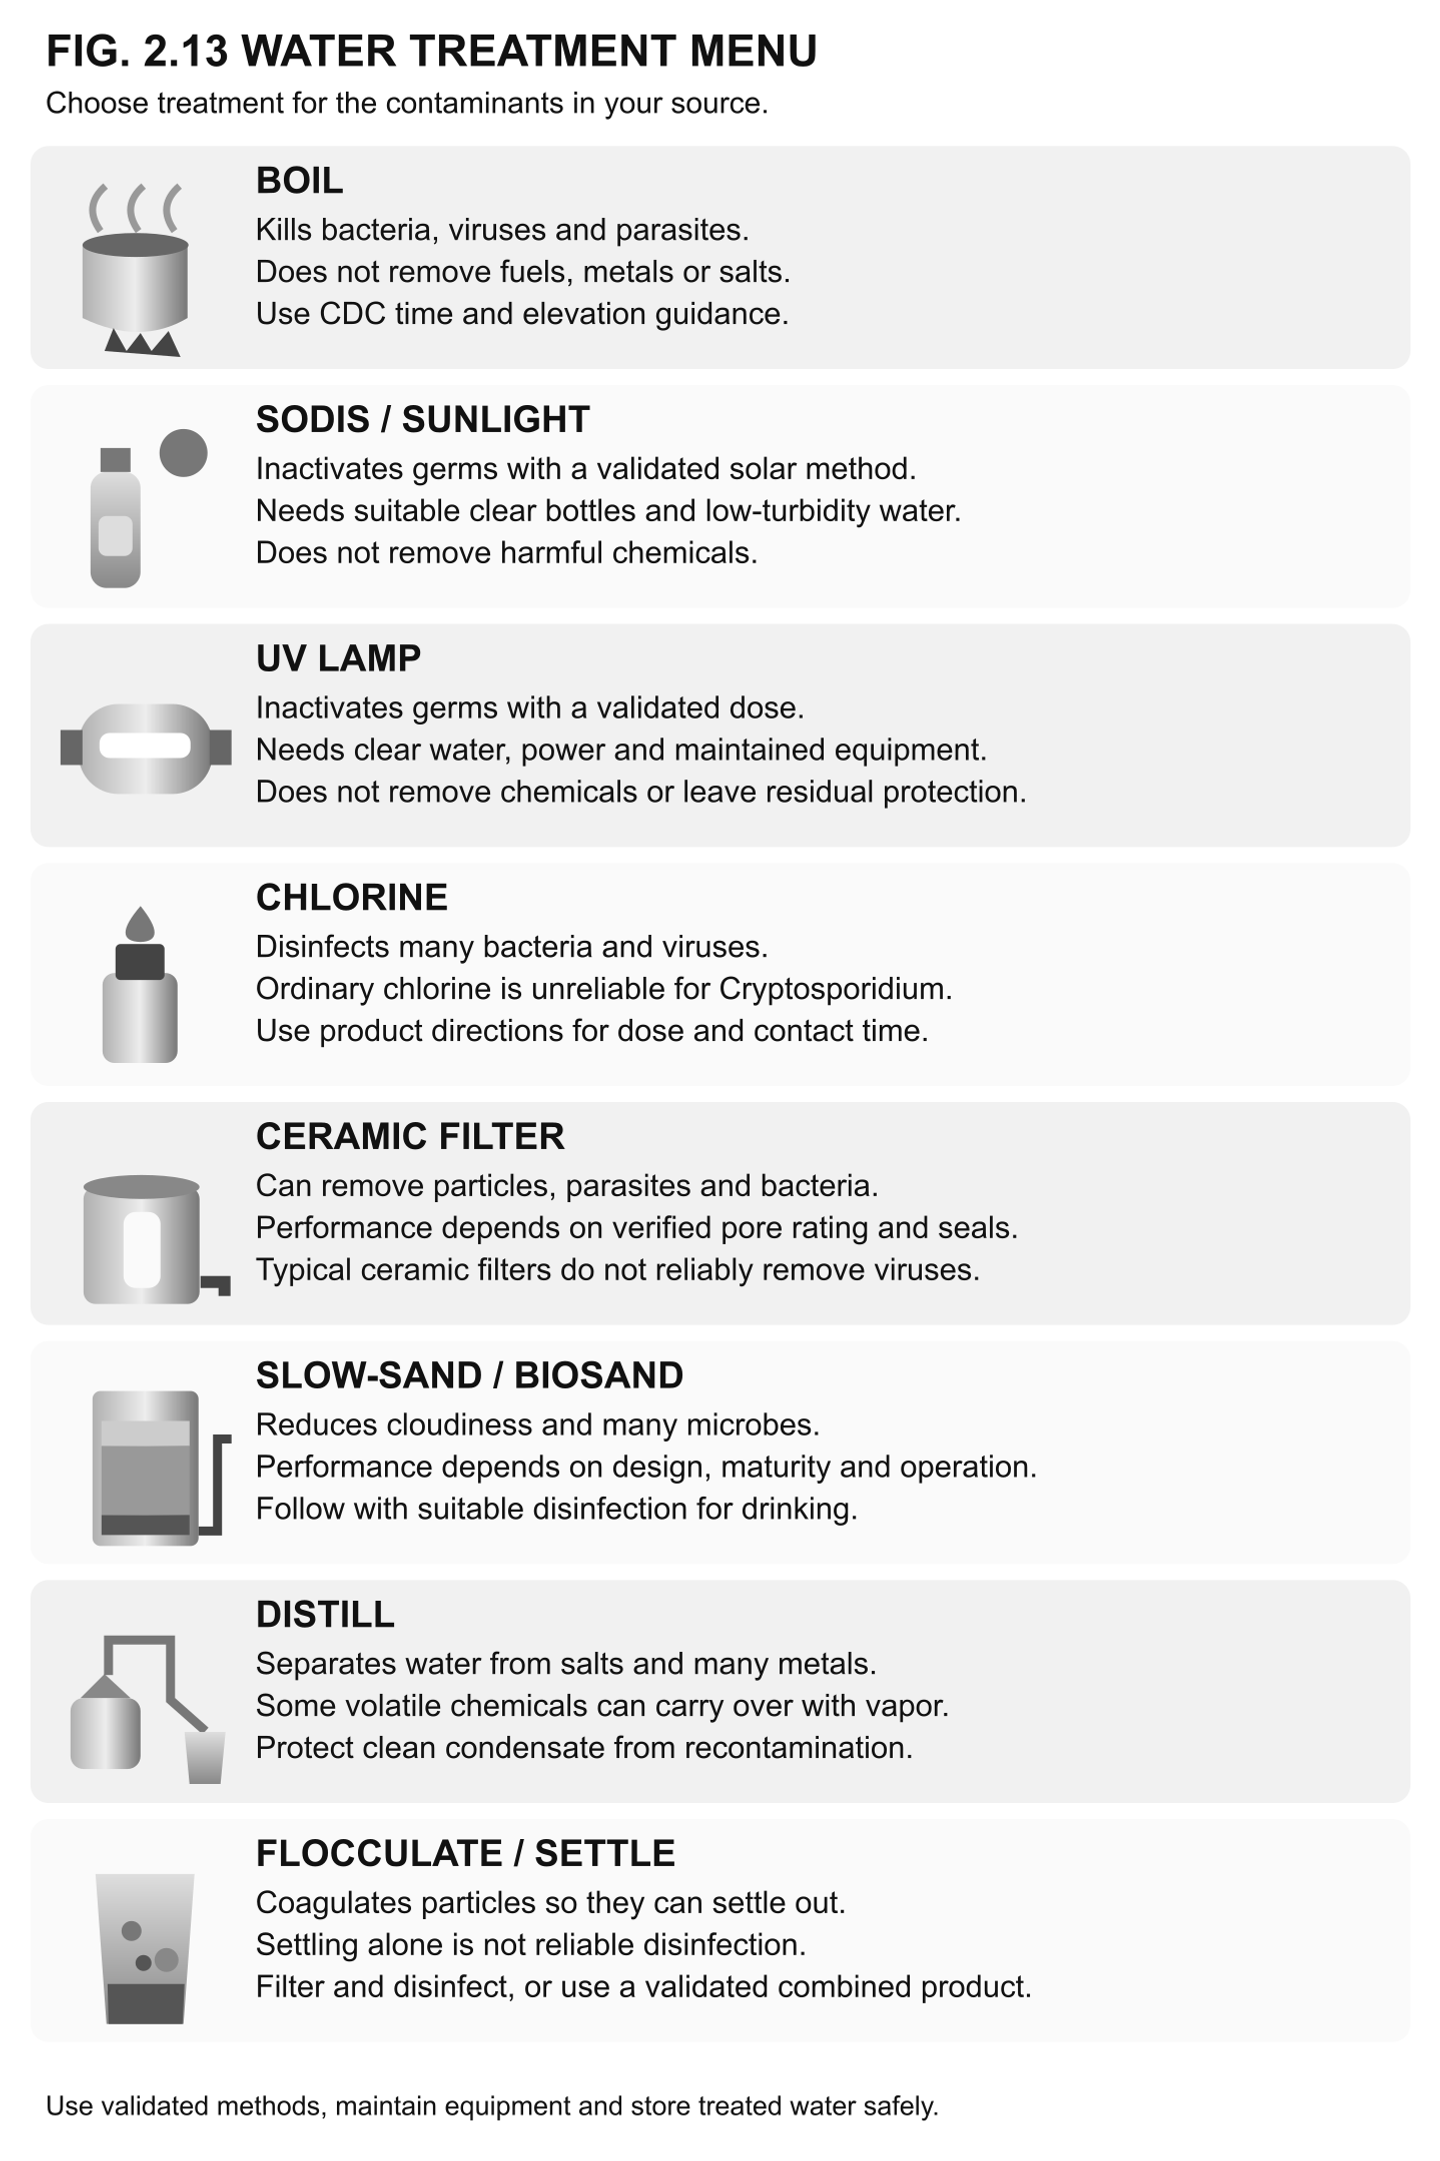
Making It Safe: The Treatment Menu
Harvesting is half the job. These are the ways to make any water drinkable.
DifficultyVaries
TimeVaries
CostVaries
SkillsBasic
Pick the right method (often two)
Settle & flocculate: let sediment drop, or stir in a pinch of alum to clump fine particles. First step for muddy water; removes turbidity, not pathogens.
Boil: a rolling boil for 1 minute (3 at high altitude) kills everything living. The gold standard; costs fuel, removes nothing chemical.
SODIS (solar): clear water in a clear PET bottle, 6 hours in strong sun (2 days if cloudy). UV plus heat kills microbes. Free, slow, needs clear water and sun.
UV lamp: fast microbe kill if you have power and pre-filtered clear water.
Chlorine: unscented bleach, ~2 drops per liter (4 if cloudy), wait 30 min. Shelf-stable and cheap; get the dose right.
Ceramic filter: pore-size filtration removes bacteria, protozoa, and turbidity; pair with disinfection for viruses.
Slow-sand / biosand: the living filter on the next page; great all-rounder, finish with disinfection.
Distillation: the only method that removes salt, heavy metals, and chemicals (see 2.10); slow, low yield.
Safety & code No single method does everything: filters miss viruses, boiling misses chemicals, chlorine struggles with crypto. For sketchy water the safe recipe is clarify, then filter, then disinfect. Match the method to the threat, and when in doubt, boil.
Tips & variations Keep a shelf-stable backup (bleach or tablets) for when the power and the sun both fail. Store treated water separately from raw so you never mix them up.
Ceric's HomesteadWater · Slow-Sand Filter
Slow-Sand Water Filter
A barrel of sand that grows its own living filter. Old technology, still undefeated.
DifficultyIntermediate
Time1 day + 3 wk ripen
Cost$40–$120
SkillsBulkhead plumbing
Why it is worth it
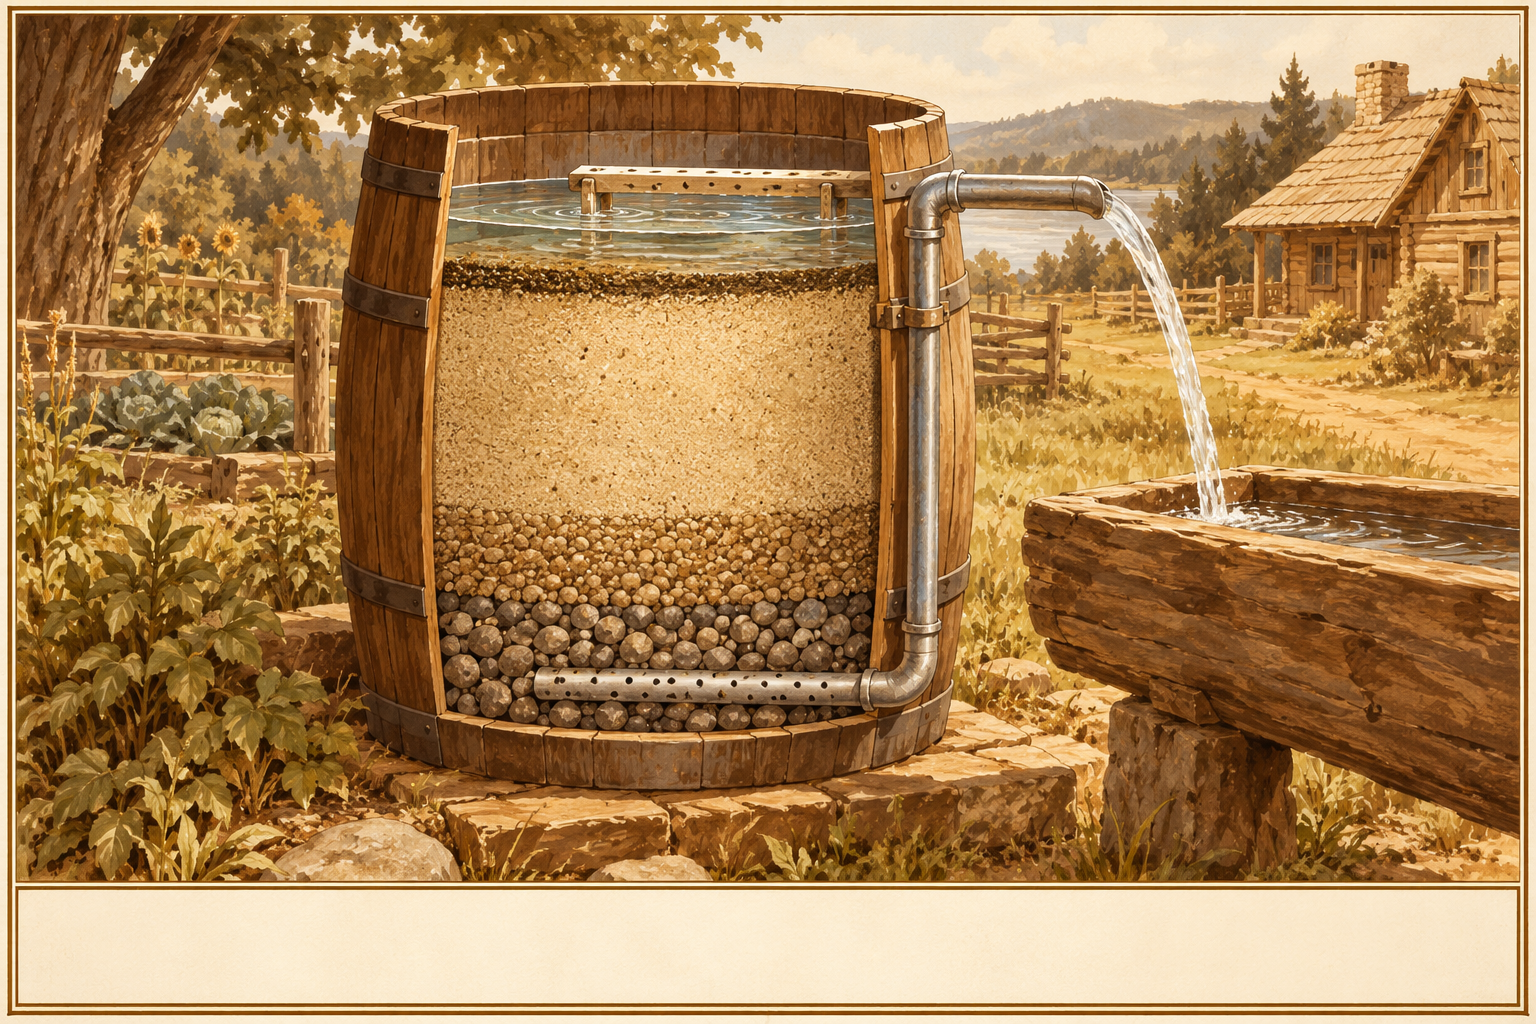
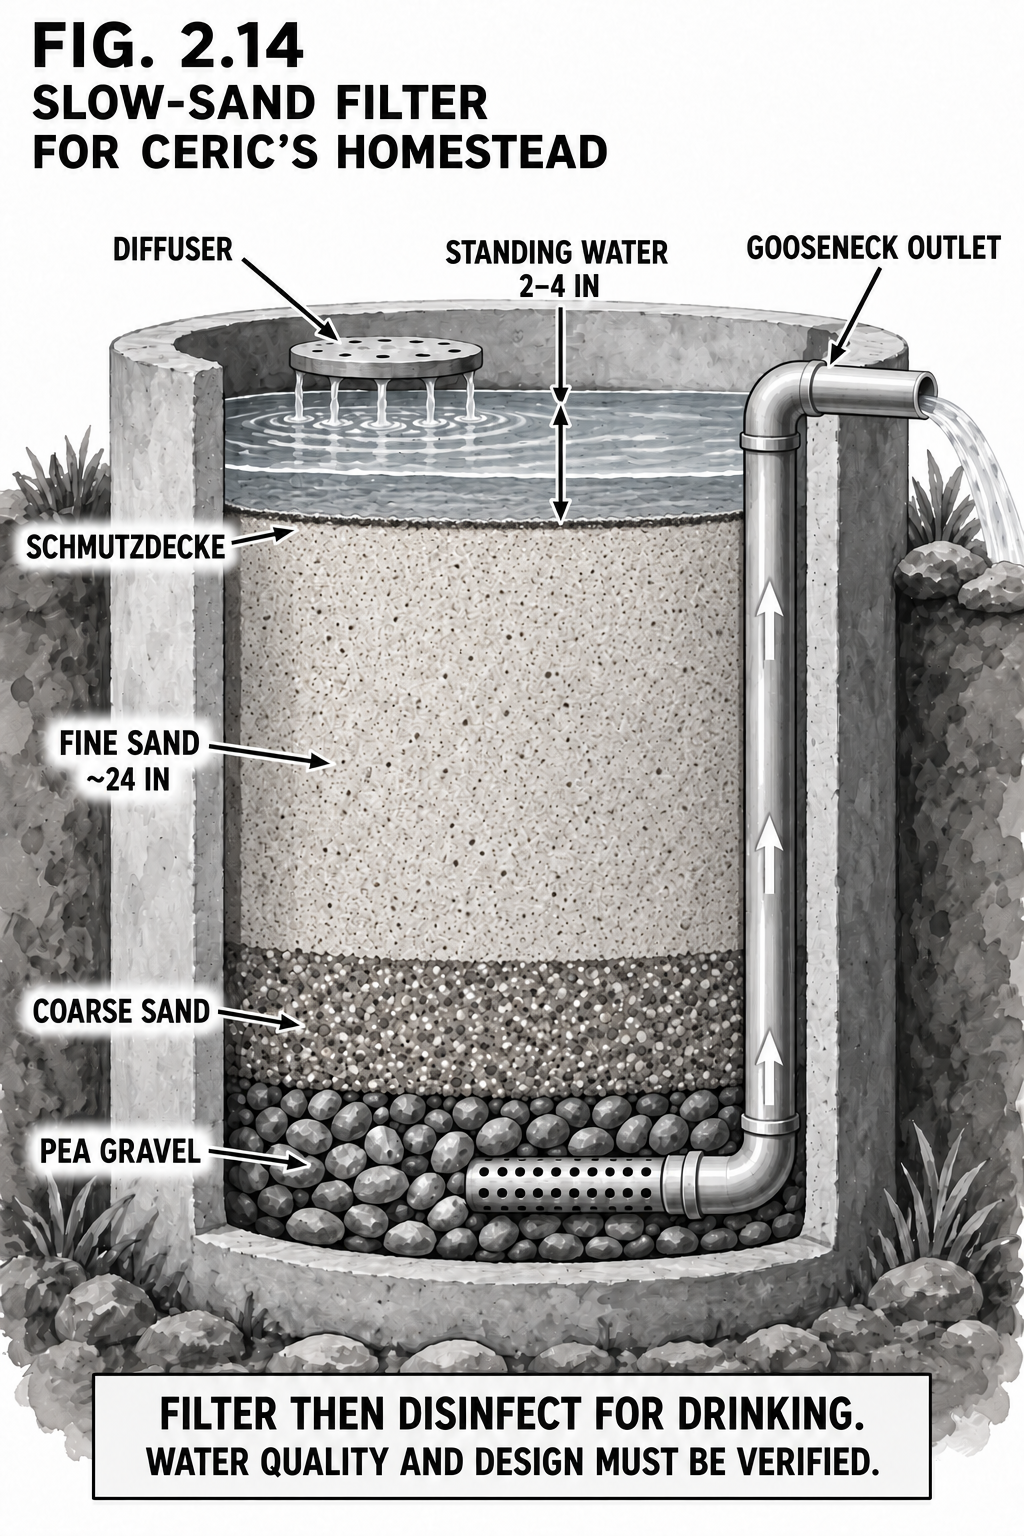
A slow-sand filter is not a sieve, it is a living thing. As water trickles slowly through fine sand, a biological layer called the schmutzdecke grows on top: a mat of microbes that eat and trap pathogens and turbidity. Built and ripened right, it removes the large majority of bacteria and protozoa with no power and no cartridges.
Materials & tools
Food-grade barrel
Fine washed sand (sharp)
Coarse sand
Pea gravel
Bulkhead + outlet pipe
Elbows for a gooseneck
Diffuser plate
Step by step
Wash the sand until the rinse runs clear.
Fit a low bulkhead and plumb the outlet up into a gooseneck whose top sits a few inches above the sand, so water always covers the sand.
Layer: ~4 in gravel, ~2 in coarse sand, then ~24 in fine sand.
Set a diffuser plate on the sand so inflow does not crater the biolayer.
Keep 2 to 4 in of standing water above the sand at all times.
Run it slowly; ripen 2 to 4 weeks before the output is safe.
When flow drops, skim only the top centimeter and let it re-ripen.
Safety & code A slow-sand filter greatly reduces pathogens but is NOT a guarantee of potability alone: finish drinking water with a boil, UV, or chlorination. Never let it dry out (it kills the biolayer). Do not drink the output during the 2 to 4 week ripening. Sand will not remove chemical contamination, so protect the source.
Tips & variations Feed it the pre-filtered rain from 2.1 for a clean two-stage system. Mark the gooseneck height before you glue it: that one measurement sets the water level.
Ceric's HomesteadWater · Storage
Storing It: Cisterns & Pressure
Water you cannot keep is water you do not have. Store smart, pressurize for free.
DifficultyVaries
Time1–3 days
Cost$100–$2,000
SkillsSiting + plumbing
Why it is worth it
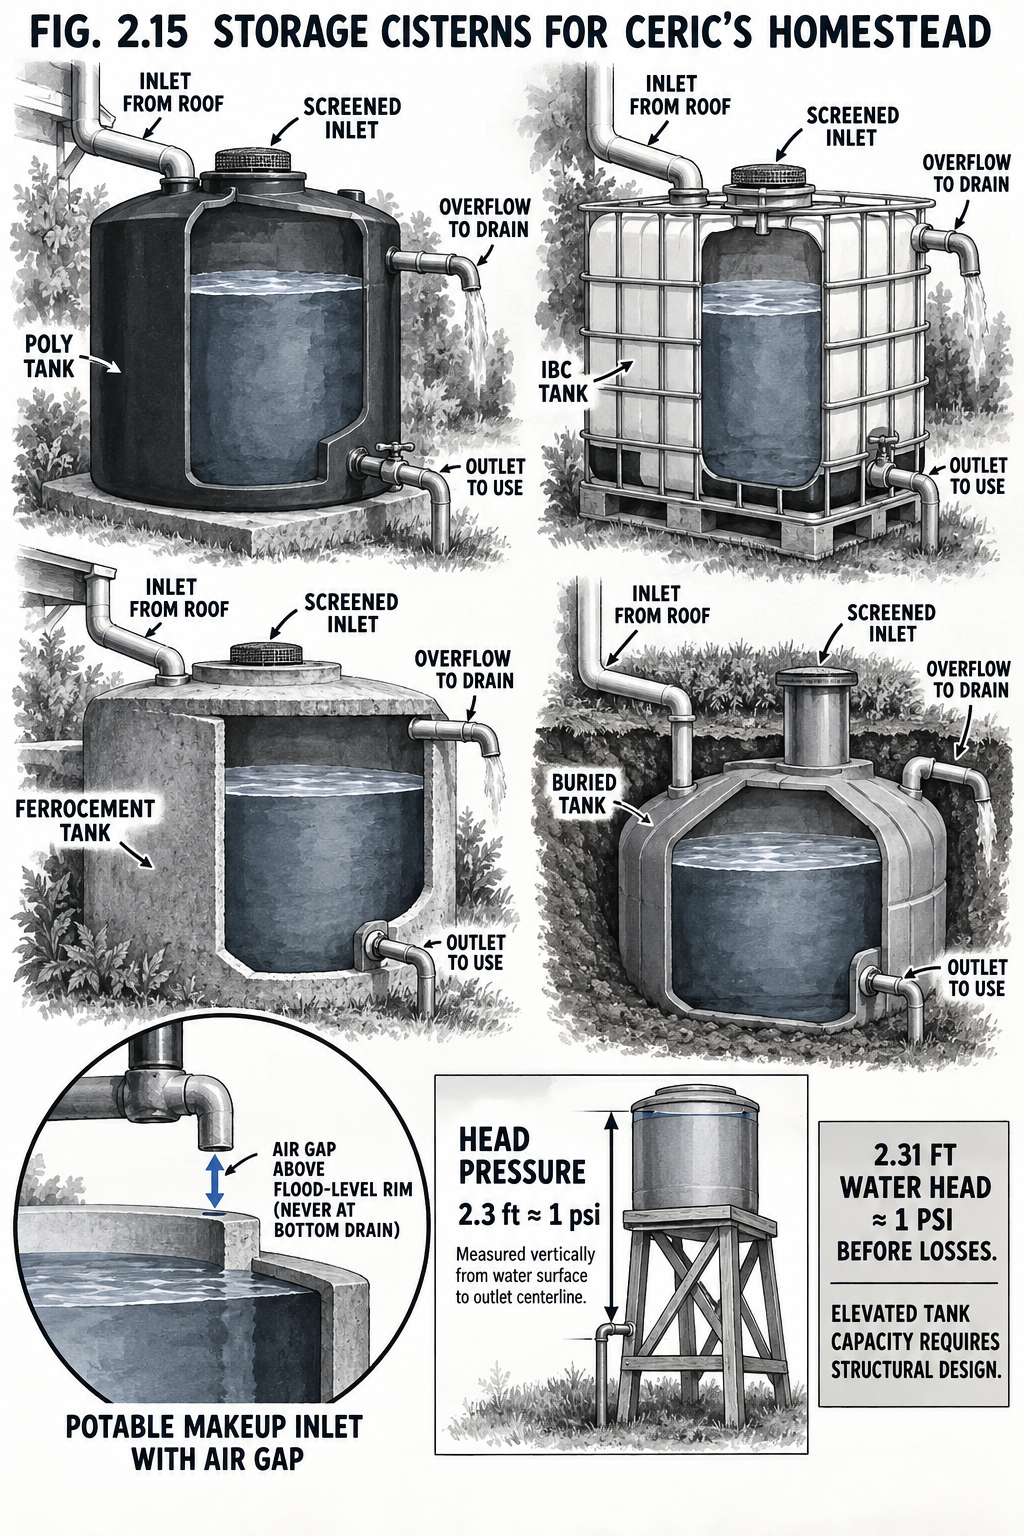
Every source above is only as good as where you keep the water. The homestead rule is store more than you think: a long dry spell or a frozen source is survived out of the tank. And if you set the tank uphill, gravity gives you household pressure for nothing: about 1 psi for every 2.3 feet of height.
Tank choices
Poly tank: cheap, easy, opaque; the default. Get food-grade and dark.
IBC tote (275 gal): best bang for the buck; shade it (the cage lets light in).
Ferrocement: big, permanent, built in place; the homestead classic for thousands of gallons.
Buried cistern: freeze-proof and cool, but needs a pump or a low draw point.
Set it up right
Build a dead-level, load-rated base (water is 8.3 lb per gallon).
Keep every tank opaque and screened against light, bugs, and critters.
Fit a high overflow and a low drain/cleanout.
Put the tank uphill of the house for gravity pressure, or add a small pump + pressure tank.
Safety & code A full tank is enormously heavy and will crush a weak stand or person, so engineer the base. Keep stored drinking water covered, dark, and screened, and turn it over regularly. Separate potable from non-potable tanks and label them. Elevated tanks must be braced for wind and, in some areas, seismic.
Tips & variations Several linked tanks beat one giant one (redundancy + you can clean one at a time). A small pressure tank plus a DC pump gives steady house pressure without a tower.