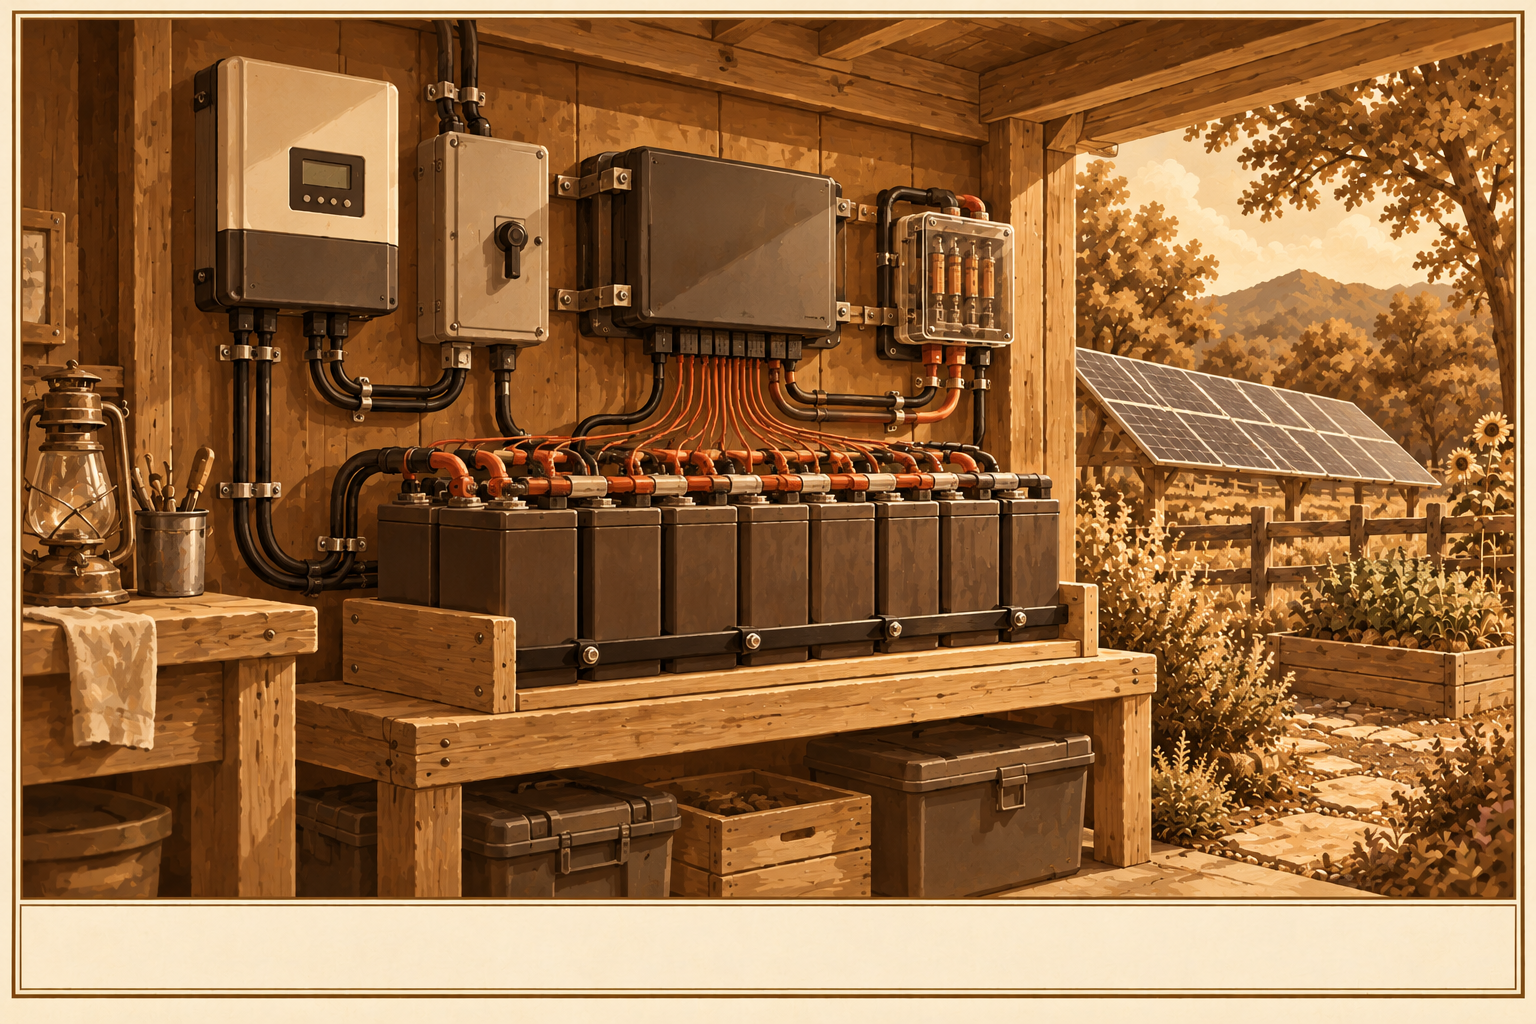
Off grid does not mean without power. It means you make it, store it, and spend it deliberately. This chapter is every honest way to generate electricity on a homestead, every way to store it, and how to wire it so it is safe. Respect the current: electricity does not forgive carelessness.
Power · GenerationSolar PV
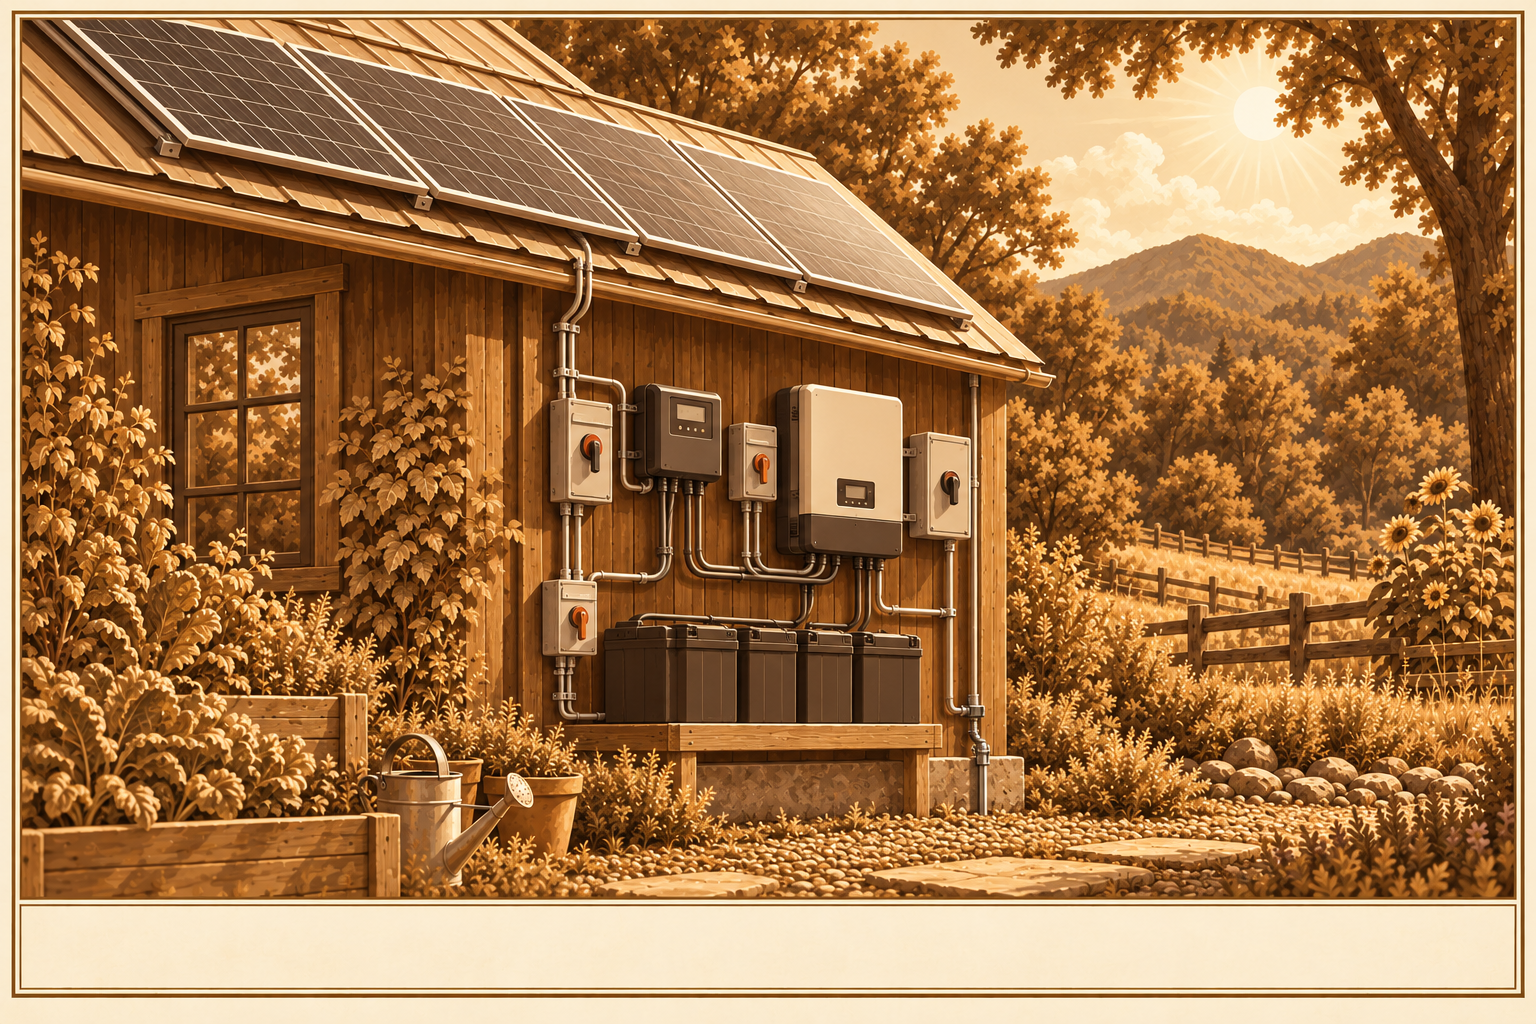
Solar Photovoltaic Array
Silent, no moving parts, and the fuel falls on you for free.
DifficultyIntermediate
TimeDays
Cost$$–$$$
SkillsDC wiring
Why it is worth it
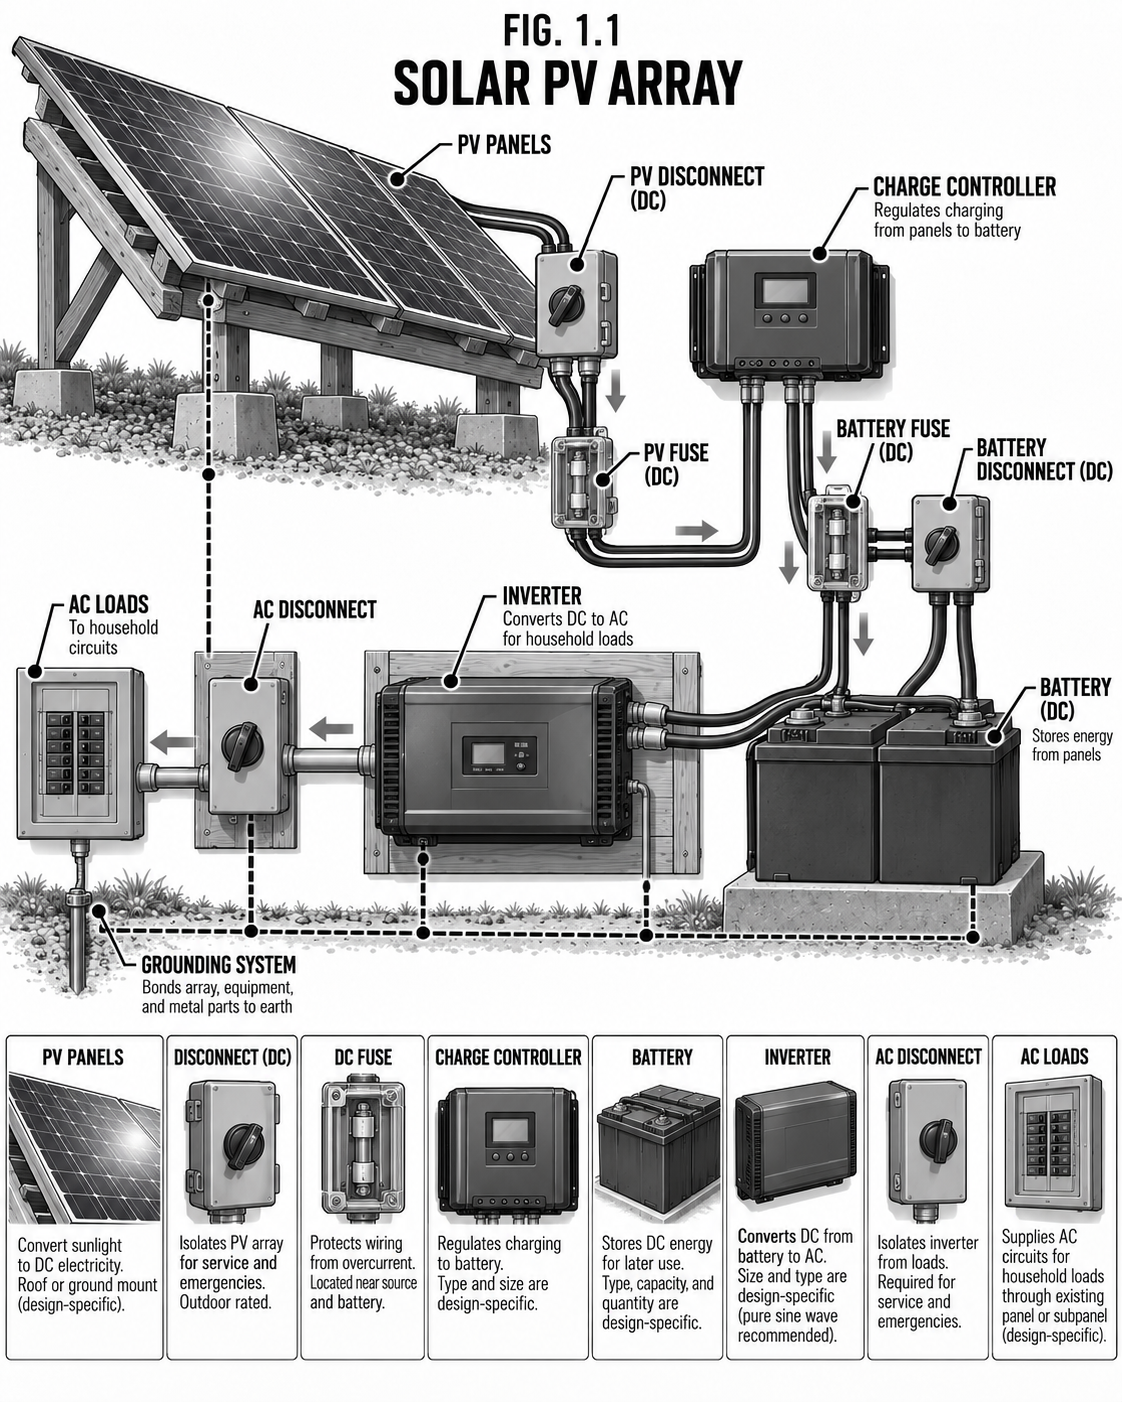
Panels turn daylight straight into DC electricity with nothing to wear out. For most homesteads solar is the backbone: pair it with a battery bank and you have power day and night. Size the array to your daily load (see 1.23), aim it toward the equator at roughly your latitude, and keep it clear of shade.
Materials & tools
PV panels
Racking / mounts
Charge controller (MPPT)
Fused DC combiner + disconnect
Correctly sized PV wire
Grounding lug + rod
Step by step
Size the array from your daily watt-hour budget and local sun-hours.
Mount facing the equator, tilted near your latitude, in full all-day sun.
Wire panels in series/parallel to hit the controller's voltage window.
Run through a fused DC disconnect to the charge controller, then to the battery.
Ground the frames and system per code; add surge protection.
Safety & code A PV array is LIVE whenever there is light: you cannot switch off the sun, so cover panels or work at night and treat every PV wire as energized. Fuse every ungrounded conductor, size wire for the current, use DC-rated disconnects, and bond grounds properly. DC arcs do not self-extinguish like AC. When in doubt, have the final hookup checked.
Tips & variations A little over-paneling beats an undersized array in winter. Ground mounts stay cooler (more output) and clean easier than roof mounts.
Power · GenerationSolar Tracker
Solar Tracking Mount
Follow the sun and wring more hours out of the same panels.
DifficultyAdvanced
TimeDays
Cost$$
SkillsMechanical + control
Why it is worth it
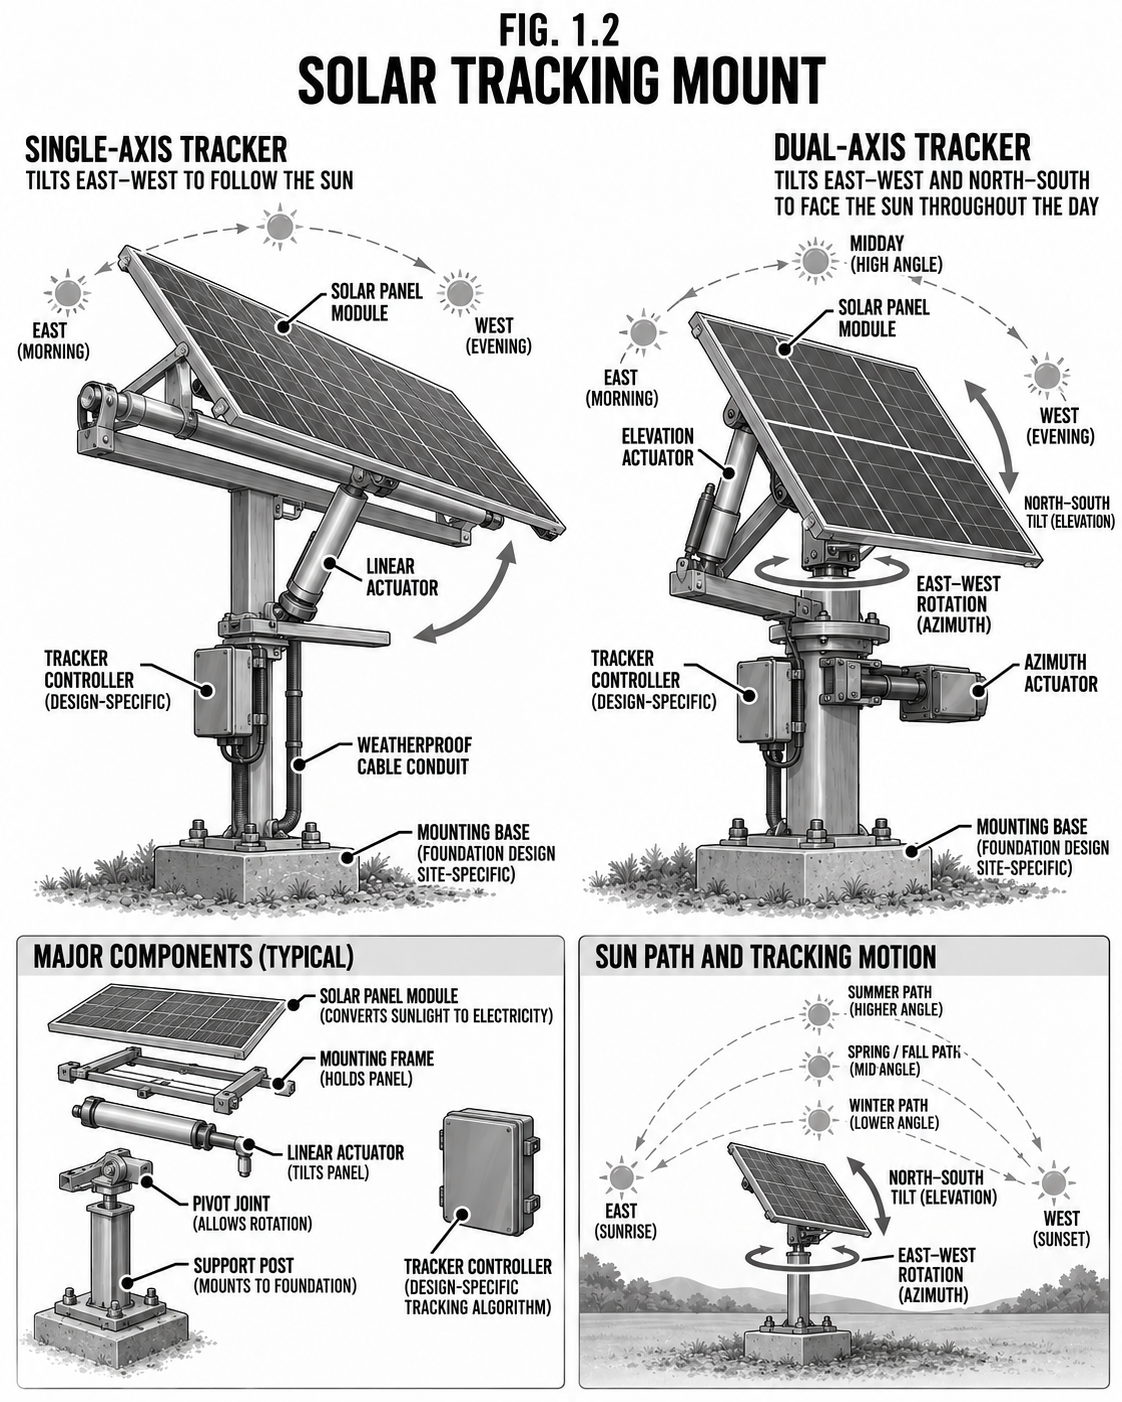
A fixed panel only faces the sun squarely for an hour or two. A tracker pivots the array to follow it, adding 25 to 45 percent more daily energy, most of it in the valuable morning and evening. A single-axis tracker follows east-to-west; dual-axis also adjusts for the seasonal height of the sun.
Step by step
Build a balanced pivot frame that carries the array's weight and wind load.
Drive it with a linear actuator (active) or a passive gas-charged tracker.
Control with a light-seeking sensor or a timed program.
Set wind-stow limits so storms lay it flat.
Safety & code Trackers are heavy moving machines: keep hands and children clear of pinch points, and build a wind-stow mode or a strong gust will tear a tracking array apart. More parts means more failure points, so a tracker earns its keep only in good sun and reliable builds.
Tips & variations In cloudy northern winters, fixed-plus-extra-panels often beats a tracker. Passive trackers need no power but move sluggishly in cold.
Power · GenerationWind (HAWT)
Horizontal-Axis Wind Turbine
When the sun is down and the wind is up, the propeller keeps the lights on.
DifficultyAdvanced
TimeDays+
Cost$$–$$$
SkillsRigging + DC
Why it is worth it
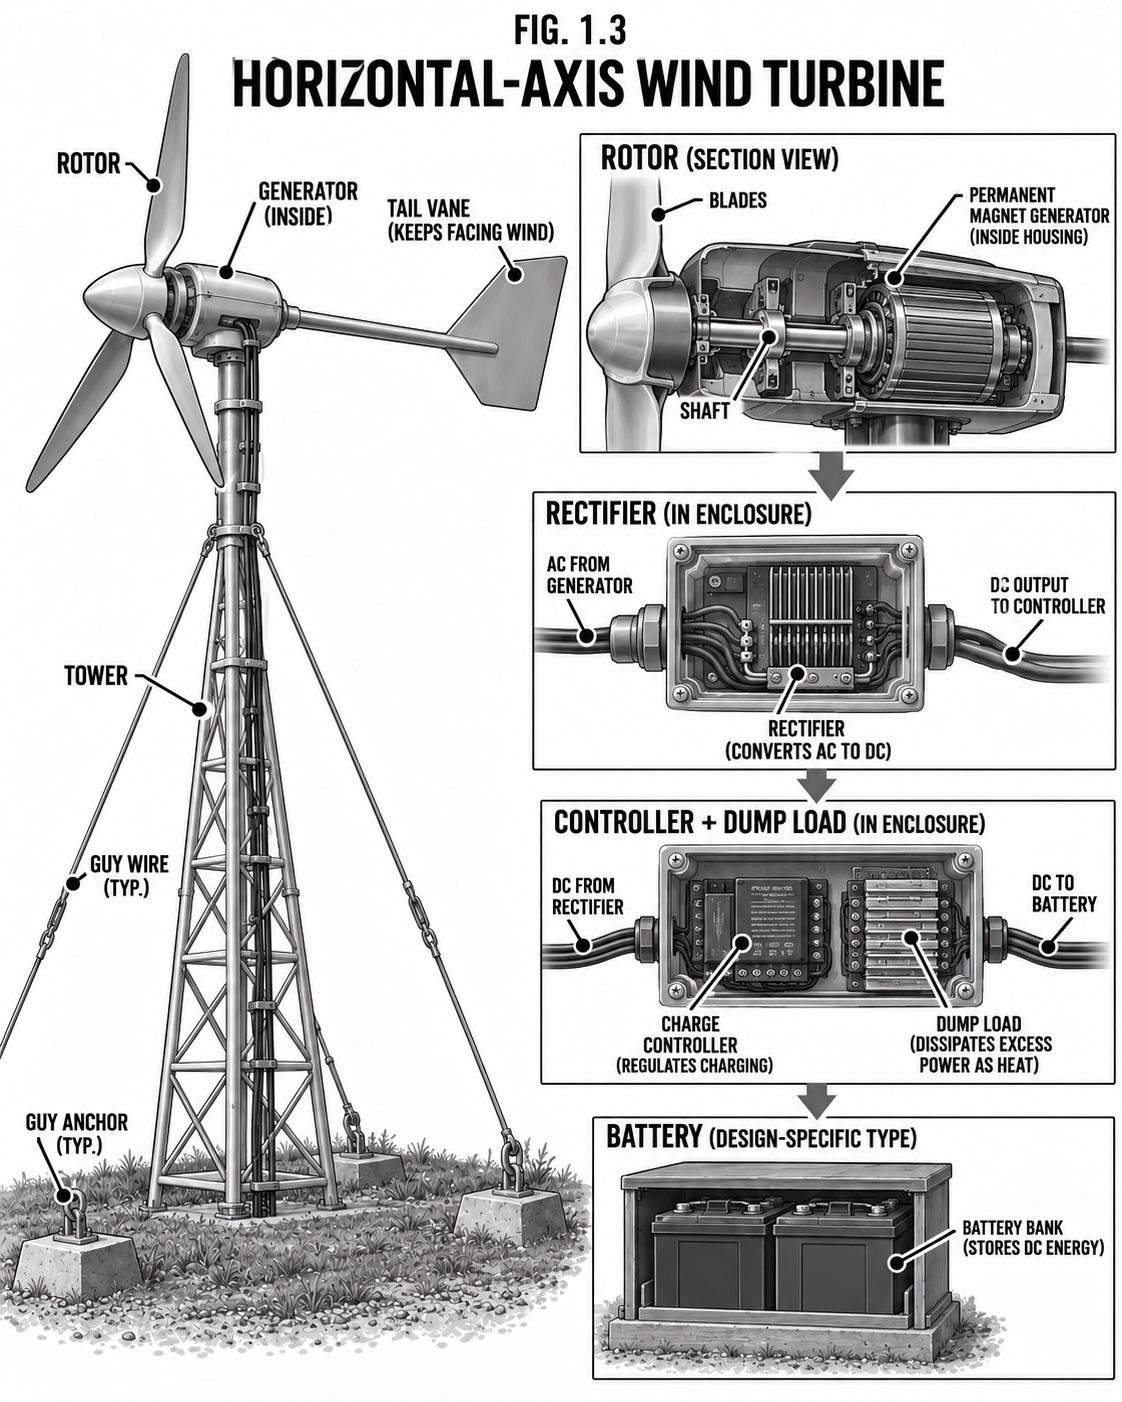
Wind complements solar beautifully: it often blows hardest in winter and at night when the panels are idle. A propeller-style (horizontal-axis) turbine on a tall tower is the most efficient wind machine. The two hard truths: you need real, steady wind, and you need the turbine up high and clear of trees and buildings (turbulence near the ground wrecks output and bearings).
Materials & tools
Turbine + blades
Tall tower + guy wires + anchors
Rectifier (if 3-phase)
Charge controller with DUMP LOAD
Slip ring or droop cable
Disconnect / brake
Step by step
Confirm your site's average wind; measure if you can.
Raise the rotor at least 30 ft above anything within ~500 ft.
Guy the tower properly to rated anchors; plan a safe raise/lower (tilt-up).
Rectify AC to DC if needed, into a controller with a dump load.
Fit a shut-down brake or short for storms and service.
Safety & code A wind turbine MUST have a dump/diversion load: an unloaded turbine (full battery or open circuit) can freewheel to destruction and throw blades. Towers kill people during raising and lowering, so rig it right and keep everyone clear. Follow setback and height rules. Lightning finds towers, so ground it.
Tips & variations Height beats blade size for real-world yield. A hinged tilt-up tower lets one or two people raise and service it safely.
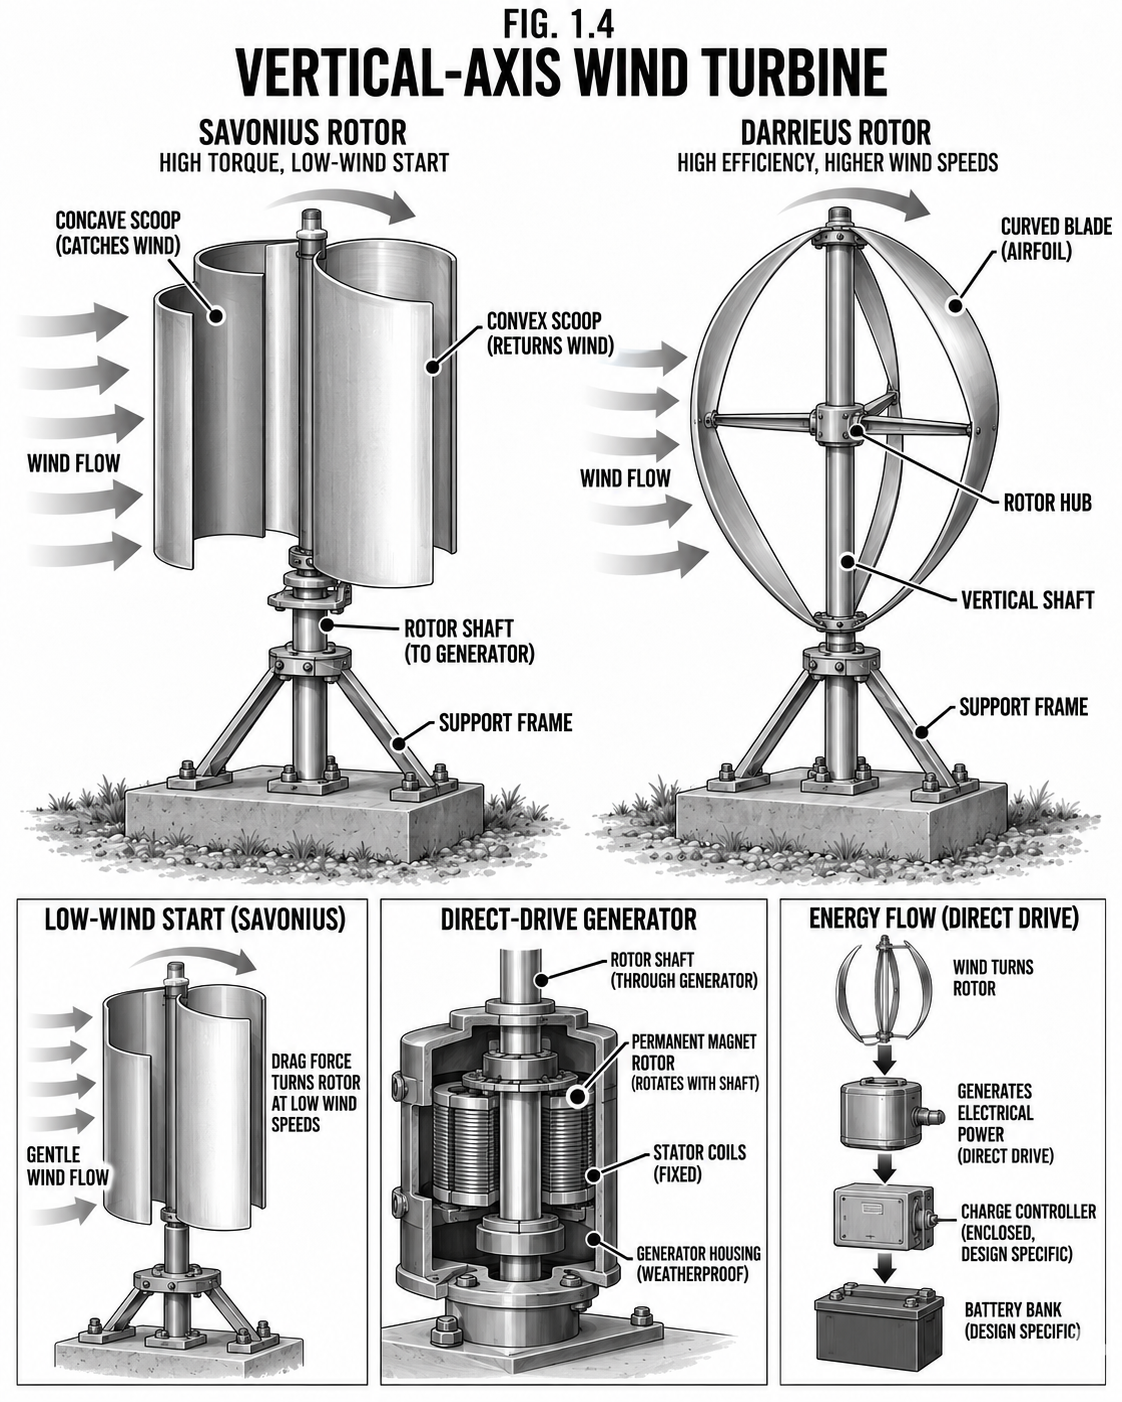
Power · GenerationWind (VAWT)
Vertical-Axis Wind Turbine
Takes wind from any direction, lives closer to the ground, shrugs off gusts.
DifficultyIntermediate
TimeDays
Cost$$
SkillsFabrication
Why it is worth it
Vertical-axis turbines spin on an upright shaft, so they do not need to turn into the wind and they tolerate gusty, turbulent, swirling wind better than a propeller. A drag-type Savonius self-starts in light wind and is easy to build from barrels; a lift-type Darrieus is faster but needs help starting. They are less efficient than a good HAWT but simpler, quieter, and friendlier near buildings.
Step by step
Pick the type: Savonius for easy DIY and low wind, Darrieus for more output.
Build a balanced rotor on a sturdy vertical shaft and bearings.
Couple to a low-RPM generator (often a modified motor or axial-flux).
Rectify to DC into a controller with a dump load, same as any wind machine.
Safety & code Same dump-load rule: never let it spin unloaded. Balance the rotor or vibration destroys the bearings. Keep the spinning rotor fenced from people and animals.
Tips & variations A barrel-halves Savonius is a classic first build. Mount low and close where a tall tower is impractical, but accept lower yield.
Power · GenerationMicro-Hydro: Wheel
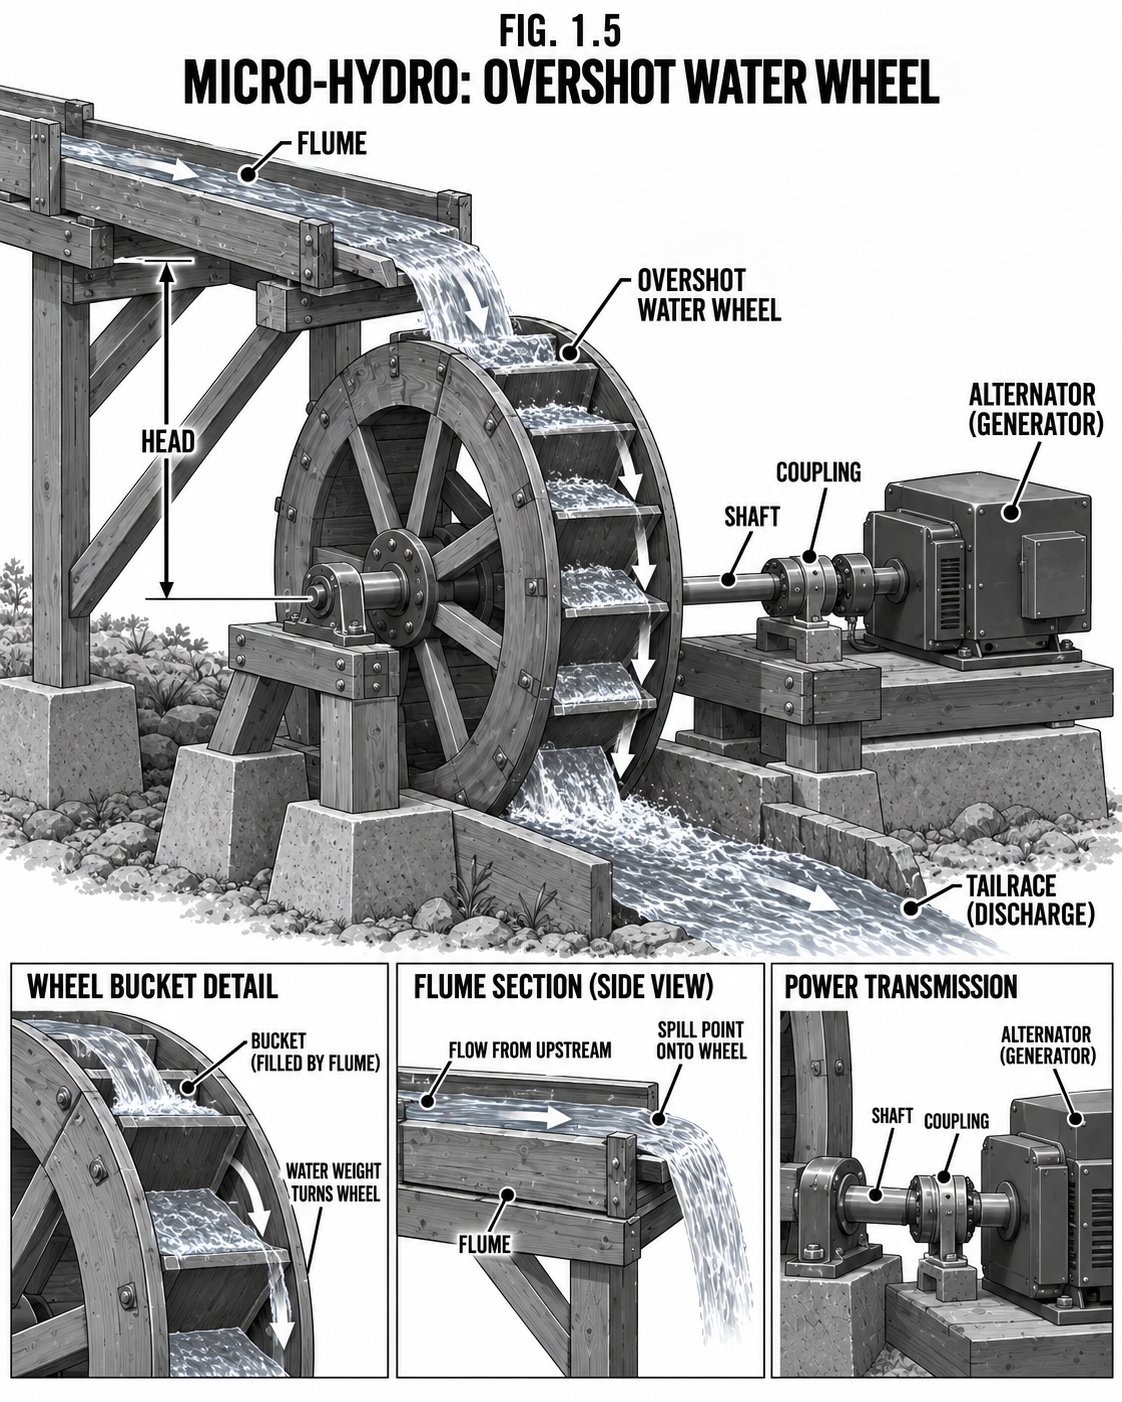
Overshot Water Wheel
If you have falling water, you have the steadiest power on the homestead.
DifficultyAdvanced
TimeDays+
Cost$$
SkillsFabrication
Why it is worth it
A stream with a modest drop can run 24 hours a day, rain or shine, wind or calm, which makes micro-hydro the most reliable off-grid source of all where it is available. The classic overshot wheel takes water onto the top of the wheel and lets gravity in the filled buckets turn it; it suits low flow with moderate head (a few feet of drop).
Step by step
Measure your head (vertical drop) and flow (gallons per minute).
Build a flume to deliver water onto the top of the wheel.
Size the wheel so filled buckets on the descending side drive it.
Gear up the slow wheel to a generator's RPM via belt or chain.
Return the water to the stream (tailrace) below.
Safety & code Water rights and in-stream work are regulated almost everywhere, so get it right before you divert. A screened intake keeps fish, debris, and children out. Moving water plus gears is a serious entanglement hazard, so guard the drive. Protect the works from flood and ice.
Tips & variations Even a small continuous trickle of power, stored in a battery, adds up to far more than a bigger intermittent source.
Power · GenerationMicro-Hydro: Pelton
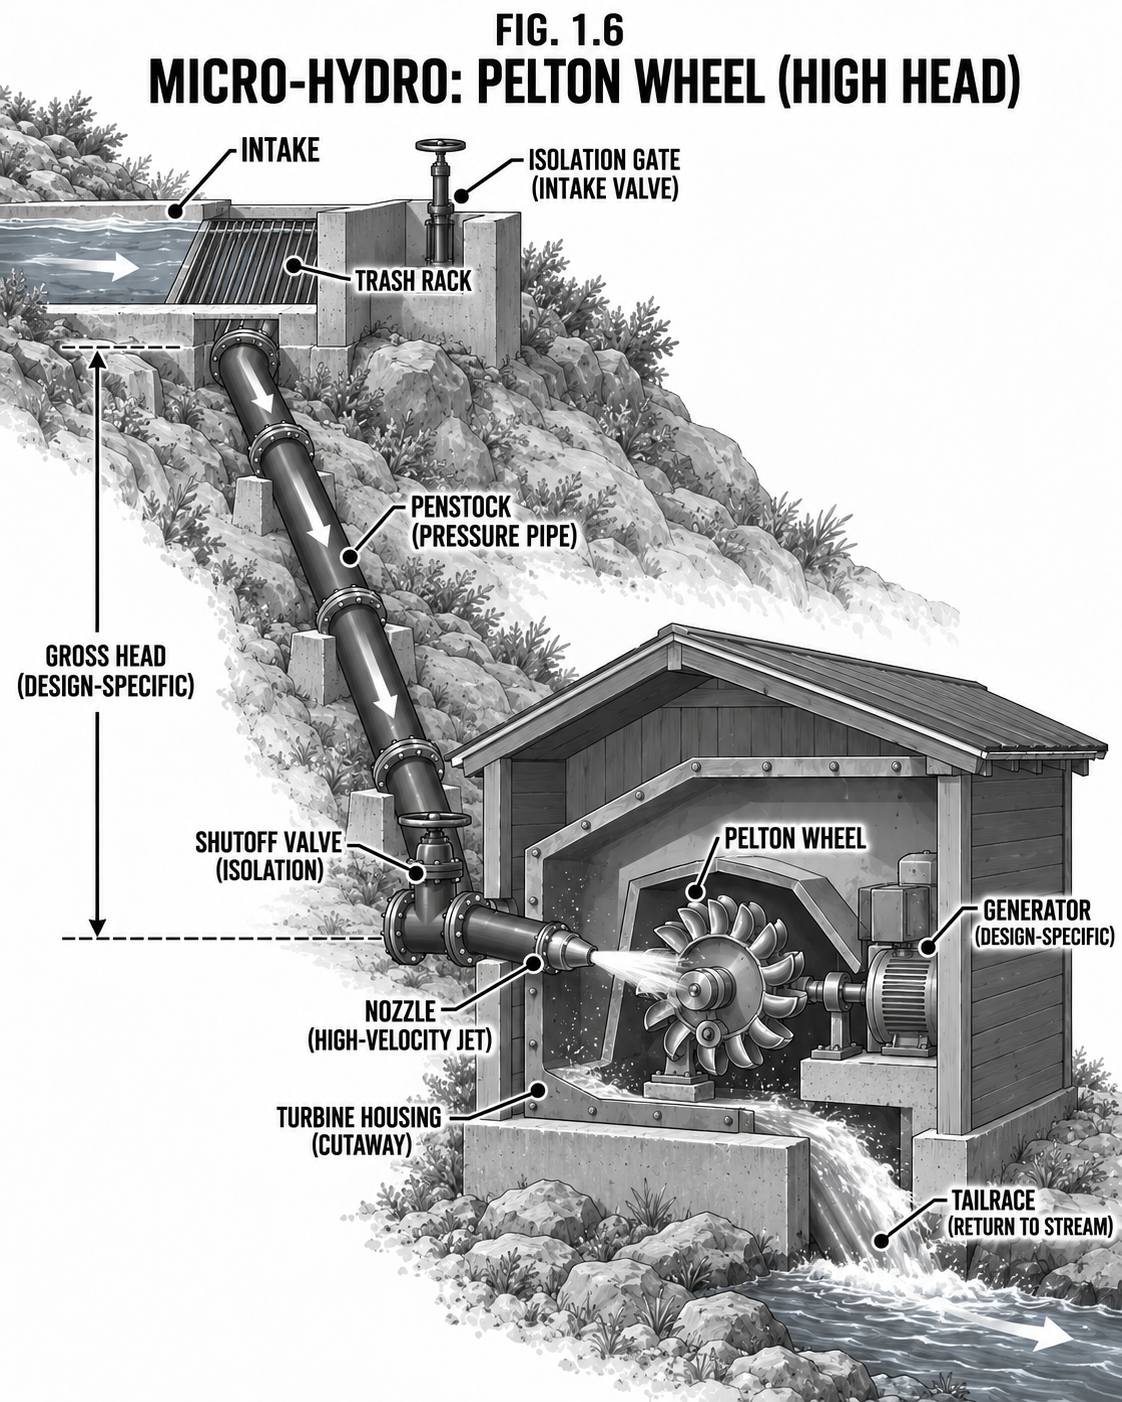
Pelton Wheel (High Head)
A tall pipe of water, a nozzle, and a spinning cup wheel: big power from a small stream.
DifficultyAdvanced
TimeDays
Cost$$
SkillsPlumbing + fab
Why it is worth it
When you have head (a lot of vertical drop) but not much flow (a hillside spring or creek), a Pelton wheel shines. Water piped down a penstock gains pressure and is fired through a nozzle as a fast jet onto spoon-shaped cups, spinning a small wheel fast enough to drive a generator directly. More head means more power from the same trickle.
Step by step
Find high head: measure the vertical drop from intake to turbine.
Run a penstock pipe down the drop (bigger pipe loses less pressure).
Fire the jet through a sized nozzle at the Pelton cups.
Couple the wheel to an alternator, into a rectifier and controller.
Return water to the stream below.
Safety & code A high-pressure penstock is dangerous: a jet can cut, and a burst pipe is violent, so rate and anchor it. Screen the intake. Same water-rights rules apply. Guard the spinning wheel.
Tips & variations Spare nozzles of different sizes let you tune for wet and dry seasons. A cross-flow (Banki) turbine (1.7) handles more flow at lower head.
Power · GenerationMicro-Hydro: Cross-Flow
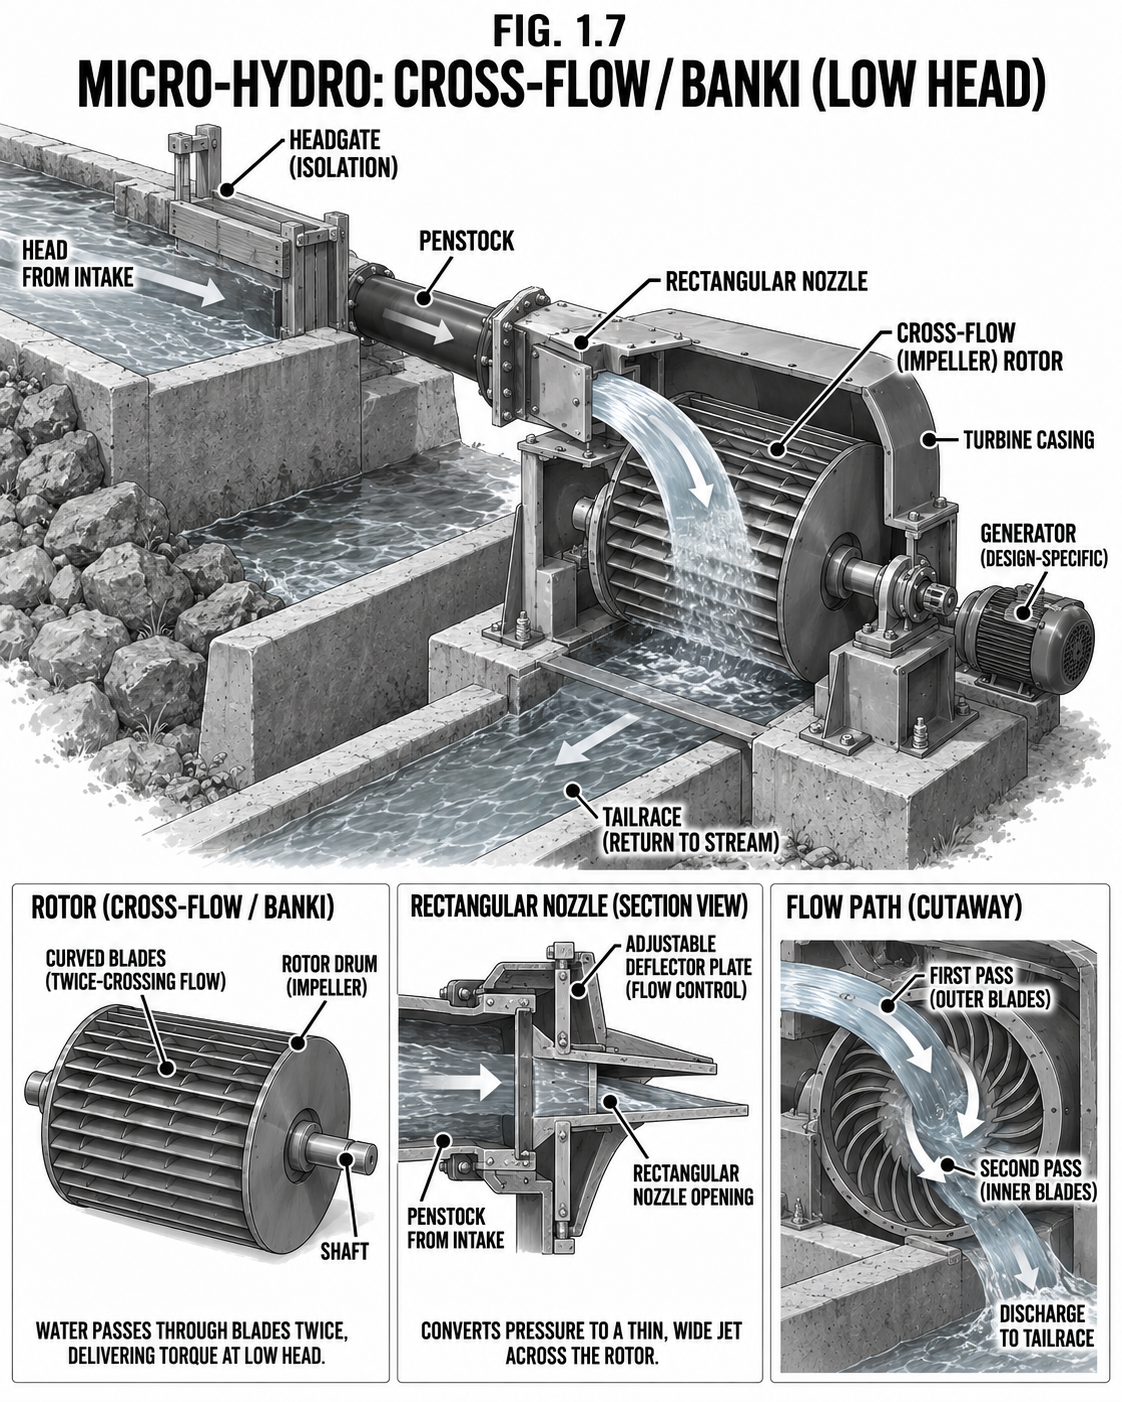
Cross-Flow (Banki) Turbine
The workhorse for streams with more flow and less drop.
DifficultyAdvanced
TimeDays
Cost$$
SkillsFabrication
Why it is worth it
Where a Pelton wants head and a wheel wants gentle flow, the cross-flow turbine sits in between: a wide rectangular jet pours across a drum-shaped rotor (the water passes through the blades twice), handling bigger, lower-head flows gracefully. It is forgiving, self-cleaning, and buildable in a farm shop.
Step by step
Match the turbine to your head-and-flow pair.
Build the drum rotor and the rectangular guide-vane nozzle.
Feed from a penstock or open flume into the nozzle.
Belt to a generator; rectify and control as usual.
Safety & code Same as all hydro: water rights, a screened intake, a guarded drive, and flood protection. Balance the rotor to spare the bearings.
Tips & variations Its wide tolerance for varying flow makes it the best single choice if your stream swings a lot between seasons.
Power · GenerationMicro-Hydro: Screw
Archimedes Screw (Very Low Head)
Barely any drop at all? An old spiral still makes power, and fish swim through it.
DifficultyAdvanced
TimeDays
Cost$$
SkillsFabrication
Why it is worth it
With only a foot or two of drop but good flow, run the Archimedes screw in reverse: falling water turns the spiral instead of the spiral lifting water. It works at tiny head, tolerates debris, and is famously fish-friendly, which matters where screened intakes and fish passage are required.
Step by step
Set a large spiral screw on a shallow incline in the channel.
Let falling water fill the flights and turn the screw.
Gear the slow, high-torque shaft up to a generator.
Safety & code Still regulated as in-stream work; low head does not mean no permit. Guard the turning screw and shaft.
Tips & variations Best where you have lots of water and almost no drop, exactly where Pelton and overshot fail.
Power · GenerationThermoelectric
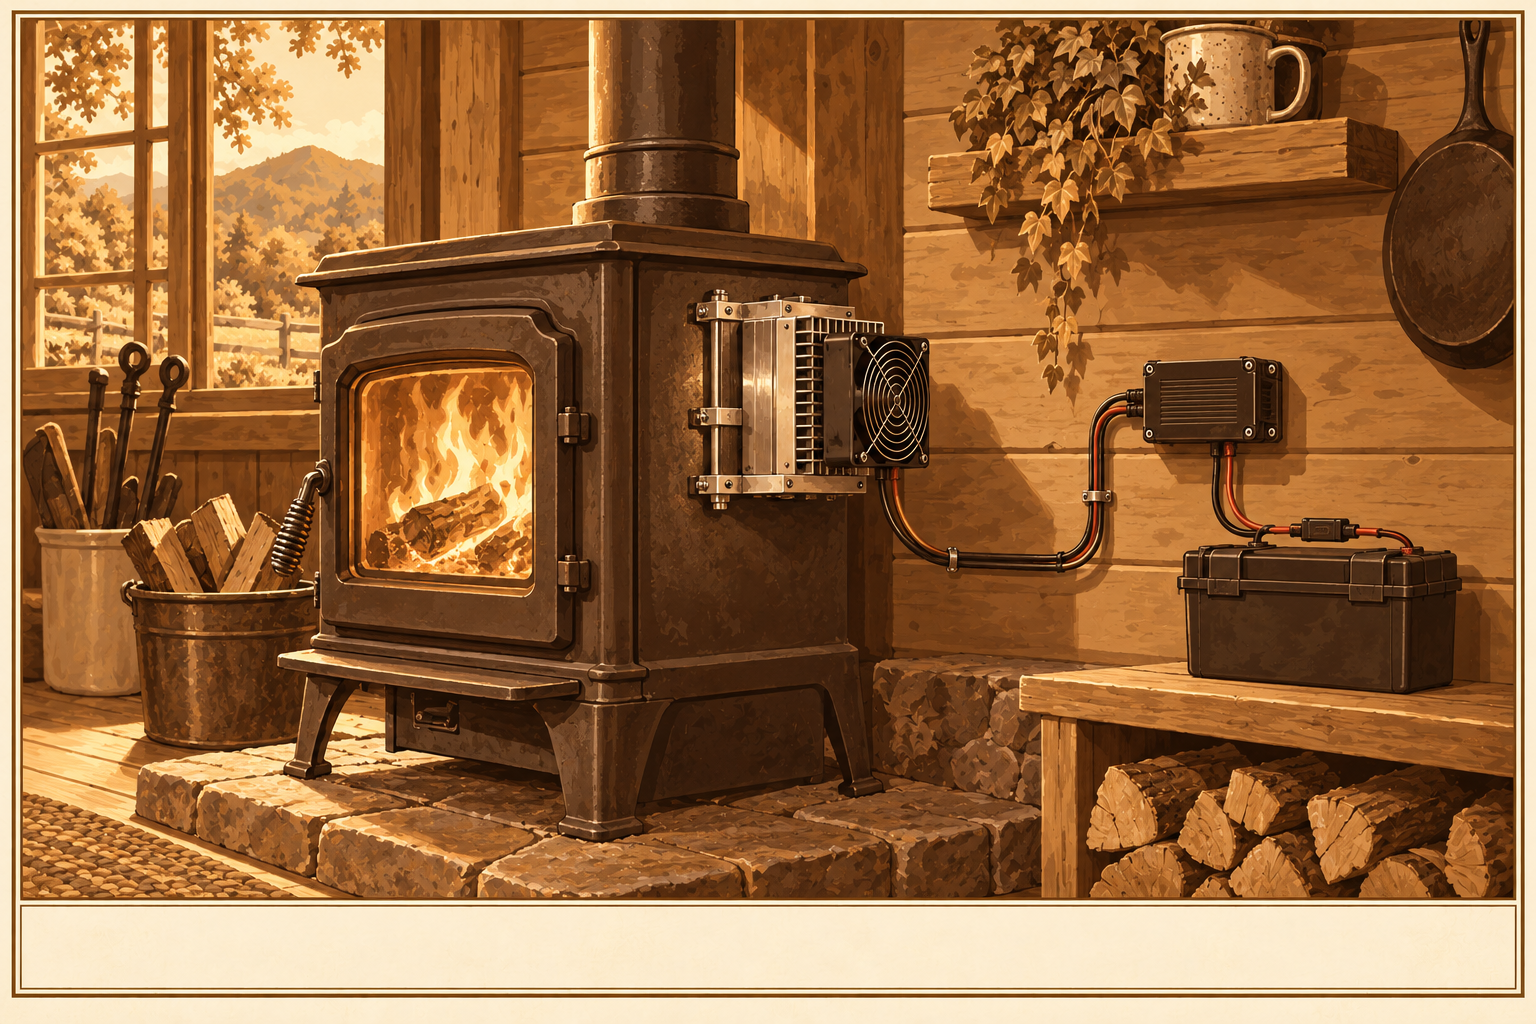
Thermoelectric Generator (Wood-Stove TEG)
Turn the heat you are already making into a trickle of electricity.
DifficultyIntermediate
TimeHours
Cost$
SkillsDC basics
Why it is worth it
A thermoelectric module makes DC from a temperature difference across it. Clamp one to a hot wood stove with a cooled heat sink on the other side and it quietly produces a few watts all winter, exactly when solar is weakest, enough to charge phones, run LEDs, or trickle a small battery. No moving parts.
Step by step
Mount a TEG module flat against a hot stove surface (within its rated temperature).
Clamp a finned heat sink (air or water cooled) on the cold side; the bigger the difference, the more power.
Feed the output through a DC-DC regulator into a small battery.
Safety & code Overheating destroys TEG modules, so respect the hot-side temperature limit and keep the cold side truly cooled. A fan or water loop that fails can cook the module, so fail safe.
Tips & variations A small fan on the cold side (powered by the TEG itself) hugely boosts output. Great backup charger for the dead of winter.
Power · GenerationPedal Power
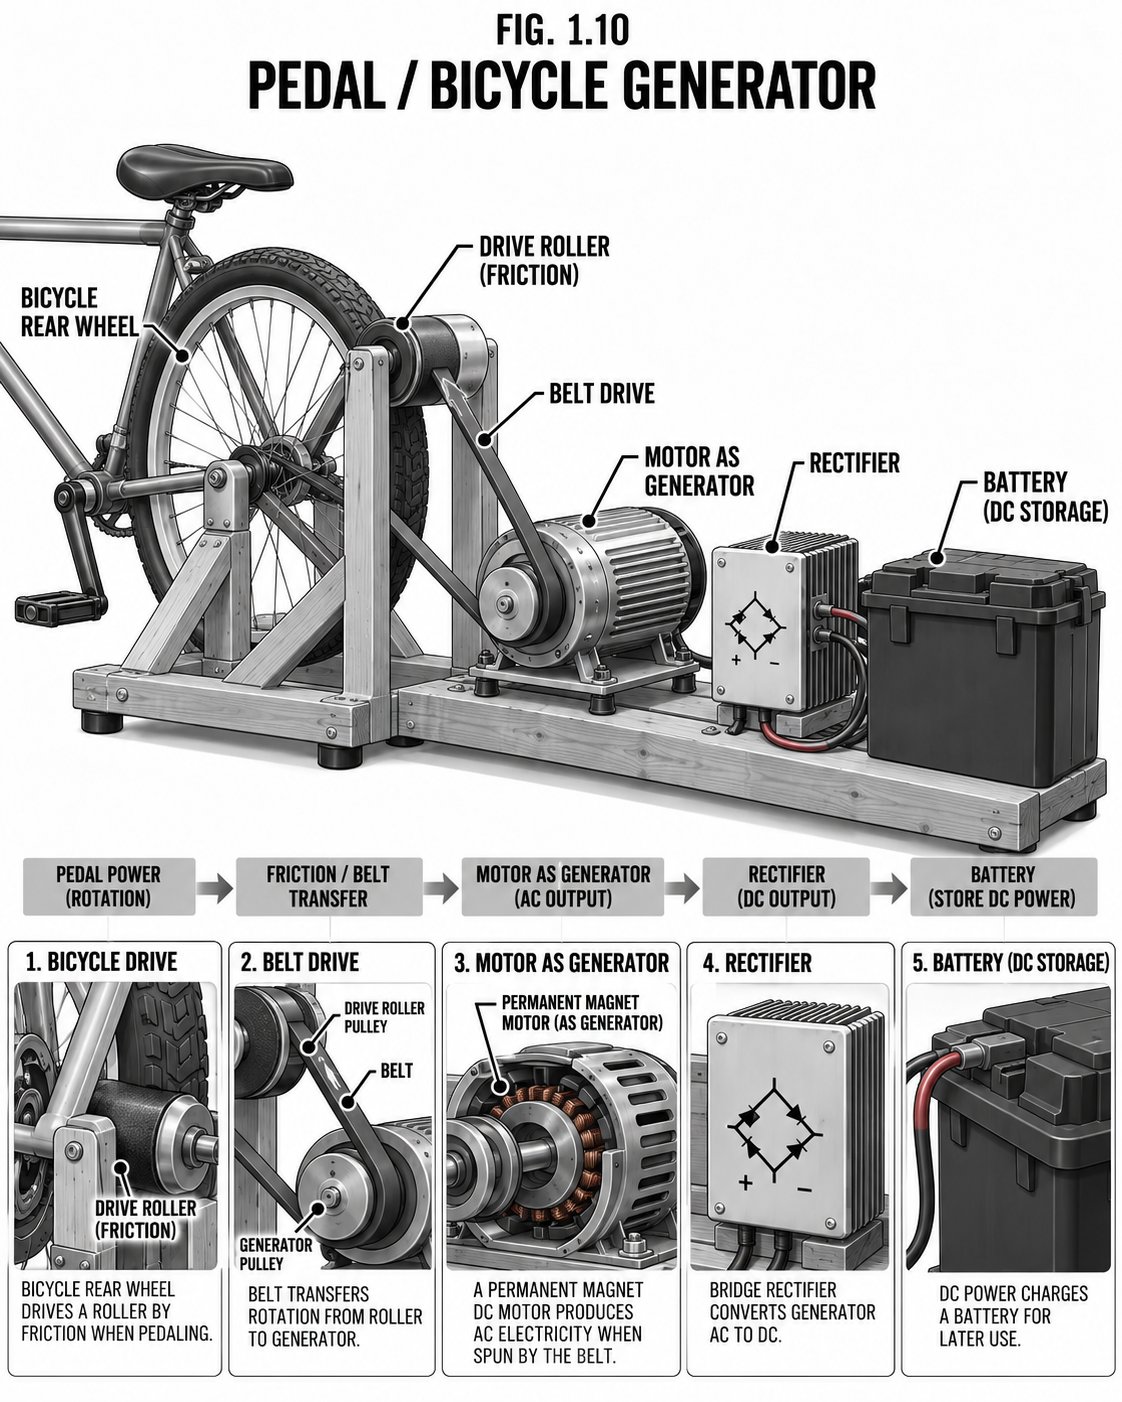
Pedal / Bicycle Generator
Your legs are a generator that also keeps you warm.
DifficultyBeginner
TimeAn afternoon
Cost$
SkillsBasic
Why it is worth it
A human can sustain roughly 75 to 150 watts of pedaling. That will not run a house, but it will charge a phone, power lights and radio, or top a small battery when the sun and wind both quit, and it works any time you are willing to work for it. Simple, cheap, and good exercise.
Step by step
Mount a bike on a stand so the rear wheel drives a motor-used-as-generator (friction roller or belt).
Rectify the output and run it through a DC-DC regulator into a battery.
Add a meter so you can see your watts.
Safety & code Guard the belt and roller from fingers and loose clothing. Do not overcharge a small battery; use a regulator.
Tips & variations A permanent-magnet DC motor is the easiest generator. Hand-crank versions work for the infirm.
Power · GenerationWood Gas
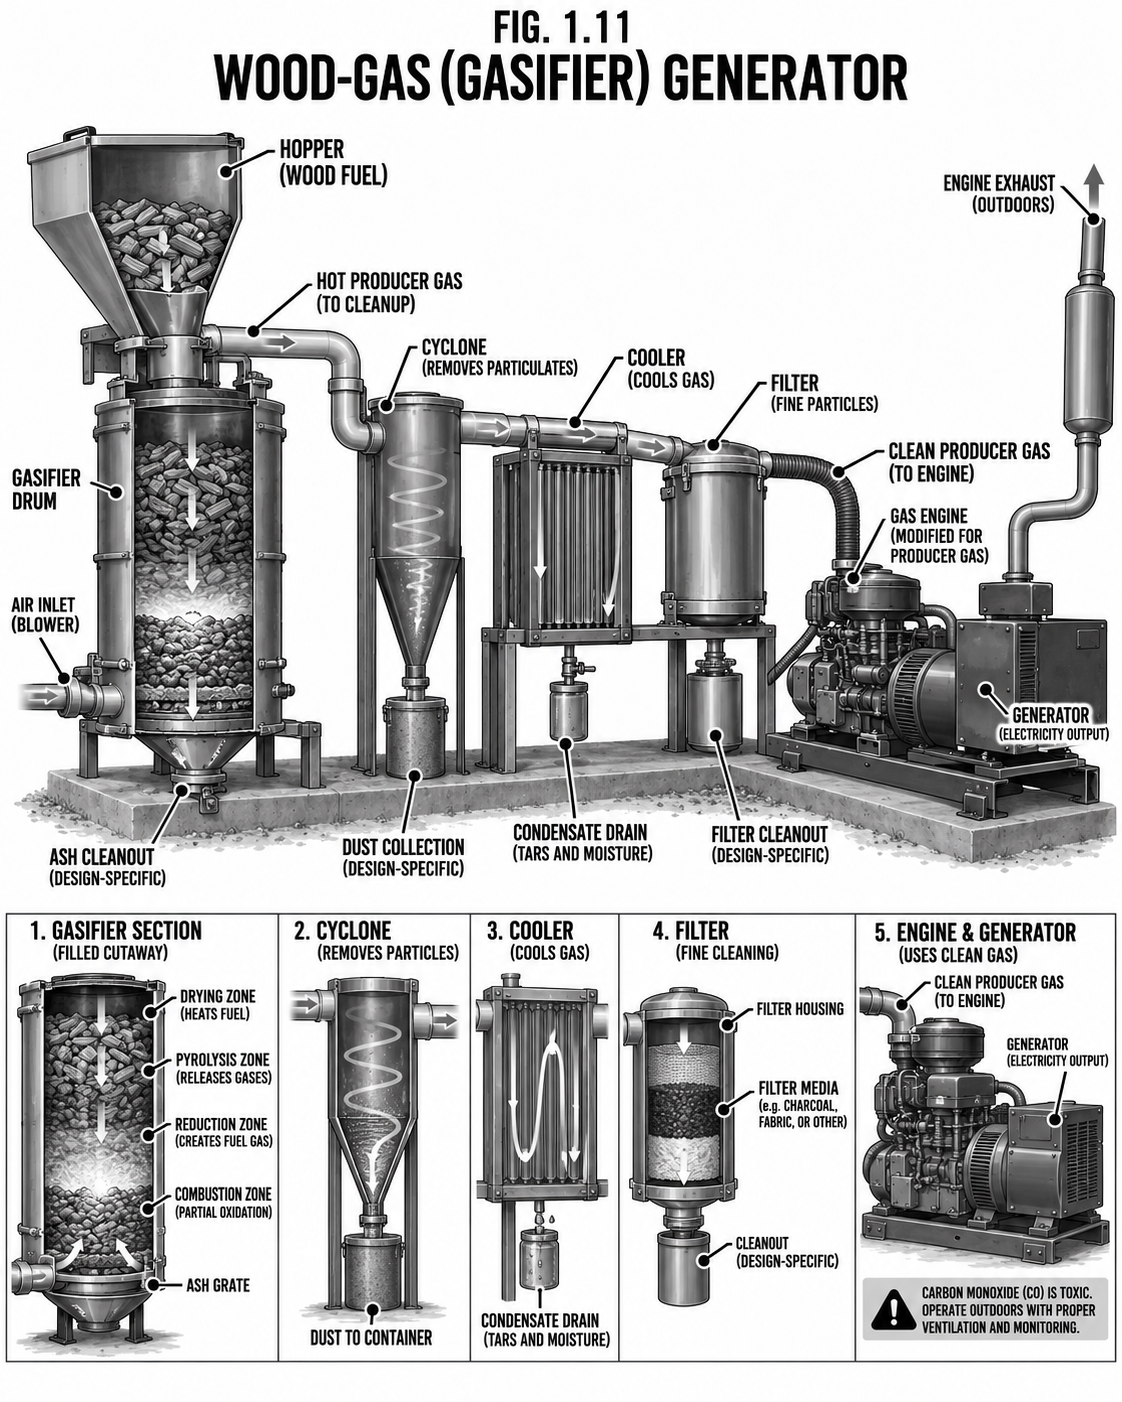
Wood-Gas (Gasifier) Generator
Run an engine on smoke: turn wood into a gas you can burn.
DifficultyExpert
TimeDays
Cost$$
SkillsFab + engines
Why it is worth it
A gasifier starves wood of oxygen and heats it until it gives off a combustible producer gas (mostly carbon monoxide and hydrogen) that an ordinary engine can run on. In a fuel emergency it lets a woodlot power a generator. It is also the most dangerous project in this chapter and belongs only in experienced hands.
Step by step
Build the stages: fuel hopper, restricted reduction zone, then cyclone, cooler, and filter to clean the gas.
Pipe the cleaned, cooled gas to the engine's air intake.
Start on gasoline, then switch to wood gas once the gas runs clean.
Run only in the open air, never enclosed.
Safety & code Producer gas is mostly CARBON MONOXIDE: odorless, colorless, and lethal. Run gasifiers only outdoors, never in a shed or barn, with CO alarms nearby. The gas is also flammable and the unit runs red-hot (fire risk, tar burns). This is genuinely hazardous; learn from someone who has built one before you light yours.
Tips & variations Dry, chunked hardwood runs cleanest. Think of this as emergency/backup generation, not daily power.
Power · GenerationBiogas
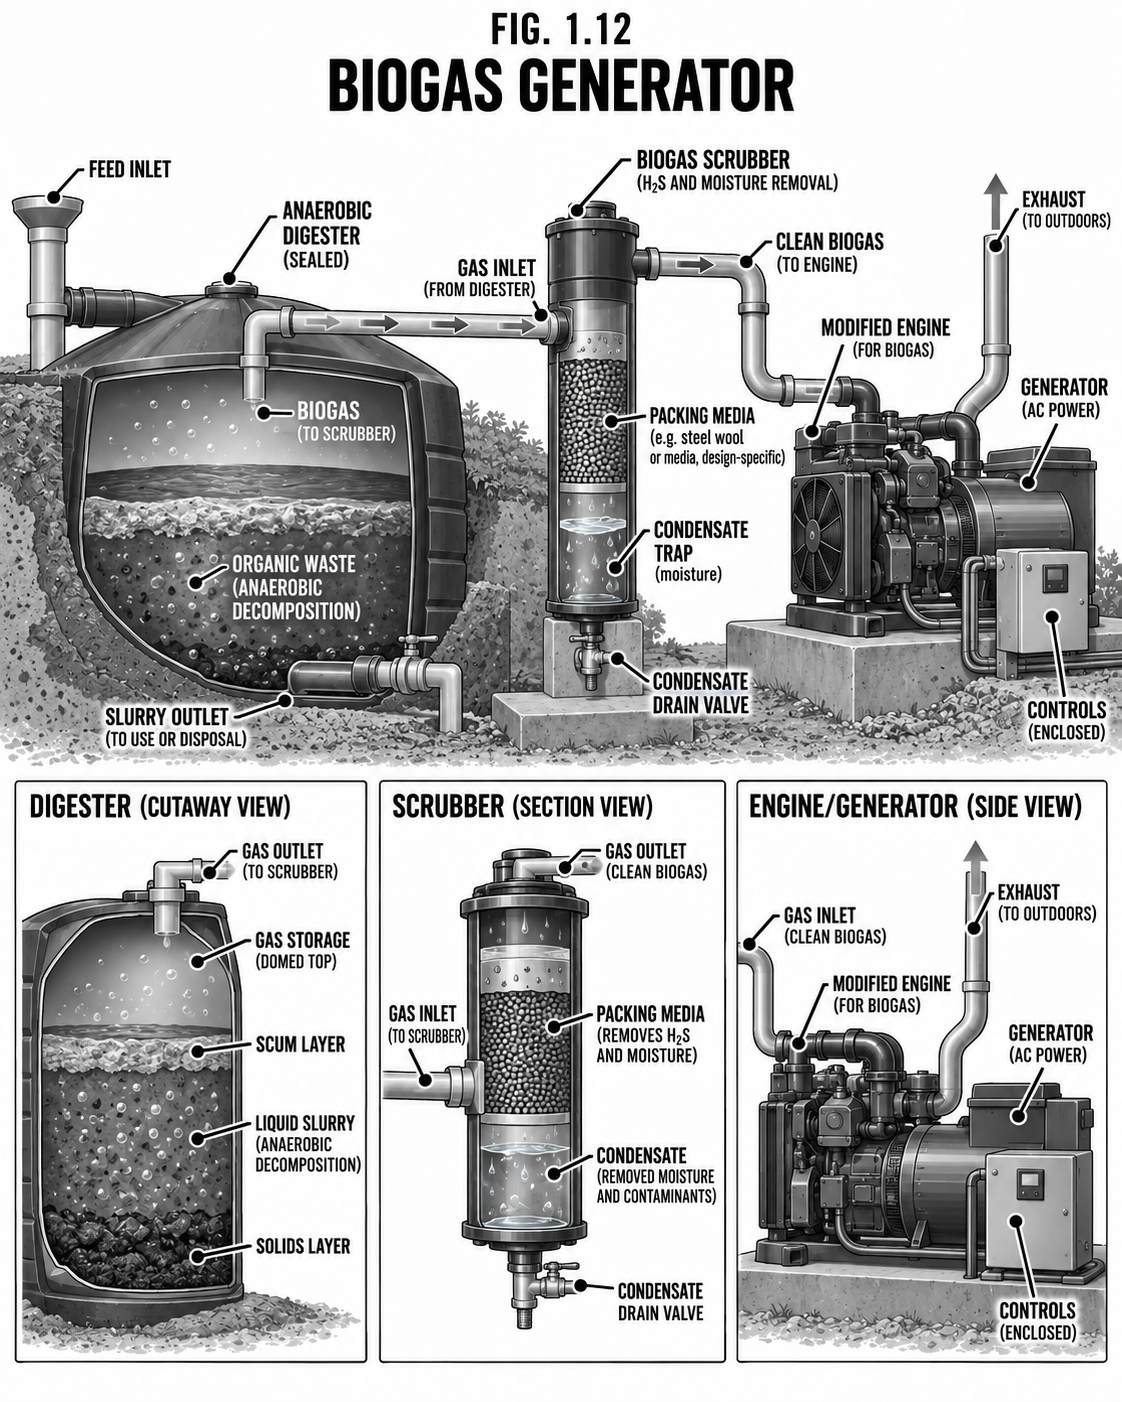
Biogas Generator
Rot turns manure and scraps into cooking gas and electricity.
DifficultyAdvanced
TimeBuild + weeks to start
Cost$$
SkillsPlumbing + engines
Why it is worth it
An anaerobic digester (Chapter 6) feeds on manure and food waste and gives off methane-rich biogas. Scrubbed of hydrogen sulfide and moisture, that gas cooks, heats, and runs a converted engine-generator, all from waste you already have. It shines in warm climates where the digester stays active.
Step by step
Build and feed the digester (see Chapter 6) and let it establish.
Scrub the gas (iron sponge for H2S, a moisture trap for water).
Feed the clean gas to a converted spark-ignition engine driving a generator.
Safety & code Biogas is flammable and explosive, and raw gas contains toxic hydrogen sulfide, so scrub it, store it safely, and never run the engine enclosed (CO again). No open flames near the digester or storage.
Tips & variations Even if you never make electricity, piping biogas to a cook burner is the easy, high-value win.
Power · GenerationFuel Generator
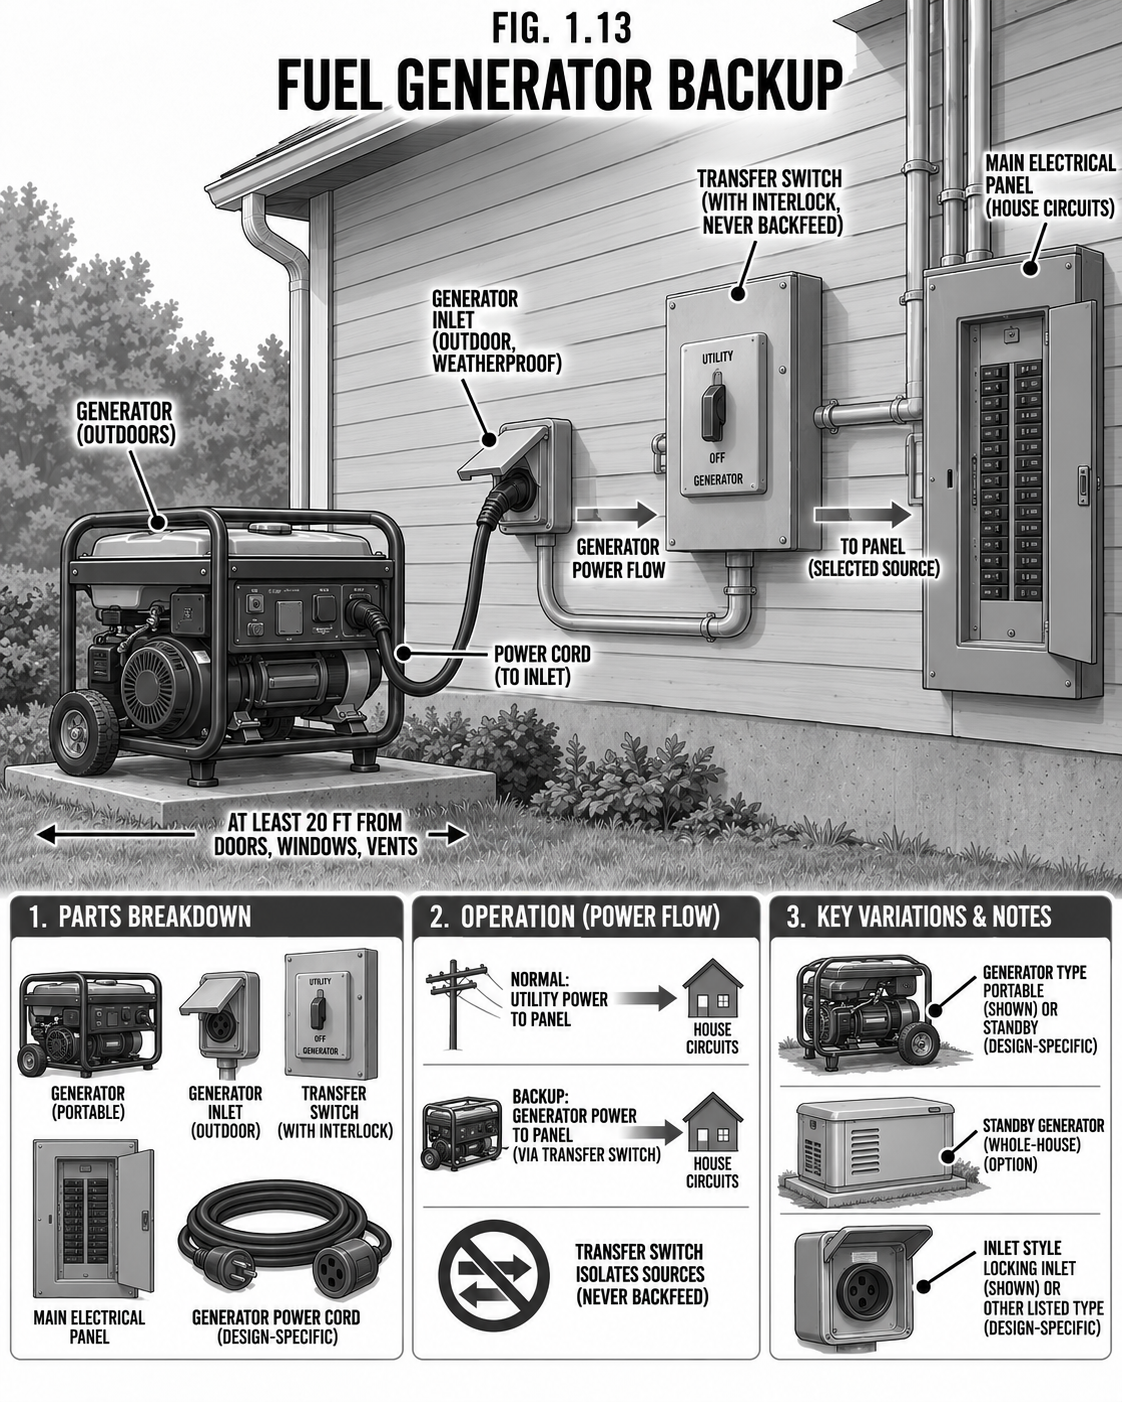
Fuel Generator Backup
The thing you run as little as possible, and are very glad to have.
DifficultyIntermediate
TimeHours
Cost$$
SkillsWiring
Why it is worth it
A gas, propane, or diesel generator is the backstop for the dark, windless week when the batteries sag. Used right, it runs briefly to bulk-charge the bank or carry a heavy load, then shuts off. Propane stores for years without going stale, which makes it the off-grid favorite.
Step by step
Size it to your charger/largest load, not your whole future.
Wire it to the system through a proper transfer switch or interlock.
Feed a battery charger so short runtime does the most good.
Run it outdoors, well clear of windows and intakes.
Safety & code NEVER backfeed a house or grid without a transfer switch or interlock: a generator can push lethal voltage back up the line and kill a lineman or a neighbor. Run generators OUTDOORS only; their exhaust is carbon monoxide and kills people in garages and sheds every year. Store fuel safely and away from living spaces.
Tips & variations An inverter generator sips fuel at light loads and makes clean power for electronics. Propane + a dual-fuel unit is the resilient choice.
Power · StorageFlooded Lead-Acid
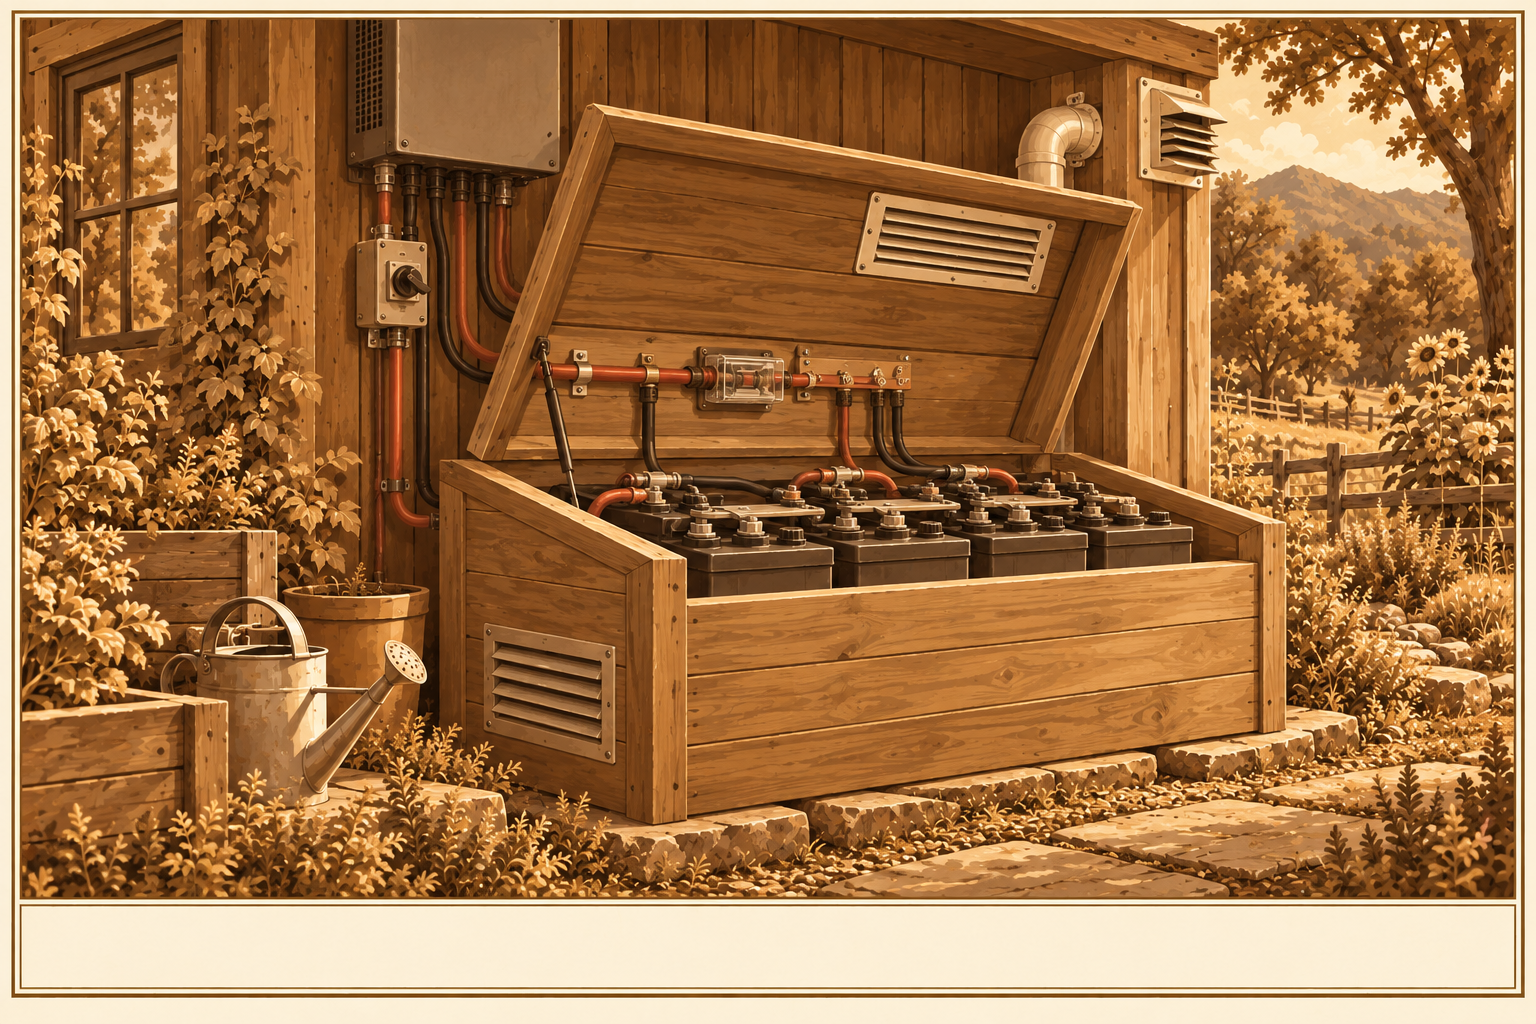
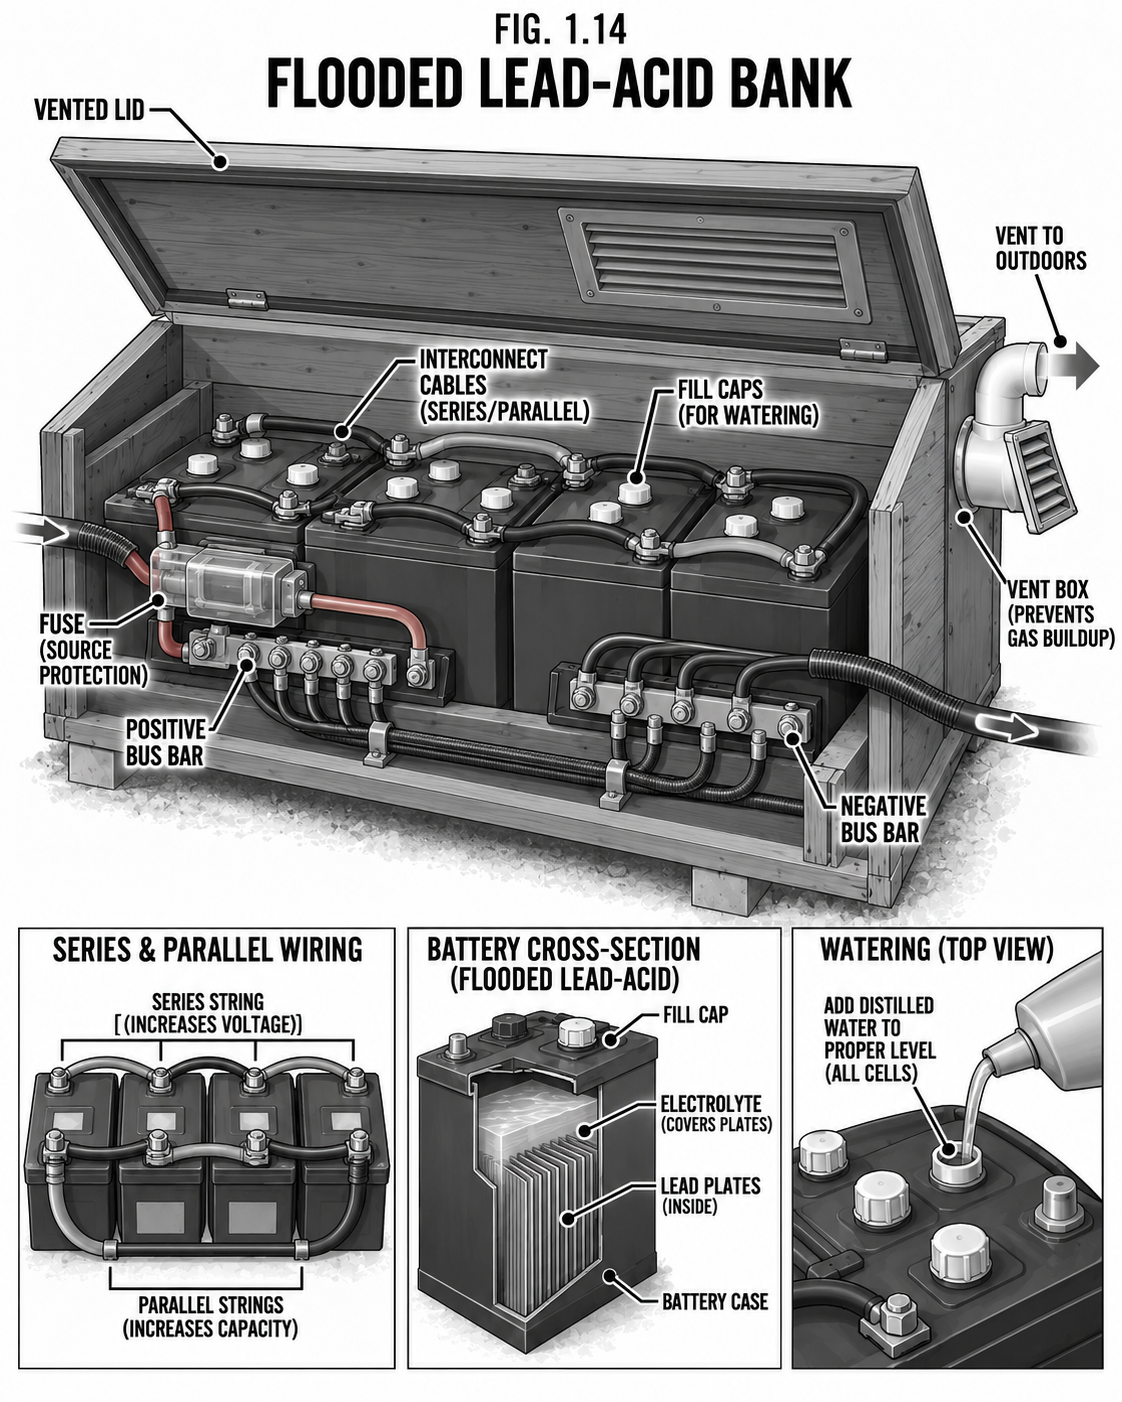
Flooded Lead-Acid Battery Bank
Heavy, cheap, proven, and forgiving if you tend it.
DifficultyIntermediate
TimeHours
Cost$$
SkillsDC wiring
Why it is worth it
Flooded lead-acid (the golf-cart or L16 battery) is the old reliable of off-grid storage: cheap per watt-hour, tolerant of abuse, and repairable. The trade is maintenance (checking and topping water) and that it should not be drawn below about half charge if you want it to last years.
Step by step
Wire cells in series/parallel to your system voltage and capacity.
Use proper cable, a main fuse, and a bus bar; torque terminals.
Set the charge profile (bulk, absorb, float, periodic equalize).
Check electrolyte monthly and top with distilled water.
Safety & code Charging lead-acid vents HYDROGEN, which is explosive, so the bank must be VENTED and kept away from any spark or flame. The acid burns skin and eyes, so wear gloves and goggles and keep baking soda handy. A battery bank can dump enormous current into a dropped wrench, so insulate tools and wear no rings.
Tips & variations Keep the bank warm-ish; cold cuts capacity. Never mix old and new cells.
Power · StorageAGM / Sealed
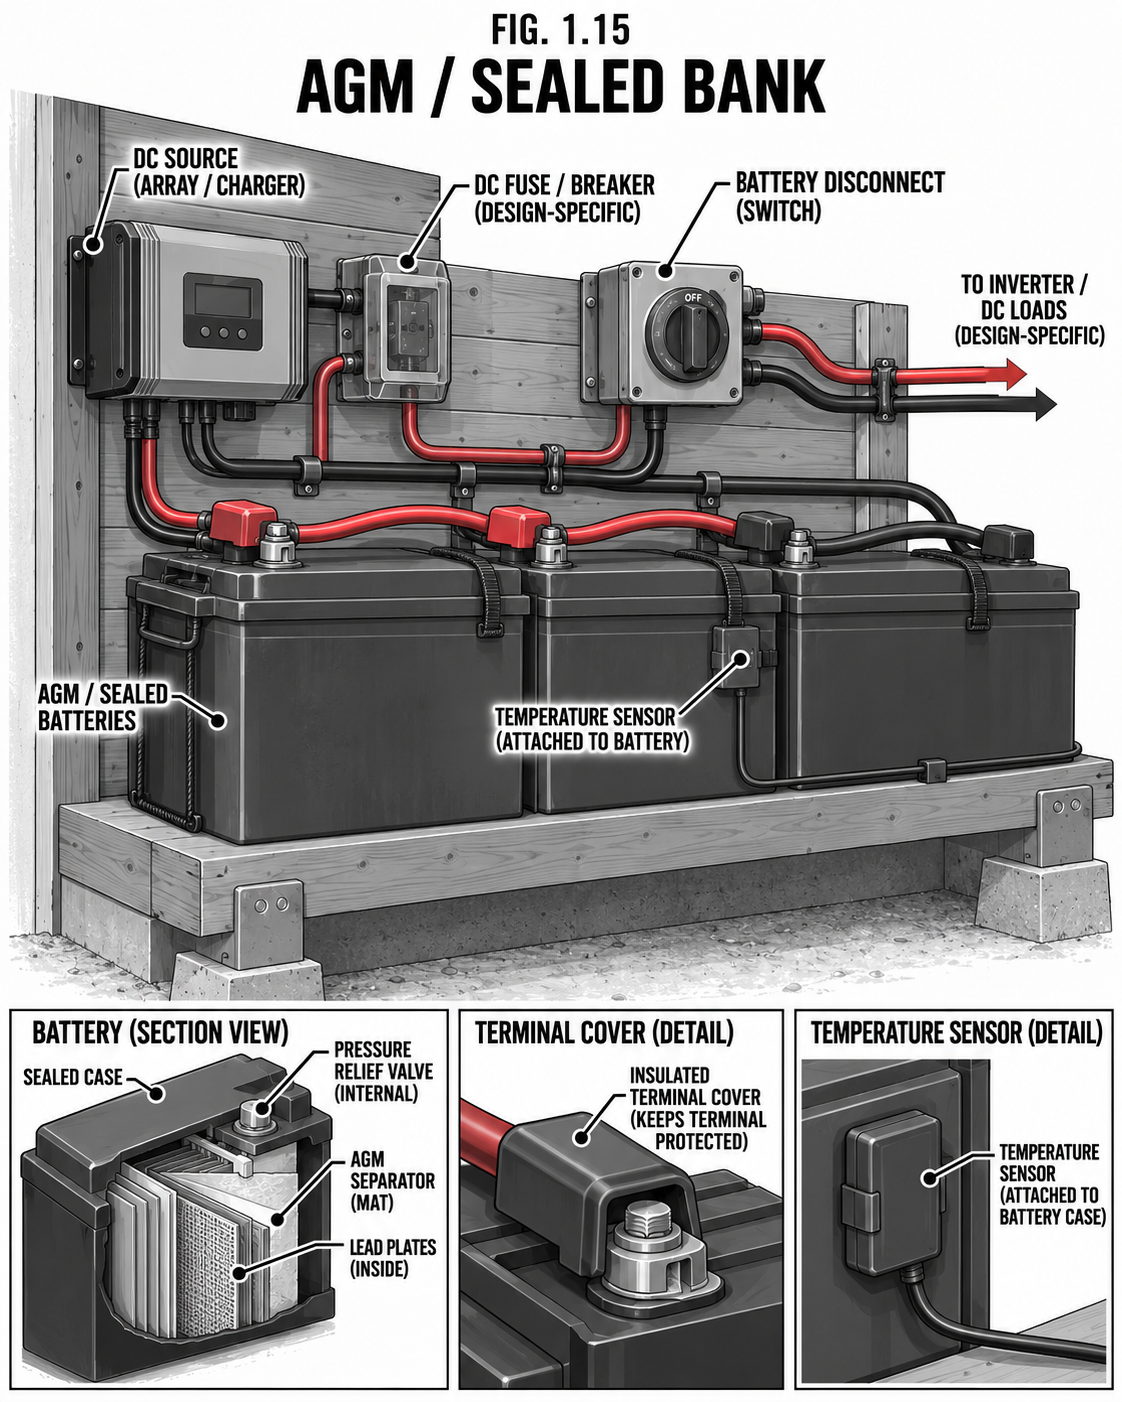
AGM & Sealed Lead-Acid
Lead-acid with the maintenance and the venting mostly designed out.
DifficultyBeginner
TimeHours
Cost$$
SkillsDC basics
Why it is worth it
AGM (absorbed glass mat) and gel batteries hold their acid in a mat or gel, so there is no watering, far less off-gassing, and they can be mounted in more positions. They cost more than flooded cells and are less tolerant of overcharging, but they are the easy, low-fuss lead-acid choice.
Step by step
Wire to voltage/capacity with proper cable and a main fuse.
Set the charge profile to the AGM spec (they dislike the high equalize voltages flooded cells want).
Add a temperature sensor so charging compensates for cold and heat.
Safety & code Lower-venting is not zero-venting: give them some airflow and keep sparks away. Overcharging ruins sealed batteries fast, so get the charge voltage right. Same huge short-circuit current as any lead-acid, so insulate tools.
Tips & variations Good where the bank lives in or near living space. Still do not discharge deeply if you want long life.
Power · StorageLithium (LiFePO4)
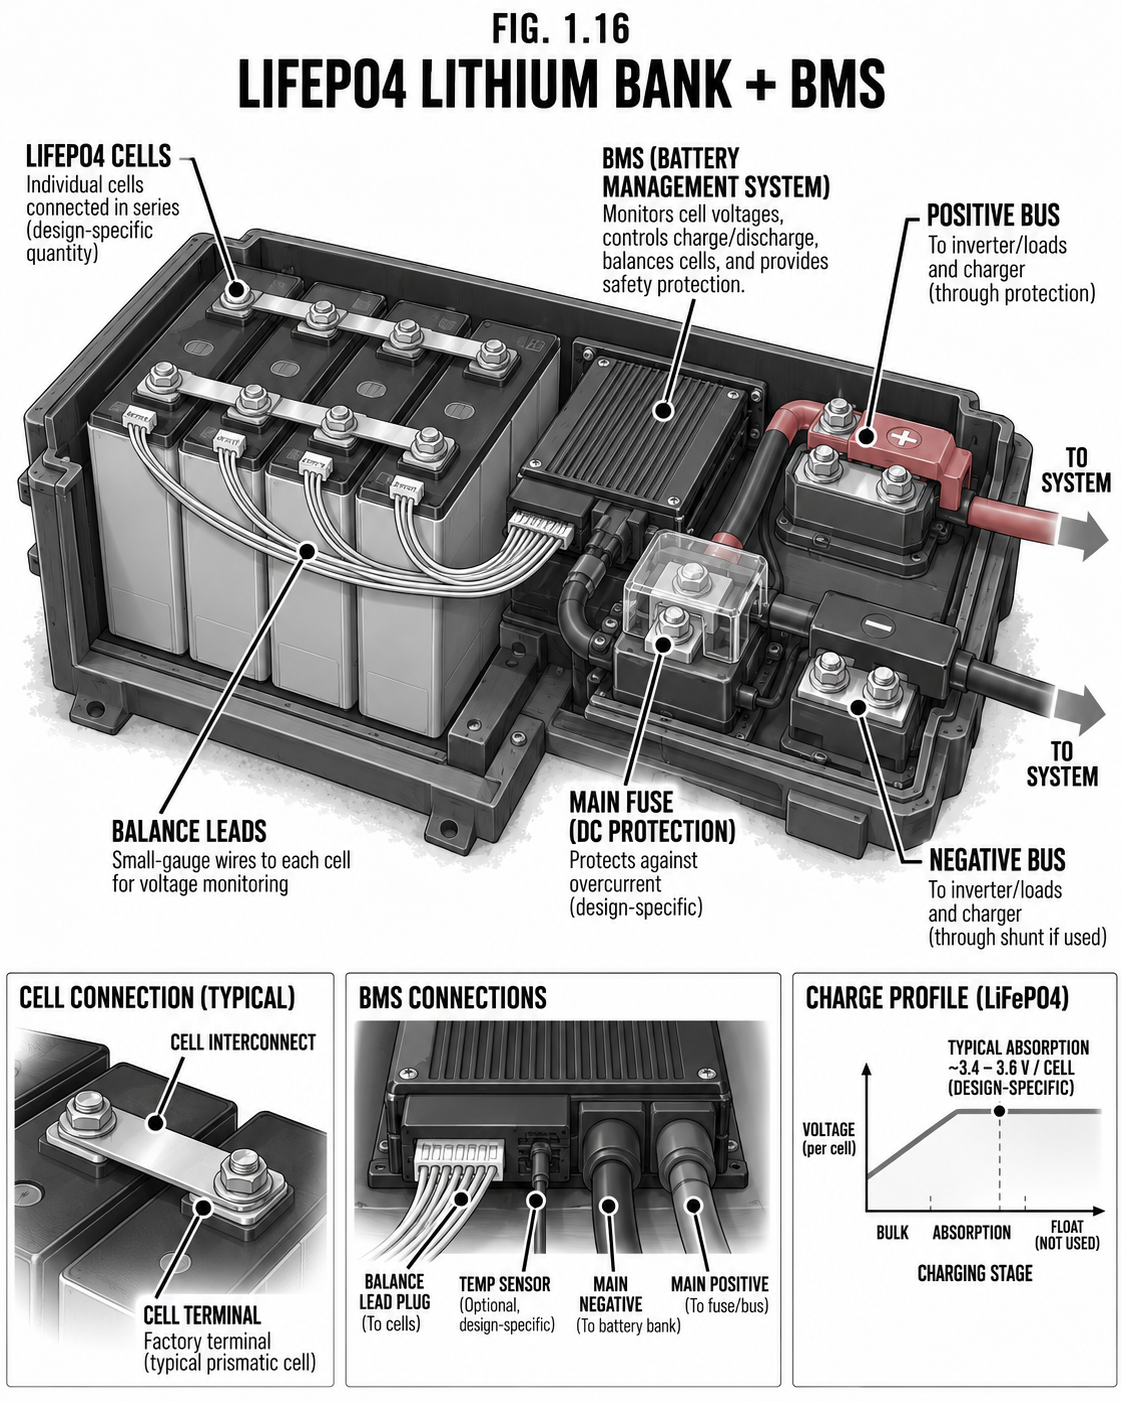
LiFePO4 Lithium Bank
Light, deep-cycling, long-lived: the modern off-grid battery.
DifficultyIntermediate
TimeHours
Cost$$$
SkillsDC + BMS setup
Why it is worth it
Lithium iron phosphate holds far more usable energy per pound, can be drawn down deep without harm, lasts thousands of cycles, and needs no watering. It costs more up front but often less per usable cycle, and LiFePO4 is the safest lithium chemistry (it does not readily run away like the laptop kind).
Step by step
Build the pack to voltage with matched cells and a proper Battery Management System (BMS).
Let the BMS handle cell balancing and cutoffs; wire balance leads correctly.
Set the charger to the LiFePO4 profile (no float abuse, correct voltages).
Fuse and protect as with any bank.
Safety & code A lithium bank MUST have a working BMS: it prevents the over-charge, over-discharge, and cell imbalance that cause failures. Do not puncture, crush, or charge below freezing (charging cold damages cells). Use the correct charge profile; a lead-acid charger can harm lithium. Fuse it; the short-circuit current is immense.
Tips & variations Keep lithium above freezing for charging; many packs add a small heater. Right-sized, a lithium bank you can use to 80 percent often beats a bigger lead bank you can only use to 50.
Power · StorageNickel-Iron
Nickel-Iron (Edison) Cells
Nearly immortal batteries you can abuse for decades.
DifficultyIntermediate
TimeHours
Cost$$$
SkillsDC + maintenance
Why it is worth it
Edison's nickel-iron cells can last 50 years or more, shrug off being left discharged, overcharged, or frozen, and are rebuildable by swapping the alkaline electrolyte. The price is low efficiency, high self-discharge, and a big up-front cost. For someone who wants a battery their grandchildren inherit, nothing else compares.
Step by step
Series the cells to system voltage (each cell is ~1.2 V).
Fill with the specified alkaline (potassium hydroxide) electrolyte.
Charge at the higher voltages NiFe wants; expect lots of gassing.
Top electrolyte and change it every several years.
Safety & code The electrolyte is caustic potassium hydroxide, so full PPE and ventilation. NiFe cells gas hydrogen heavily when charging, so ventilate well and keep away from sparks. Their inefficiency means you oversize the generation feeding them.
Tips & variations Best paired with abundant solar/hydro that can afford the charging losses. Truly a lifetime battery.
Power · StoragePumped Hydro
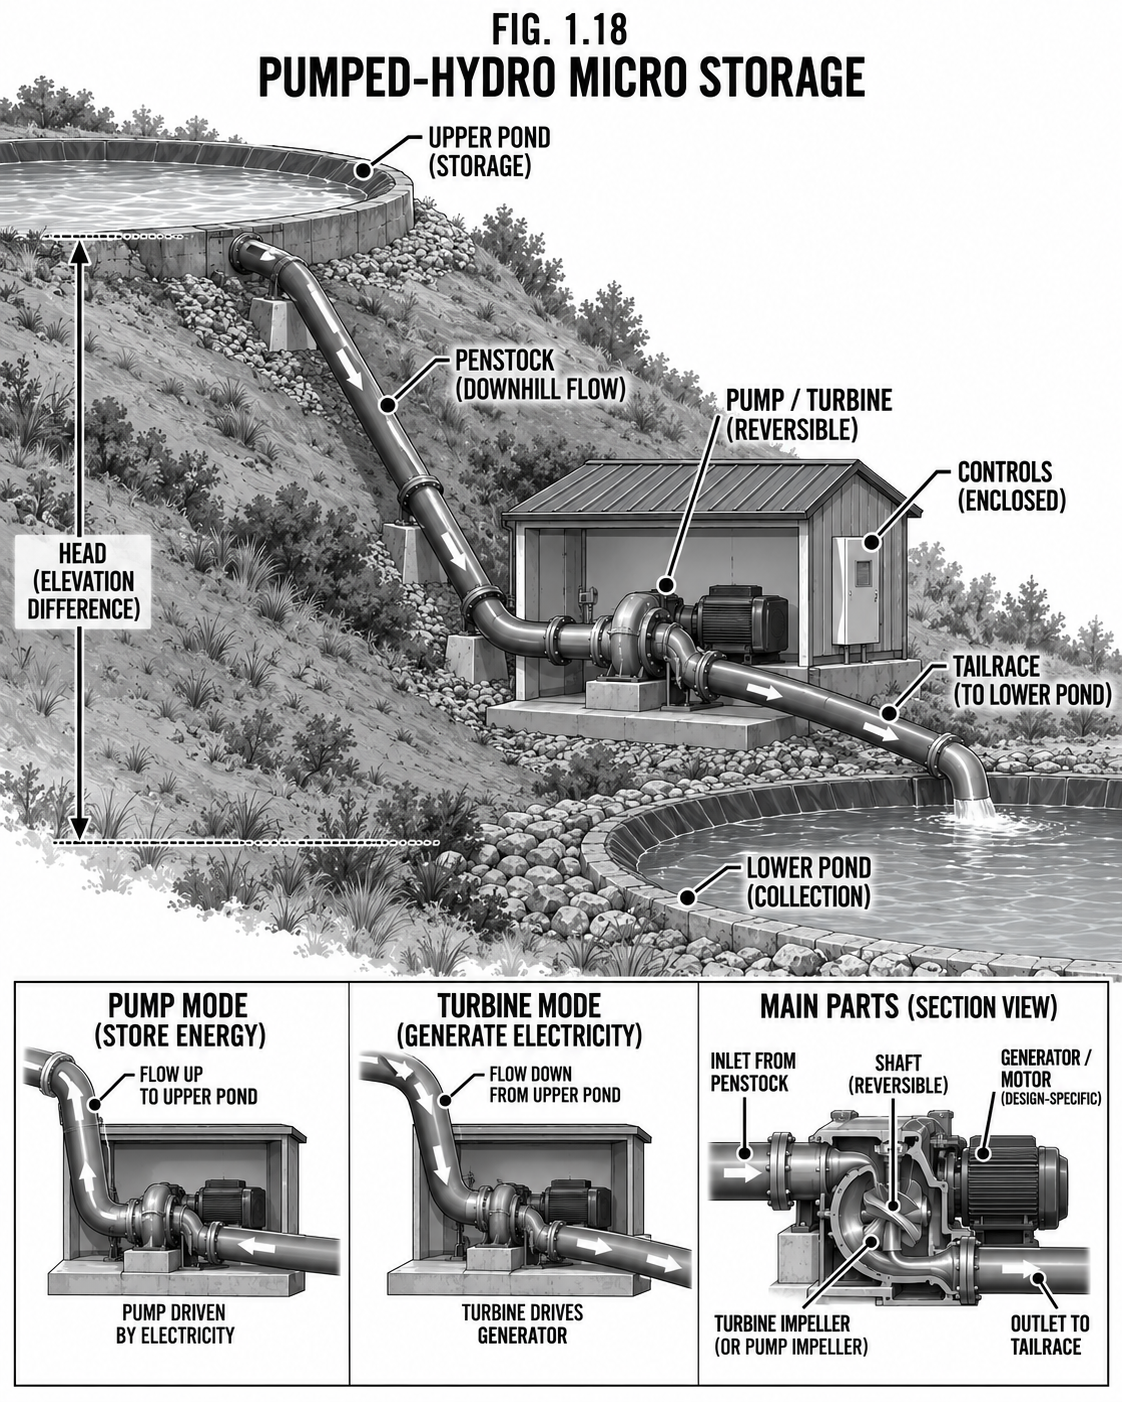
Micro Pumped-Hydro Storage
Store surplus power as water uphill, spend it as water downhill.
DifficultyAdvanced
TimeProject
Cost$$
SkillsHydro + earthworks
Why it is worth it
If you have two ponds at different heights, surplus solar can pump water up by day; at night that water runs back down through a turbine (1.6/1.7) to make power. It is the oldest grid-storage trick, scaled to a homestead: no battery chemistry to wear out, just water and head. It needs real elevation and volume to store much.
Step by step
Establish an upper and lower reservoir with as much head between them as you can.
Use a pump to lift water with surplus power.
Return it through a turbine when you need power.
Safety & code Impounded water is a dam, and dams are regulated and can fail dangerously; keep them small and well-built. Guard intakes and the turbine.
Tips & variations Round-trip efficiency is modest, so this suits abundant midday solar you would otherwise waste.
Power · StorageThermal Battery
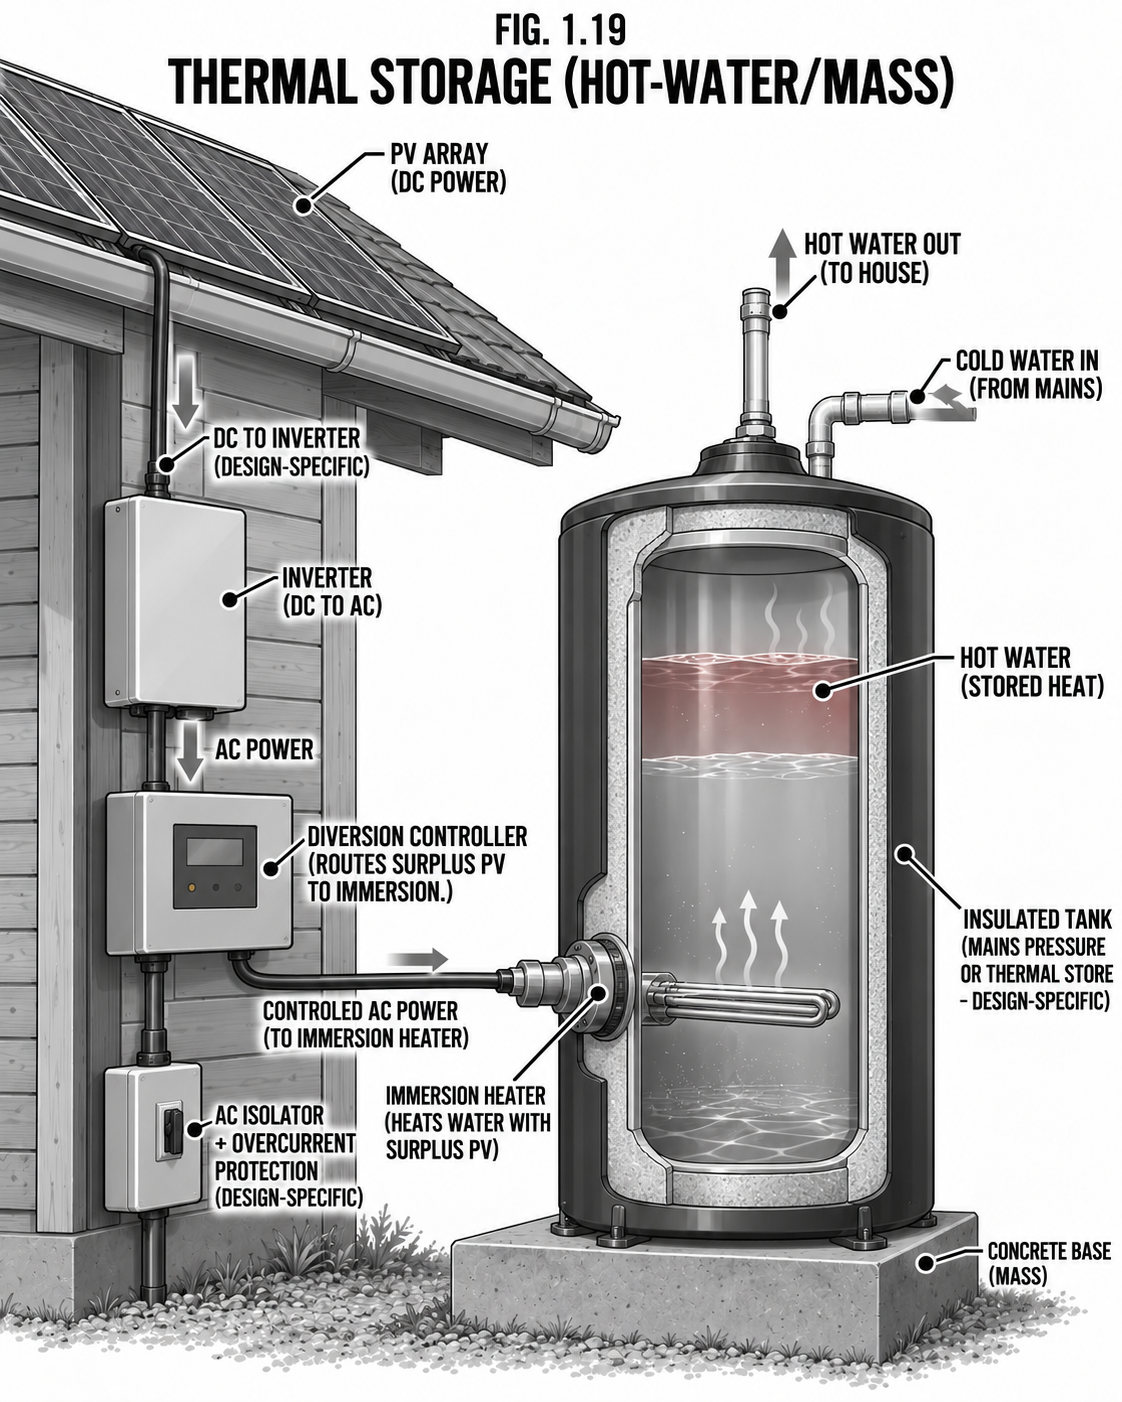
Thermal Storage (Hot Water / Mass)
The cheapest battery for heat is heat itself.
DifficultyBeginner
TimeHours
Cost$
SkillsBasic wiring
Why it is worth it
You do not have to store every surplus watt in an expensive battery. Divert midday solar excess into an immersion element in a well-insulated water tank, or into a mass of rock or cob, and you bank cheap heat for the evening: hot water and warmth without chemistry. It is the best use of power you would otherwise dump.
Step by step
Set the charge controller to divert excess (instead of a dump resistor) into a water-heater element.
Store the heat in a well-insulated tank or a thermal mass.
Draw the heat in the evening.
Safety & code A sealed heated tank needs a temperature-and-pressure relief valve, always, or it can burst. Size the element to the source. Keep wiring to the element rated and protected.
Tips & variations This pairs perfectly with a wind turbine's dump load: aim the diverted energy at hot water instead of a useless resistor.
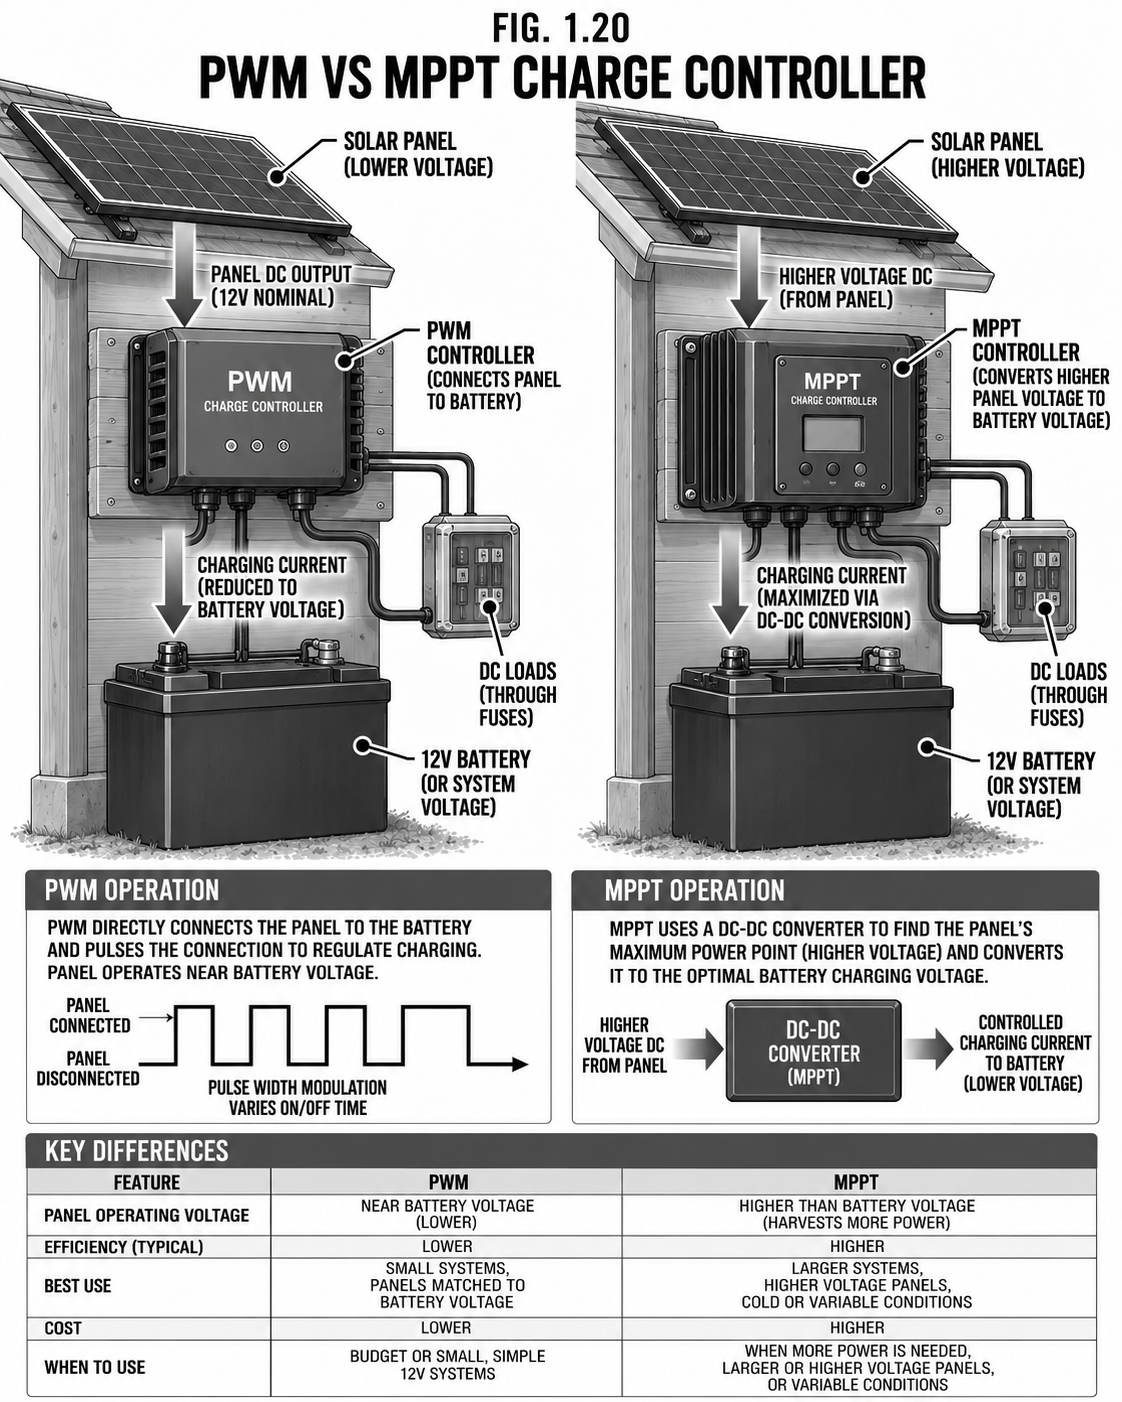
Power · ConditioningCharge Controllers
Charge Controllers: PWM vs MPPT
The brain between the panels and the battery. Pick the right one.
DifficultyBeginner
TimeMinutes
Cost$–$$
SkillsDC basics
Why it is worth it
A charge controller stops your source from cooking the battery and manages the charge stages. A cheap PWM controller simply connects panel to battery and works when their voltages are close. An MPPT controller is a smart DC-DC converter that harvests the panel's maximum power and down-converts the voltage, gaining 10 to 30 percent, especially in cold and with higher-voltage arrays. For anything but the smallest system, MPPT pays for itself.
Safety & code Size the controller to the array current with margin. Observe the correct connect order (battery first, then panels) per the manual. A failed controller can overcharge a bank, so match it to the chemistry.
Tips & variations MPPT lets you wire panels in series (higher voltage, thinner wire over distance), a real win for a far-off array.
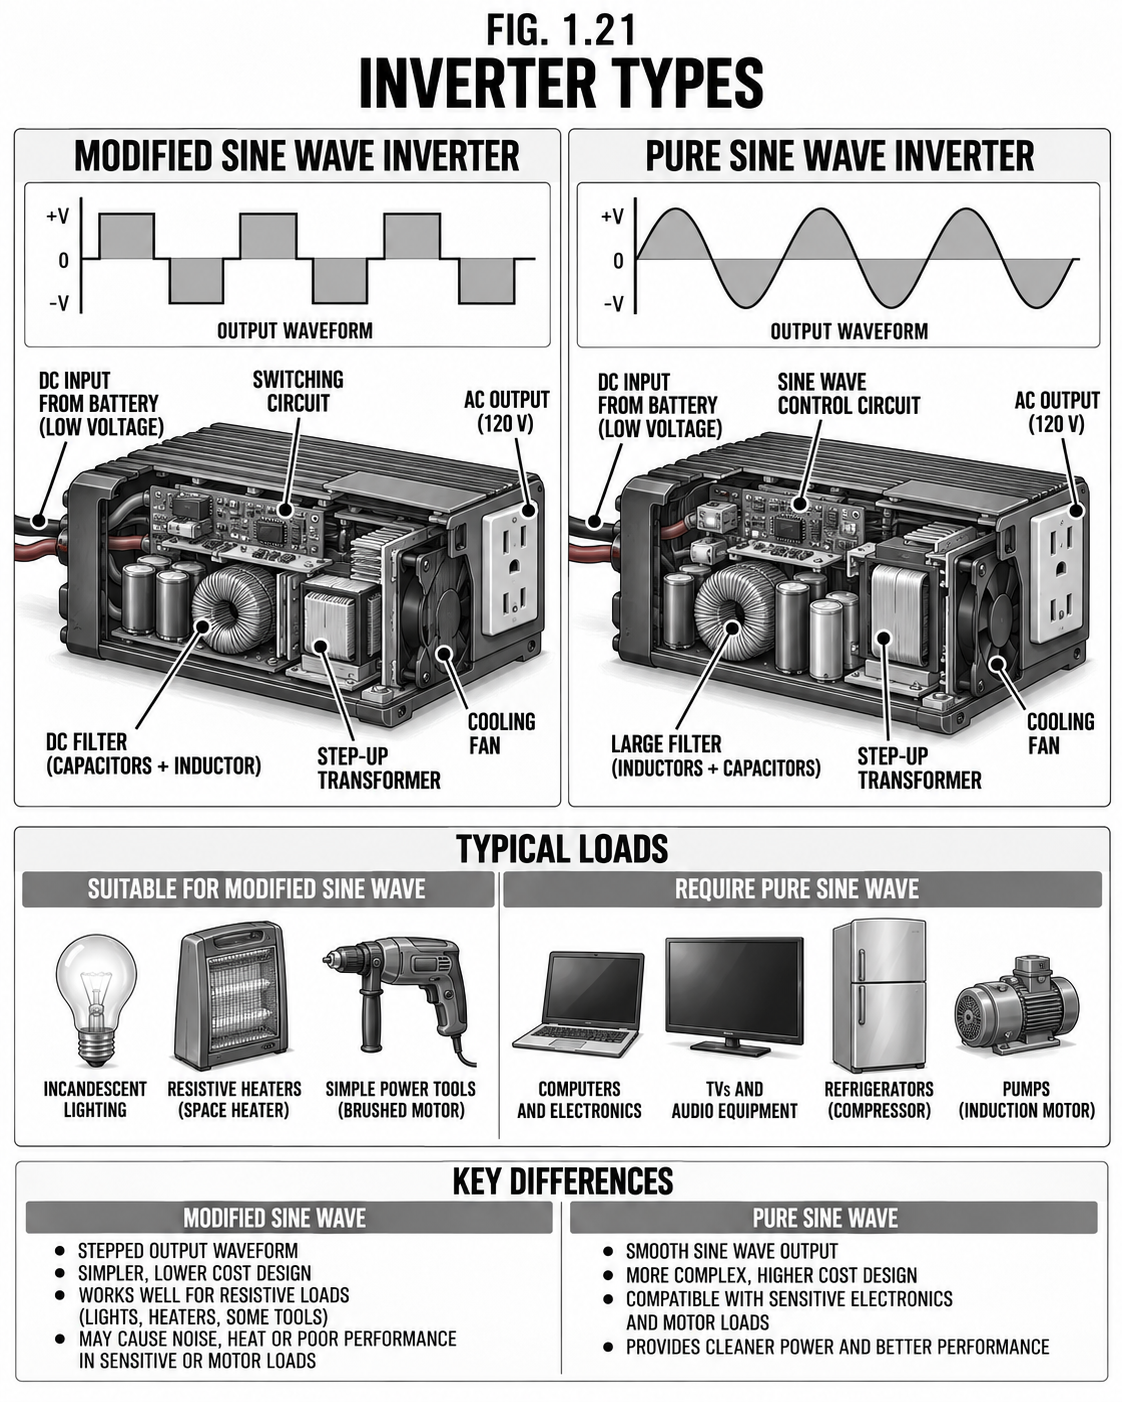
Power · ConditioningInverters
Inverters: Modified vs Pure Sine
The box that turns your battery's DC into household AC.
DifficultyBeginner
TimeHours
Cost$$
SkillsWiring
Why it is worth it
Most appliances want AC, so an inverter converts your battery DC to 120/240 V AC. A cheap modified sine inverter runs resistive loads and tools fine but can buzz, overheat, or refuse sensitive electronics, motors, and chargers. A pure sine inverter makes clean, grid-quality power that runs everything. For a whole-home system, buy pure sine.
Safety & code Inverters draw huge DC current: use correct cable and a close-coupled DC fuse/disconnect. Bond the AC output ground per code. Do not exceed the surge rating with motor startups.
Tips & variations An inverter/charger combo also charges the bank from a generator and switches sources automatically.
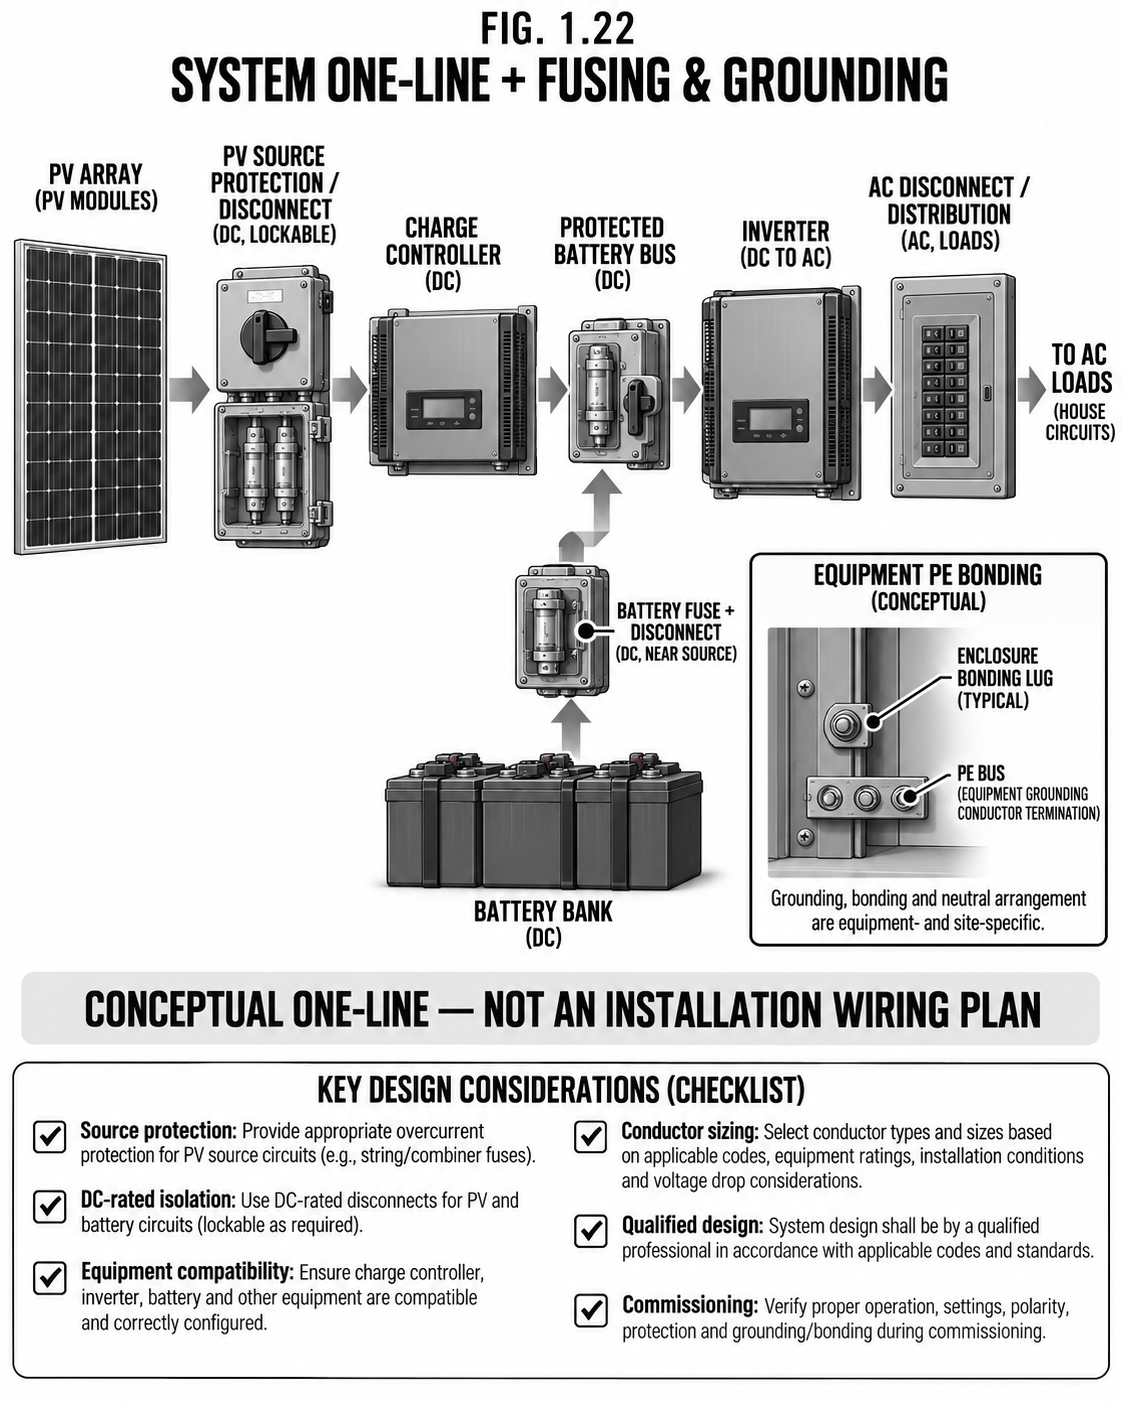
Power · ConditioningSystem One-Line
The Whole System: Fusing & Grounding
How it all ties together, safely. This page is the one to get right.
DifficultyAdvanced
TimeProject
Cost$$
SkillsDC + code
The rules that keep it from burning down
Fuse every ungrounded conductor close to its source (array, battery, each branch). A battery can deliver thousands of amps into a fault.
Size wire to the current and the distance; undersized wire is a fire.
Use DC-rated disconnects at the array and battery so you can isolate for service.
Ground and bond panel frames, equipment, and the system per code, with a ground rod and surge protection.
One bonding point between neutral and ground; know where it is.
Safety & code This is where off-grid systems start fires and shock people. If you are not confident reading a one-line diagram and sizing overcurrent protection, have an electrician check the final build. DC is unforgiving: it arcs and does not self-extinguish, and a battery fault is near-instant. Label every disconnect so anyone can kill power fast.
Tips & variations Draw your own one-line before you buy a thing: it tells you every fuse, wire gauge, and disconnect you need.
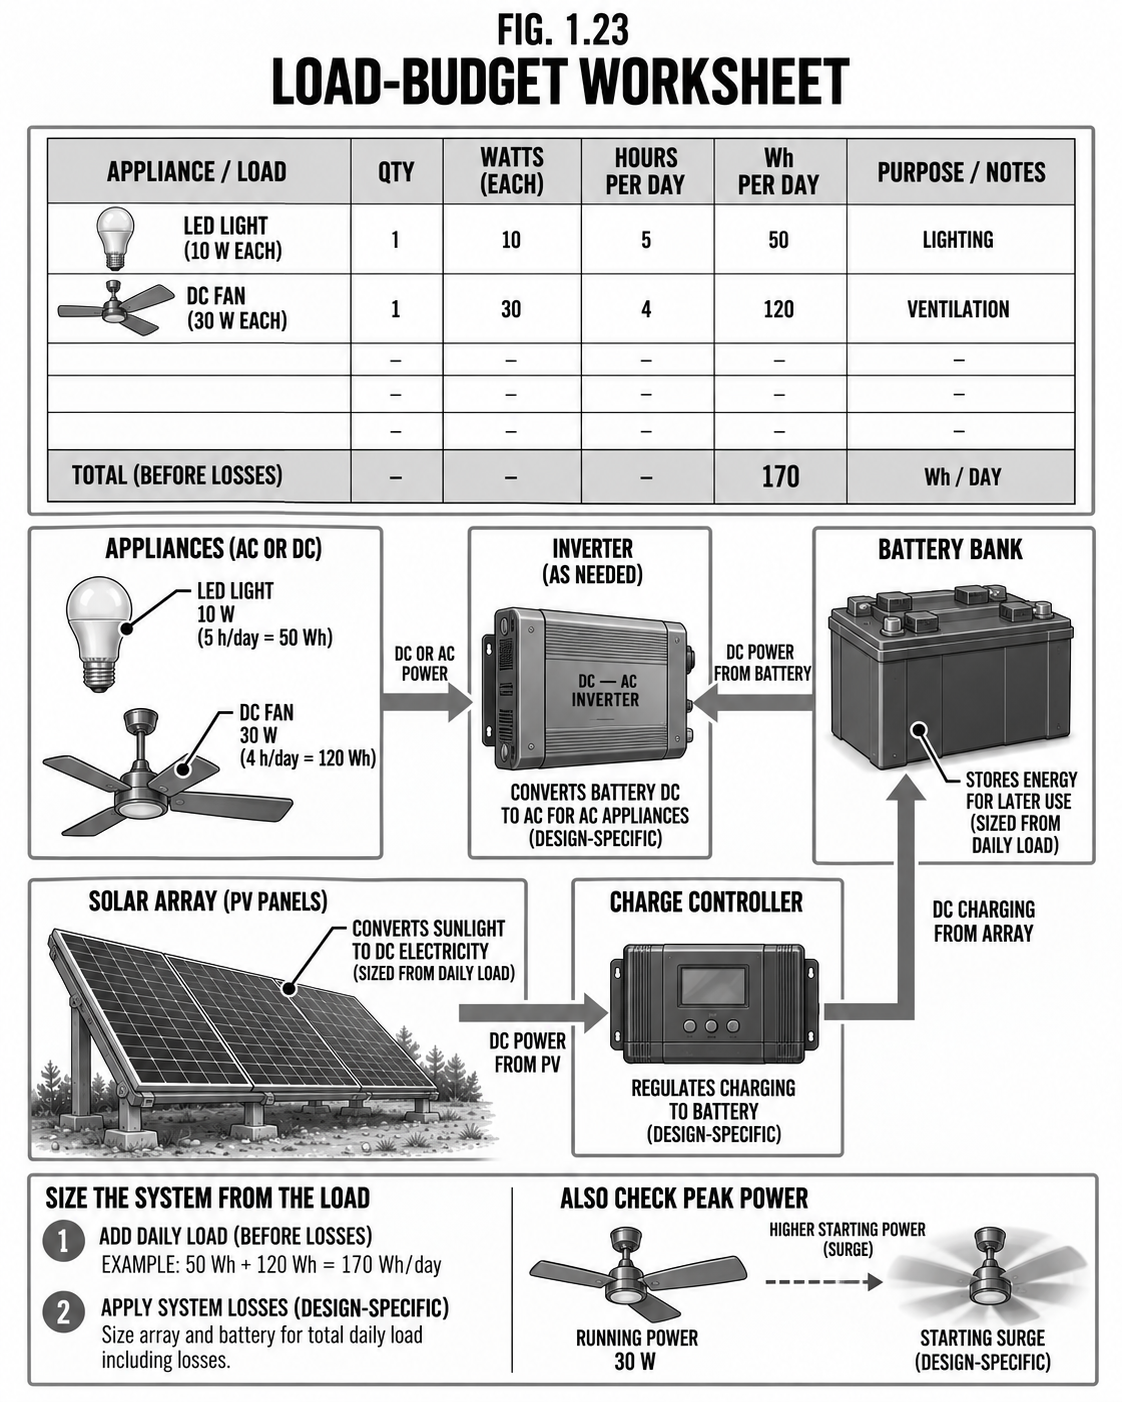
Power · ConditioningLoad Budget
Sizing It: The Load Budget
Everything upstream is sized by one honest worksheet.
DifficultyBeginner
TimeAn evening
CostFree
SkillsArithmetic
Do this before you buy anything
List every load, its watts, and the hours per day you run it; watts times hours is watt-hours. Add them for your daily watt-hour need. That one number sizes everything: divide by your local winter sun-hours to size the array, and multiply by your days-of-autonomy and depth-of-discharge to size the battery bank.
List loads: lights, fridge, pump, tools, phone, well pump.
Battery Wh ≈ daily Wh x days of autonomy ÷ usable depth-of-discharge.
Safety & code Be honest about winter: systems fail in December because they were sized for July sun. Measure real loads with a meter; nameplate ratings lie. Undersizing leads to chronically dead batteries and a short bank life.
Tips & variations The cheapest watt-hour is the one you do not use: efficient fridge, LED lights, and DC appliances shrink the whole system and its cost.